



Install copyparty: Your Own File Server with Docker and Caddy
Install copyparty on Debian 13 with Docker and Caddy: users, permissions, uploads, share links, WebDAV, backup and updates, step by step.
Contents
copyparty 1.20.26Caddy 2.11Docker 29.9Debian 13copyparty is a file server that you run yourself. You open it in the browser, drag files into it and download them again later. It also gives you users with their own permissions, share links for friends, and a dropbox folder where strangers can throw in files without seeing anything.
In this guide I install copyparty on a Debian 13 server with Docker and secure it with HTTPS through Caddy. After that we go through some features one at a time: configuration, login, upload, views, shares, permissions, WebDAV, backup and updates.
What is copyparty?
copyparty is a Python program that makes a folder on your server available in the browser. You need no database and no other software. Everything lives in one container.
Here is what copyparty can do:
- Upload, download, move, rename and delete files in the browser.
- Download folders as a ZIP.
- Show thumbnails for photos and videos and play music directly.
- Create users and set per folder who may read, write or delete.
- Create links that you send by message, with a password and an expiry date.
- Set up folders where anyone may upload but nobody may look inside.
- Be mounted as a drive over WebDAV or through rclone. copyparty also speaks FTP and SMB.
Prerequisites
- A server with an operating system compatible with Docker. I use a small VPS from Hetzner running Debian 13. copyparty needs little power; what matters is enough disk space for your files.
- A user with
sudorights. - A domain such as
{{domain}}. It must point to your server’s IP address with an A record. - Open ports 80 and 443 so Caddy can get its certificate.
Install Docker
Connect to the server over SSH and install Docker with the official script:
curl -fsSL https://get.docker.com | sudo shThen check the installation:
docker --versionIf curl is missing, install it first with sudo apt install -y curl.
Create the folders
Create a directory for copyparty with the folders cfg and daten (“data”) inside it:
mkdir -p ~/copyparty/cfg ~/copyparty/daten/gemeinsam
cd ~/copypartycfgholds the configuration and everything copyparty remembers, such as shares and logins.datenholds your files. At first it only contains the foldergemeinsam(“shared”).
The container will run with user ID 1000 later. The folders only belong to you if your user also has ID 1000. Check that:
id -uIf it prints 1000, everything fits. If it prints another number, replace the line user: "1000:1000" in the compose.yaml below with your number, for example user: "1001:1001".
The compose.yaml
Create the file:
nano compose.yamlservices:
copyparty:
image: copyparty/ac:latest
container_name: copyparty
restart: unless-stopped
user: "1000:1000"
volumes:
- ./cfg:/cfg
- ./daten:/w
environment:
PYTHONUNBUFFERED: 1
stop_grace_period: 15s
caddy:
image: caddy:2
container_name: caddy
restart: unless-stopped
ports:
- "80:80"
- "443:443"
volumes:
- ./Caddyfile:/etc/caddy/Caddyfile
- caddy_data:/data
- caddy_config:/config
volumes:
caddy_data:
caddy_config:What the lines do:
copyparty/acis the image that includes helper programs, for example for thumbnails../cfg:/cfgconnects your configuration folder to the folder/cfginside the container. Do not add:rohere. copyparty has to be able to write there, otherwise it will not start once you use shares../daten:/wconnects your files to/winside the container, so inside the container they are called/w/....PYTHONUNBUFFEREDmakes log messages appear immediately.stop_grace_periodgives copyparty 15 seconds to finish running work when it shuts down.- copyparty does not publish a port of its own. You reach it only through Caddy.
The Caddyfile
nano Caddyfile{{domain}} {
reverse_proxy copyparty:3923
}On first start, Caddy automatically requests a certificate from Let’s Encrypt and forwards all requests to copyparty. Port 3923 is the port copyparty listens on inside the container.
The first configuration
copyparty reads its settings from a file. Create it in the cfg folder:
nano cfg/copyparty.conf[global]
e2dsa
e2ts
rproxy: 1
xff-hdr: x-forwarded-for
xff-src: 172.16.0.0/12
[accounts]
admin: ChangeMe-Admin1
[/gemeinsam]
/w/gemeinsam
accs:
A: adminReplace ChangeMe-Admin1 with your own long password. The file has three parts:
[global]applies to the whole server.e2dsamakes copyparty index all files so search works, ande2tsalso reads music and video information. The three lines below make copyparty see your visitors’ real IP address behind Caddy instead of Caddy’s.172.16.0.0/12is the address range that Docker containers use to talk to each other.[accounts]creates users in the formname: password. The username comes before the colon, the password after it. There is only one user so far.[/gemeinsam]creates a volume. The heading in square brackets is the address in the browser,/gemeinsam. Below it is the folder inside the container,/w/gemeinsam. Theaccsblock hands out permissions: the letterAstands for everything (read, write, move, delete, admin), andadminis the user who gets it.
Anyone who does not appear in a block has no access. Your server is locked for everyone except admin for now.
Start copyparty
Start both containers:
sudo docker compose up -dCheck that both are running:
sudo docker compose psThe STATUS column must show Up for caddy and copyparty. You can see whether Caddy got its certificate here:
sudo docker compose logs caddy | grep "certificate obtained"The copyparty log shows the warning using default TLS certificate; https will be insecure. You can ignore it: Caddy handles the HTTPS encryption, and copyparty itself only talks to Caddy internally.
sudo docker compose logs copypartyIf copyparty keeps restarting instead, the log tells you why. A typo in the copyparty.conf is enough to cause it.
Log in
Open https://{{domain}} in your browser. You see a plain page with the text “howdy stranger” and a password field. Enter the password from the configuration and click login. You only need the password. copyparty does not ask for a username here, because each password belongs to exactly one user.
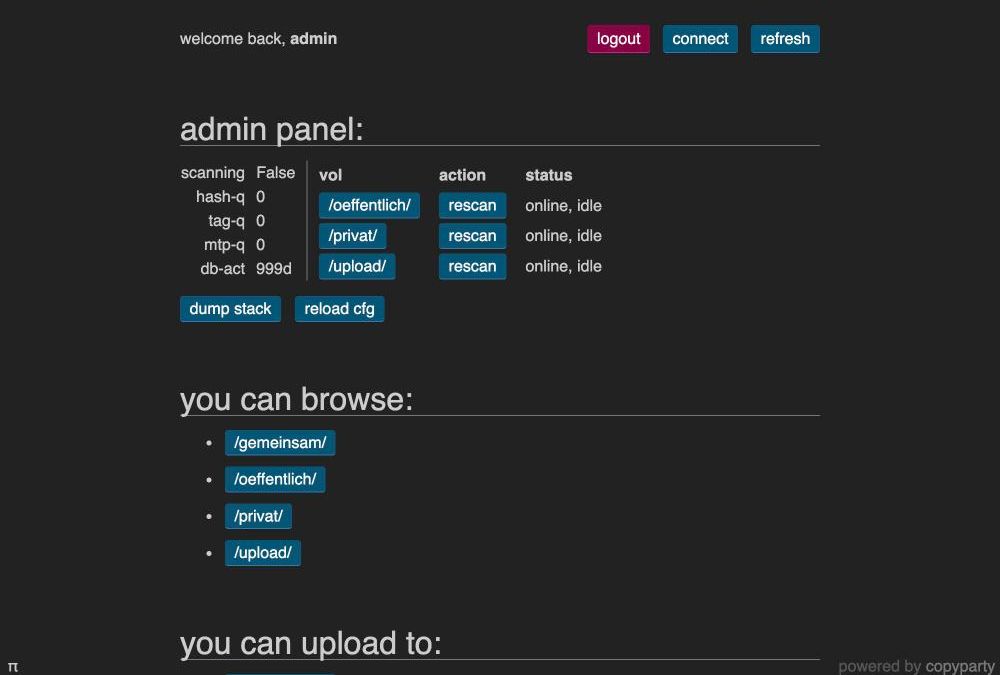
After login the page says “welcome back, admin” and shows the admin panel below it. Under “you can browse”, click /gemeinsam/. You land in your first folder. It is still empty.
Upload your first file
In the toolbar at the top, click the rocket. It opens the up2k uploader.
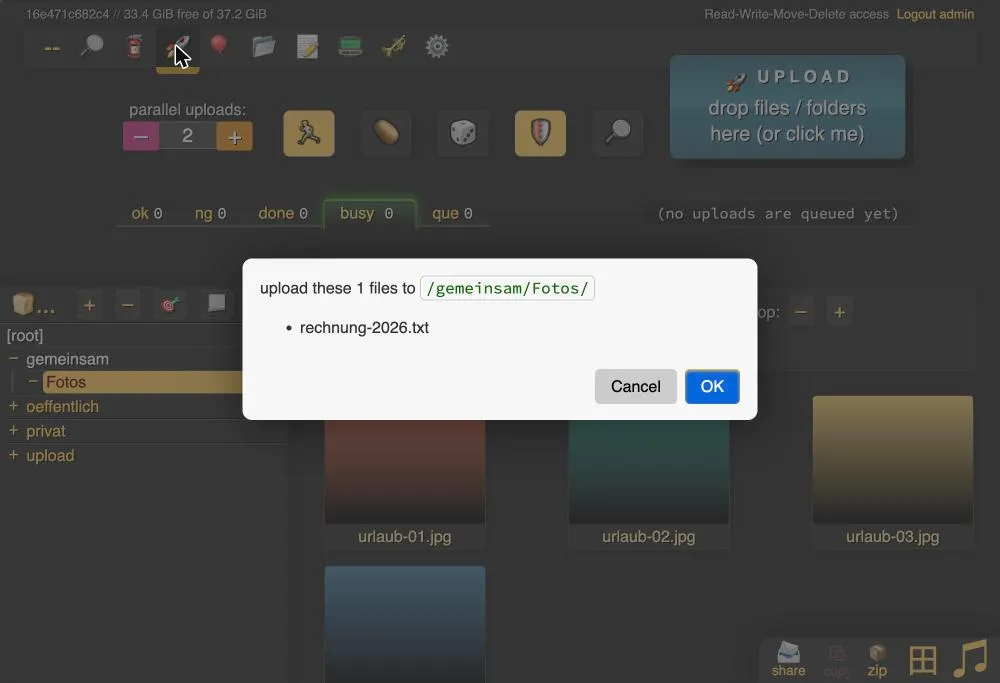
Drag a file onto the large “UPLOAD” box or click it to pick a file. copyparty asks once more where the file should go:
Click OK. The upload runs. The uploader shows the progress, and a green box at the bottom right reports success:
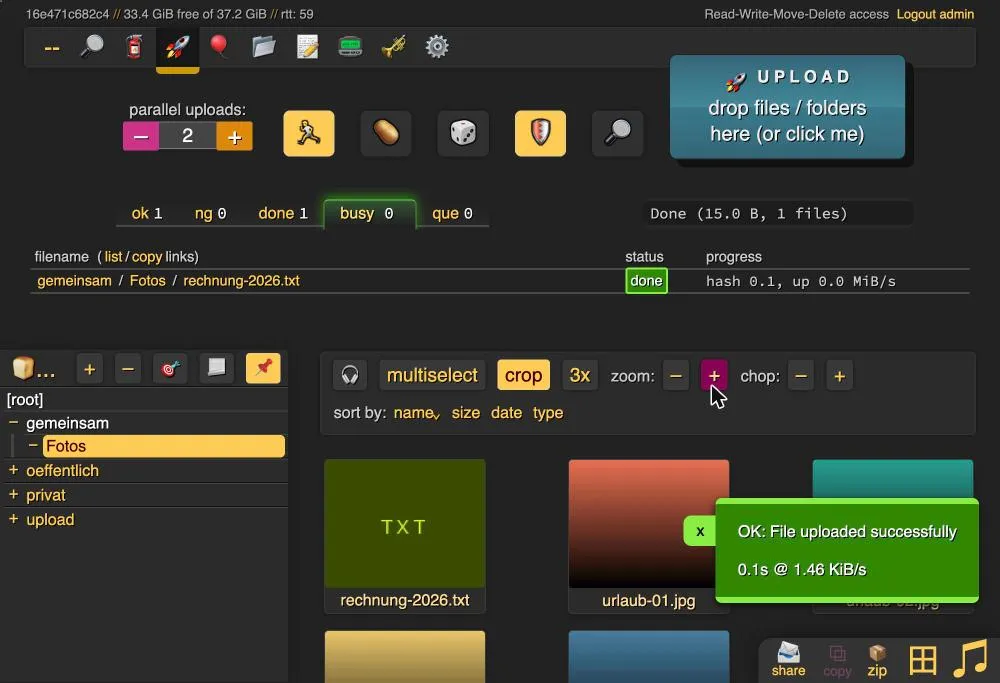
A click on the -- at the far left closes the menu again. Your file is now in the list.
On the server it sits in the folder ~/copyparty/daten/gemeinsam. You can check that:
ls ~/copyparty/daten/gemeinsamThe toolbar
There are more icons next to the rocket. Hovering over an icon shows a hint. This is what they mean:
| Icon | Function |
|---|---|
| 🔎 | Search files by name, path or music tags |
| 🧯 | Delete or abort your own uploads (unpost) |
| 🚀 | Upload files (up2k) |
| 🎈 | Basic uploader for very old browsers |
| 📂 | Create a new folder |
| 📝 | Create a new text file |
| 📟 | Write a message to the server log |
| 🎺 | Settings for the music player |
| ⚙️ | Settings for the interface |
View files
This is the normal list view:
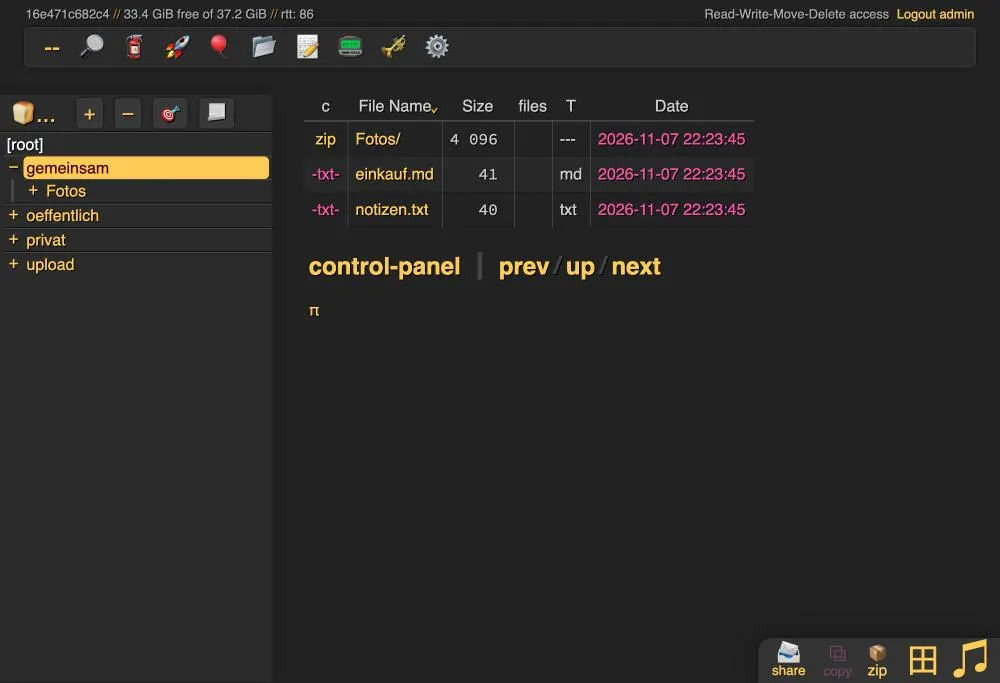
The folder tree is on the left, the files with size and date in the middle. The square icon at the bottom right switches to the grid view, which shows thumbnails:
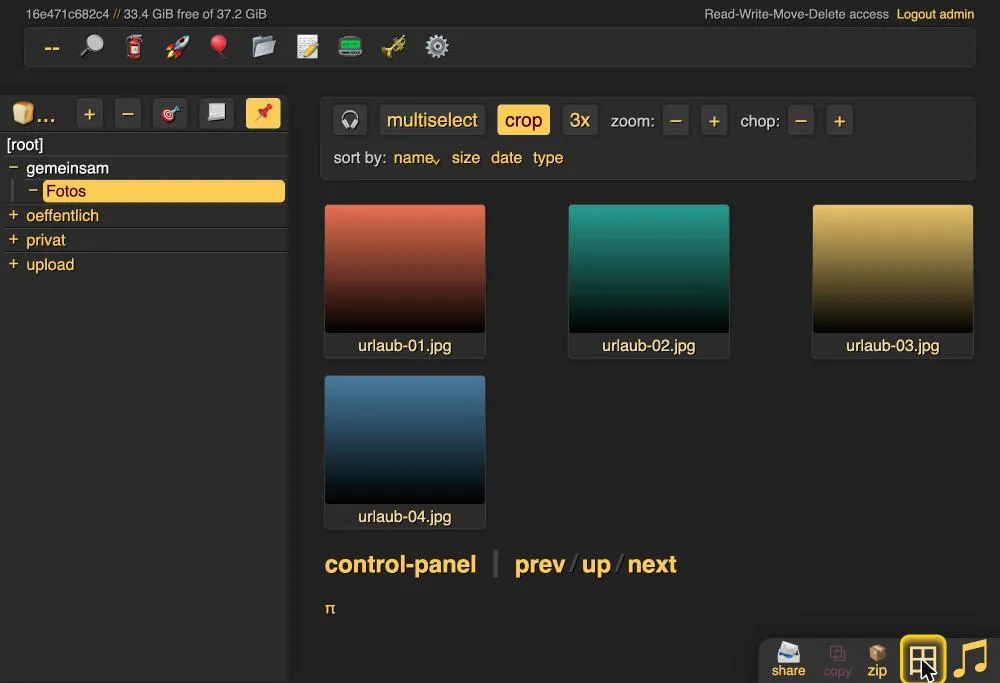
Your browser remembers the setting. sort by sorts by name, size, date or type, and zoom changes the size of the images.
Play music
A click on an audio file starts the player. It appears at the bottom edge with previous and next buttons, pause and a timeline you can jump around in:
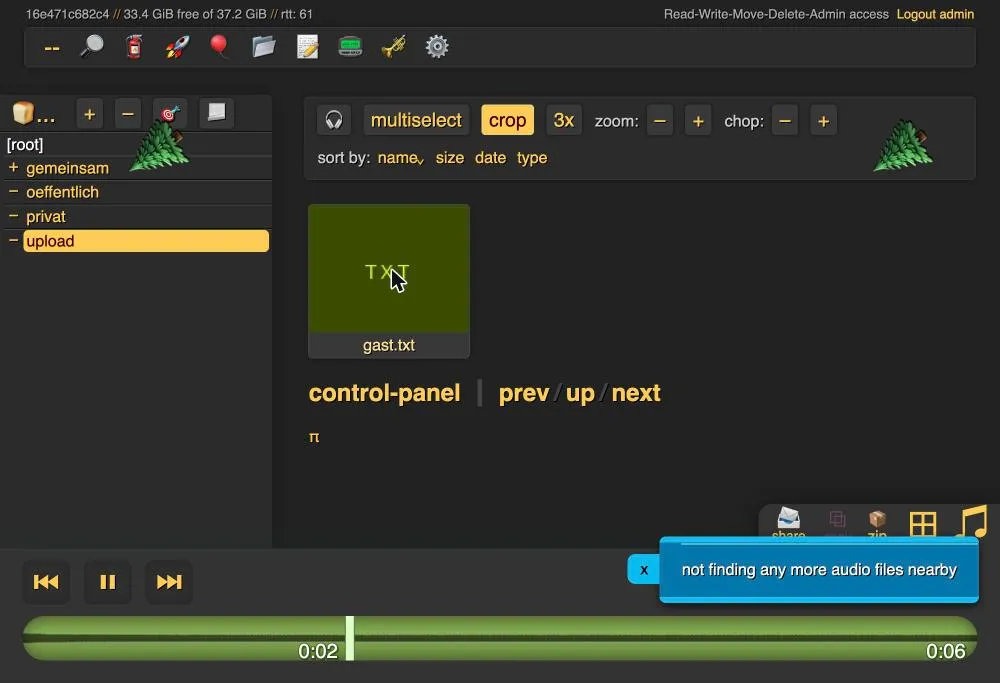
The player keeps running when you switch folders.
Read Markdown files
copyparty shows text files in Markdown format fully formatted. Append ?v to the address of the file, for example https://{{domain}}/gemeinsam/einkauf.md?v:
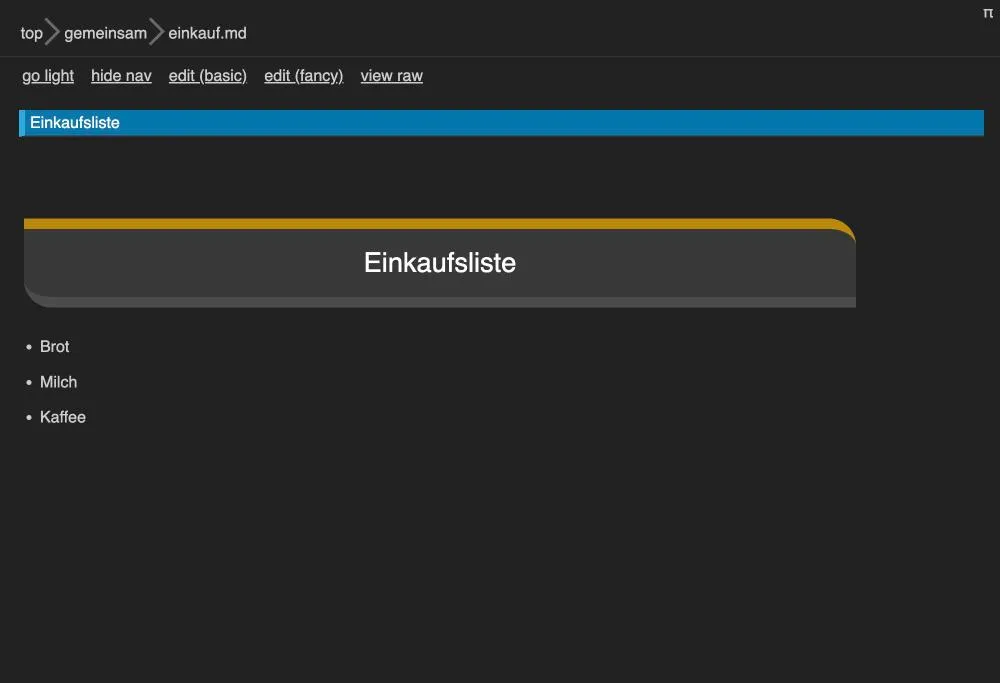
The links edit (basic) and edit (fancy) at the top let you edit the file in the browser if you have write permission. view raw shows the plain text.
Select several files
In the grid view, click multiselect. After that you mark files with a single click:
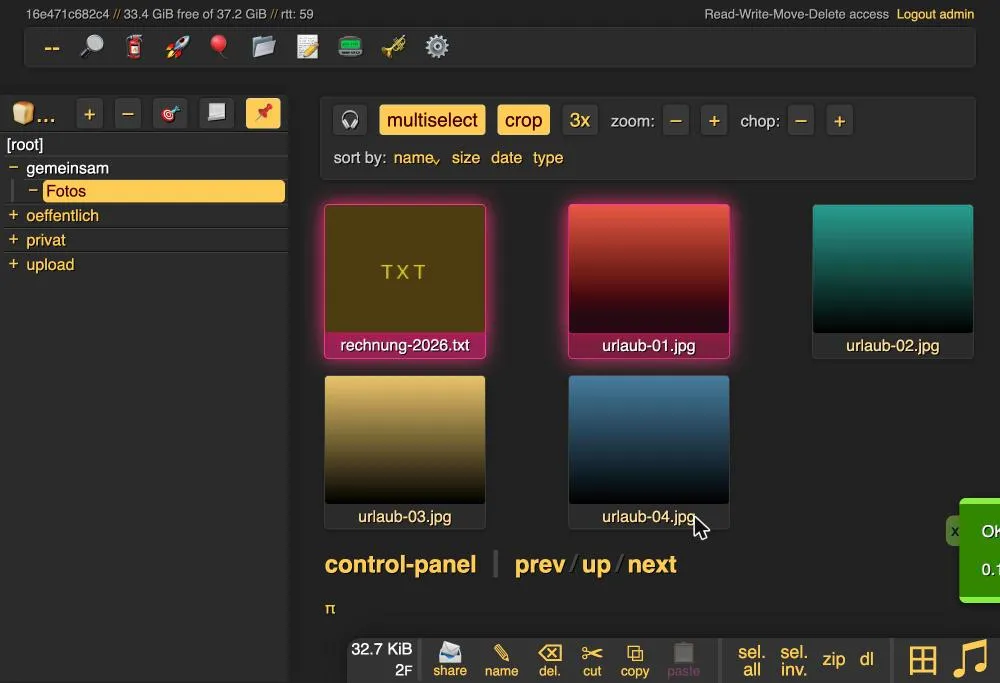
A bar appears at the bottom. To its left it shows how much you selected: 32.7 KiB in 2 files in the example. The buttons mean:
share: create a share link.name: rename.del.: delete.cut,copy,paste: cut, copy and paste into another folder.sel. allandsel. inv.: select everything or invert the selection.zip: download all selected files as a ZIP.dl: download the selection.
Create share links
With a link you pass files to people who have no account. First you enable the feature in the configuration. Open the file:
nano cfg/copyparty.confAdd two lines to the [global] block:
[global]
  e2dsa
  e2ts
  rproxy: 1
  xff-hdr: x-forwarded-for
  xff-src: 172.16.0.0/12
  shr: /freigaben
  shr-adm: admin
shr: /freigaben turns the feature on. All links live under the address /freigaben (“shares”). With shr-adm: admin, the user admin may see and delete all links.
copyparty only applies changes in the [global] block after a restart:
sudo docker compose restart copypartyLog in again, select two files in a folder and click share at the bottom. A form opens:
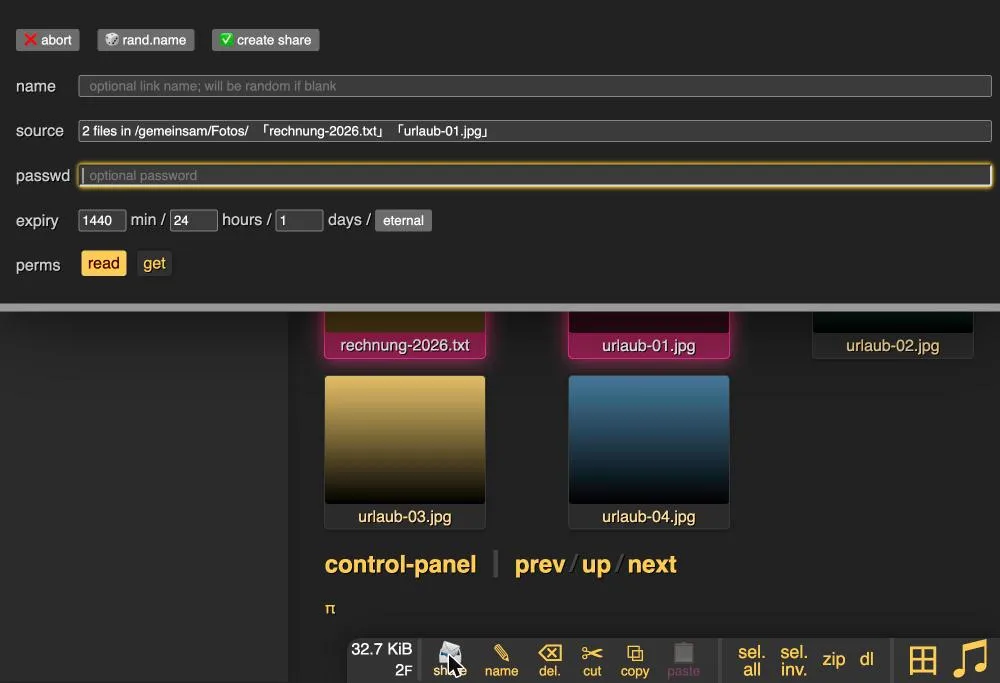
The fields:
name: The name of the link. If you leave it empty, copyparty picks a random one.source: What you are sharing. The field is already filled in.passwd: An optional password the recipient has to enter.expiry: How long the link is valid. The default is 24 hours.eternalremoves the limit.perms:readallows viewing,getonly downloading single files.
I entered the name urlaub (“vacation”) and clicked create share. copyparty shows the link and a QR code:
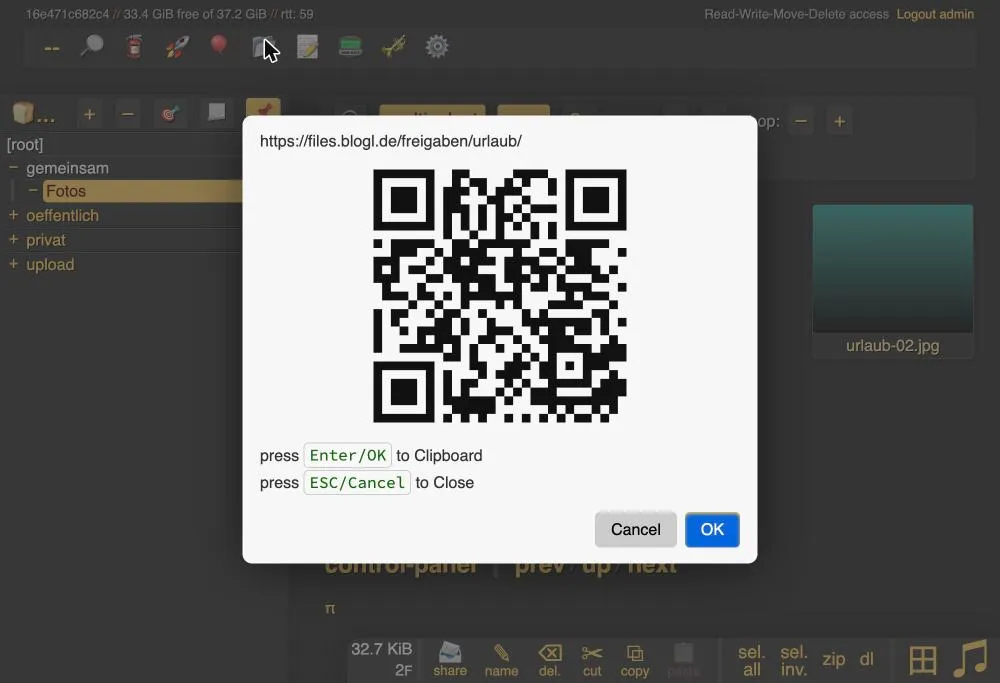
OK copies the link to the clipboard, Cancel closes the window. In this example the link is https://{{domain}}/freigaben/urlaub/. Whoever opens it sees exactly the two shared files and nothing else, even without logging in.
You manage and delete your links in the control-panel. That is the link below the file list.
More users and permissions
So far there is only the user admin. Now you build a structure with four folders for different purposes:
| Address | Who may do what |
|---|---|
/gemeinsam |
All logged-in users may read, write, move and delete |
/oeffentlich |
Anyone may read, only admin may change |
/upload |
Anyone may upload files but see nothing. Only admin sees them |
/privat |
Only admin |
First create the folders on the server:
mkdir -p ~/copyparty/daten/oeffentlich ~/copyparty/daten/upload ~/copyparty/daten/privatThen replace the whole cfg/copyparty.conf:
nano cfg/copyparty.conf[global]
e2dsa
e2ts
rproxy: 1
xff-hdr: x-forwarded-for
xff-src: 172.16.0.0/12
shr: /freigaben
shr-adm: admin
[accounts]
admin: ChangeMe-Admin1
anna: ChangeMe-Anna2
[/gemeinsam]
/w/gemeinsam
accs:
rwmd: @acct
[/oeffentlich]
/w/oeffentlich
accs:
r: *
A: admin
[/upload]
/w/upload
accs:
w: *
A: admin
[/privat]
/w/privat
accs:
A: adminSet your own passwords for admin and anna. This is new:
- Under
[accounts]there is now the useranna. @acctis a group that automatically contains every logged-in user.rwmd: @acctgives everyone the rightsr,w,mandd.*means “everyone”, even without logging in.
The permission letters:
| Letter | Permission |
|---|---|
r |
Read: view folders, download, load as ZIP |
w |
Write: upload files |
m |
Move: move files out of this folder |
d |
Delete |
a |
Admin: sees upload time and IP addresses and may reload the config |
A |
Everything at once: rwmda plus dotfiles |
copyparty loads the configuration at startup, so restart it:
sudo docker compose restart copypartyLater, the reload cfg button in the admin panel is enough for new users and permissions. Only the [global] block still needs a restart. Reloading also works as a command if you pass the password of admin:
curl -H "PW: ChangeMe-Admin1" "https://{{domain}}/?reload=cfg"This is the start page for visitors who are not logged in. They only see what they may read or upload to:
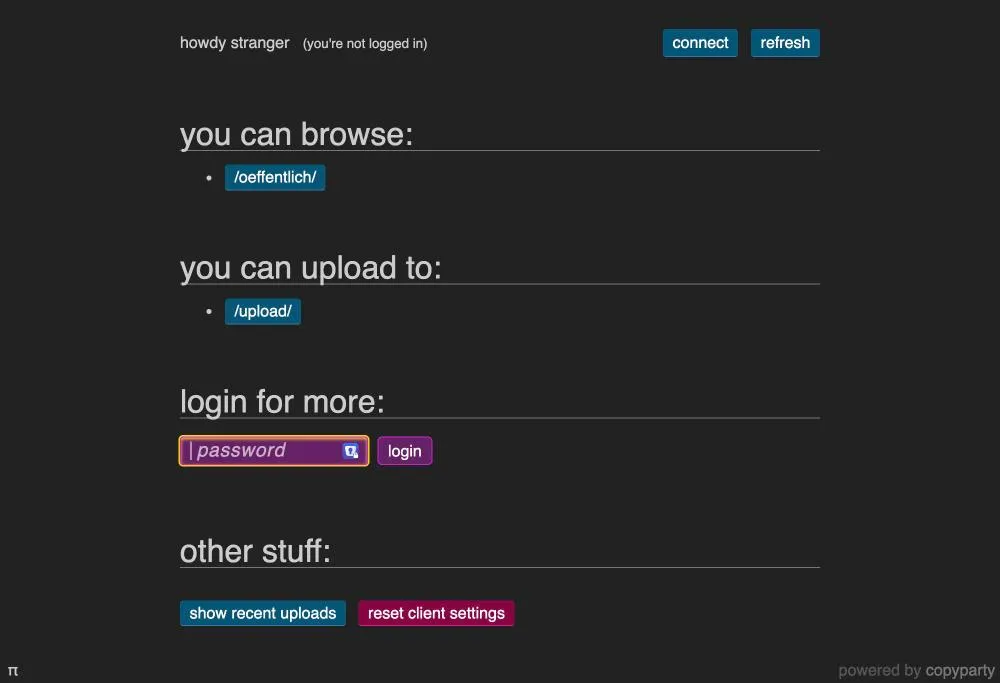
As admin you see all four folders and the admin panel with the rescan and reload cfg buttons:
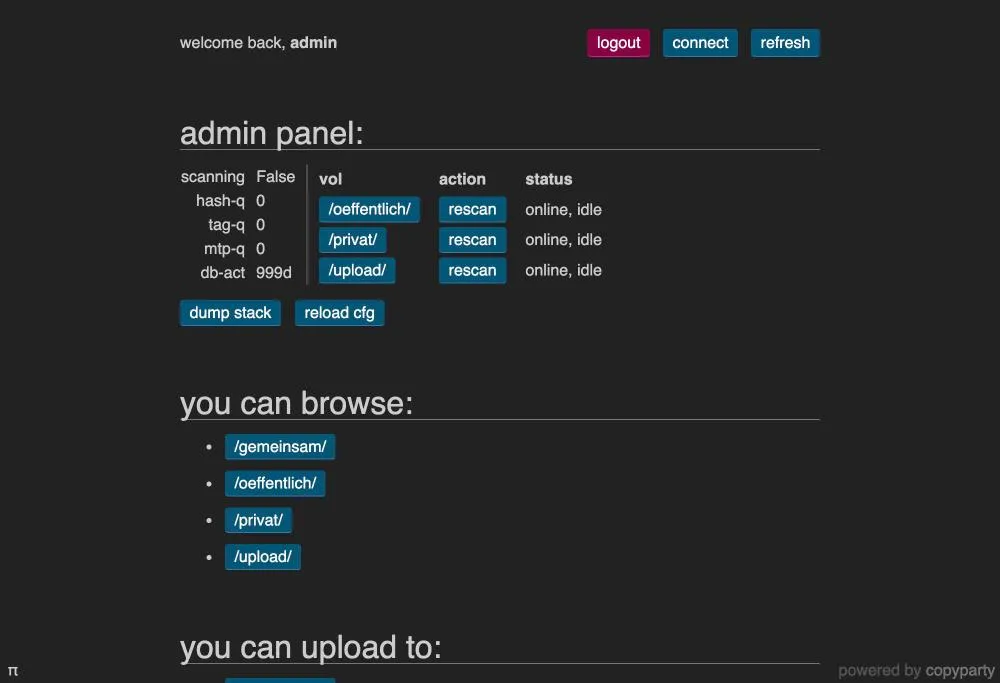
Check the permissions
Check that the permissions are right. The following command queries each folder and prints only the status code. 200 means access, 403 means blocked:
for p in privat gemeinsam oeffentlich upload; do
  echo -n "without login /$p: "
  curl -s -o /dev/null -w "%{http_code}\n" "https://{{domain}}/$p/?ls"
done
This is what I got:
| Folder | Not logged in | As anna | As admin |
|---|---|---|---|
/privat |
403 | 403 | 200 |
/gemeinsam |
403 | 200 | 200 |
/oeffentlich |
200 | 200 | 200 |
/upload |
200 | 200 | 200 |
For /upload, the 200 is only the page for uploading. Visitors who are not logged in see no files there. A guest can upload the file gast.txt (“guest.txt”), cannot open it afterwards, and it only shows up in the list for admin.
As anna you test with the PW header:
curl -s -o /dev/null -w "%{http_code}\n" -H "PW: ChangeMe-Anna2" "https://{{domain}}/gemeinsam/?ls"Anyone who logs in with a wrong password too often gets blocked by copyparty for 24 hours by default (after 9 failed attempts within an hour). That only works because the real IP address arrives through the rproxy and xff lines.
Use the server as a drive: WebDAV
copyparty speaks WebDAV. This is a standard that lets many programs treat files on a server like a local drive. You do not have to switch anything on.
Test it with curl. The command lists the contents of /gemeinsam. 207 is the correct answer:
curl -s -u anna:ChangeMe-Anna2 -X PROPFIND -H "Depth: 1" "https://{{domain}}/gemeinsam/" -o /dev/null -w "%{http_code}\n"You upload a file like this. The answer 201 means it was created:
echo "per webdav" | curl -s -u anna:ChangeMe-Anna2 -T - "https://{{domain}}/gemeinsam/webdav-test.txt" -o /dev/null -w "%{http_code}\n"With rclone you copy folders to your computer or back them up. The command lists the files in /gemeinsam:
rclone lsf :webdav: --webdav-url=https://{{domain}}/gemeinsam --webdav-vendor=other --webdav-user=anna --webdav-pass="$(rclone obscure ChangeMe-Anna2)"On my side Fotos/, einkauf.md, notizen.txt and the test file showed up. You do not write the password in plain text but pass it through rclone obscure. With rclone copy instead of rclone lsf you download or upload files.
Backup
Everything important sits in the folder copyparty: your files in daten, the configuration including shares in cfg. Back it up as a whole:
cd ~
sudo tar czf copyparty-backup.tar.gz copyparty
Then copy the file to another machine. It contains your passwords from the copyparty.conf, so do not leave it lying around openly. For large amounts of data, use rclone or rsync on the daten folder instead.
Update copyparty
cd ~/copyparty
sudo docker compose pull
sudo docker compose up -d
Your files and the configuration stay intact, because they live in daten and cfg outside the container. After the update, check that you can still log in and that the folders are visible.
When something does not work
- Caddy shows
502 Bad Gateway: copyparty is not running. Check the status withsudo docker compose psand the reason withsudo docker compose logs copyparty. I hit this error when I had mountedcfgwith:ro. The log then said the configuration could not be saved. 403in the browser: You have no permission at this address, or you are not logged in. Check in thecopyparty.confwhether your user appears in theaccsblock of the folder.- A new setting has no effect: Changes in the
[global]block needsudo docker compose restart copyparty.reload cfghandles everything else. - Uploading fails: The folder on the server has to belong to the user running in the container. Run
ls -ln ~/copyparty/datenand check that the owner column shows your user ID fromid -u. - The passwords are in plain text in the file: That is by design. Protect the file, back it up only encrypted and use a separate password for each user.
Who is copyparty for?
copyparty fits if you want to store and share files on your own server and reach them in the browser without running a large platform. It is quick to set up and needs few resources.
A few points to know:
- The interface is functional but not pretty. It is aimed at people who like keyboard shortcuts and icons.
- copyparty has no calendar, contacts or office documents. Nextcloud is the better fit for that.
- You are responsible for updates and backups.
Conclusion
With Docker and Caddy, copyparty runs within minutes. The real work sits in the copyparty.conf: that is where you create users and decide per folder who may read, write or delete. After that you use the web interface for uploads, previews and share links, and WebDAV or rclone let other programs reach the server too.
What do you use your own file server for? Let me know in the comments.
FAQ
Frequently asked questions
Is copyparty free?
Yes. copyparty is open source and free. You only pay for the server and your domain.
Is copyparty secure?
The connection runs over HTTPS, you set permissions per folder, and repeated wrong logins lead to a block. Keep the image up to date, use strong passwords and only release folders that are really meant to be public.
How do I change a password in copyparty?
Change the password in the file cfg/copyparty.conf in the [accounts] block and click reload cfg as admin. A restart is not needed for that.
How do I create a new user?
Add a line in the format name: password under [accounts], add the user to the accs block of the folders they should reach, and reload the configuration with reload cfg.
Where does copyparty store my files?
In the folder you mount to /w in the compose.yaml, here ./daten. The configuration and saved shares live in the cfg folder.
Can I share files without the recipient needing an account?
Yes, with share links. You enable the shr line in the configuration, select files and click share. Optionally you set a password and an expiry date.
How do I mount copyparty as a drive?
Over WebDAV. The address is the URL of the folder, for example https://yourdomain.com/gemeinsam, plus username and password. With rclone you can also copy and sync folders.
How do I update copyparty?
In the folder with the compose.yaml, run sudo docker compose pull and then sudo docker compose up -d. Your files and the configuration stay intact.