



Paperless-ngx: Set Up a Scanner with Samba, Barcodes and an App
Scan documents into Paperless-ngx: share the consume folder via Samba, use subfolders as tags, split stacks with barcodes and upload with a phone app.

Contents
Paperless-ngx 3.4.2dockurr/samba 4.23Docker 29.9Debian 13A scanner that saves straight into Paperless-ngx is the point where stacks of paper turn into an archive. You put the letter in, press a button, and a moment later it is searchable in the system.
The technology behind it is the consume folder. Paperless watches a folder and picks up every file that appears there. Here I show how to share that folder on the network via Samba so that scanners and computers can write into it, how to assign tags with subfolders, and how to split a stack with separator sheets into single documents. Finally, the phone.
The ways into the system
There are four ways to get a document into Paperless:
| Way | When it fits |
|---|---|
| Browser upload | Single files at your computer. |
| Consume folder | Scanners and anything that can save files to a network folder. |
| Invoices and receipts that reach you by mail anyway. | |
| App | On the go with the phone camera. |
This post covers the consume folder and the app.
The consume folder
In the standard compose.yaml of Paperless-ngx the paperless service has this line:
- ./consume:/usr/src/paperless/consumeSo the consume folder next to your compose.yaml is the entrance. Copy a PDF into it and Paperless picks it up after a few seconds. The file disappears from the folder, because Paperless stores it in media. That is intended.
Paperless only looks into subfolders if you enable it. Add to the .env:
PAPERLESS_CONSUMER_RECURSIVE=true
PAPERLESS_CONSUMER_SUBDIRS_AS_TAGS=true
PAPERLESS_CONSUMER_SUBDIRS_AS_TAGS turns subfolder names into tags. A file in consume/Steuer/ gets the tag “Steuer”. If it does not exist, Paperless creates it.
Samba share
A scanner cannot reach a folder on a server until you share it on the network. For that I use a small Samba container in the same Compose project. Add this service under services:
    samba:
        image: dockurr/samba
        container_name: paperless-samba
        restart: unless-stopped
        environment:
            NAME: scans
            USER: scanner
            PASS: your-strong-password
            UID: 1000
            GID: 1000
        ports:
            - "192.168.1.10:445:445"
        volumes:
- ./consume:/storageNAMEis the name of the share,USERandPASSare the credentials for the scanner.UIDandGIDmust match the user that owns Paperless, by default1000.- Replace
192.168.1.10with your server’s IP address on the local network. Then Samba only listens there.
Start the container:
sudo docker compose up -dImportant: Never expose port 445 to the internet. Samba belongs on your local network. If Paperless runs on a VPS, your scanner at home can only reach the server through a VPN such as WireGuard or Tailscale. Alternatively use the app or the browser upload for the VPS, and run Samba only on a server in your home network.
Test the share
Before you configure the scanner, check the share with smbclient (on Debian: sudo apt install smbclient):
smbclient //192.168.1.10/scans -U scanner -c "ls"After the password prompt you see the folder contents. Then test an upload:
smbclient //192.168.1.10/scans -U scanner -c "put invoice.pdf"After about 20 seconds the document shows up in Paperless, and invoice.pdf is gone from consume. You also see it in the log:
sudo docker compose logs -f paperlessIf the file shows up, the chain works.
Test subfolders as tags
I create a folder Steuer in consume and upload the file there:
smbclient //192.168.1.10/scans -U scanner -c "cd Steuer; put spendenquittung.pdf"The document arrives with the tags “Inbox” and “Steuer”. The “Inbox” tag comes from my workflow, “Steuer” from the folder name. That way you can create several target folders at the scanner, such as Steuer, Versicherung and Auto, and every file lands in the system with the right tag right away.
Configure the scanner
The exact menus differ per manufacturer. Look for “Scan to Folder”, “Scan to SMB” or “Scan to Network Folder”. You need these values almost everywhere:
| Field | Value |
|---|---|
| Server | IP address of the server, for example 192.168.1.10 |
| Share name | scans |
| Subfolder | empty, or for example Steuer |
| User | scanner |
| Password | the password from the compose.yaml |
| File format | |
| Resolution | 300 dpi, color or grayscale |
Set the scanner to PDF and 300 dpi. That is enough for clean text recognition without huge files.
Scanners with a “Scan to FTP” function also work, but need an FTP server in front of the folder. Samba is simpler.
Older scanners sometimes only speak SMB1. Current Samba versions disable it, and I do not advise enabling it. In that case replacing the scanner or using a Raspberry Pi as a go-between is the better route.
Split stacks with barcodes
If you feed twenty letters at once, you get a single PDF. Paperless can split it when a sheet with a special barcode sits between the letters. To do that, enable barcode detection:
PAPERLESS_CONSUMER_ENABLE_BARCODES=trueThe default separator barcode is PATCHT. You print a sheet with this code (ready-made “PATCH-T” separator sheets exist online) and place it between the letters. Paperless splits the PDF at each of these sheets and discards the separators. The original disappears, the parts become their own documents.
Archive serial numbers via barcode
Paperless can also read the archive serial number (ASN) from a barcode. I use this when I keep the paper: I stick a label with ASN00042 on every original, and Paperless enters number 42 in the document. Later I find the folder in the cabinet by that number.
PAPERLESS_CONSUMER_ENABLE_ASN_BARCODE=trueThe barcode consists of the prefix ASN and the number. Change the prefix with PAPERLESS_CONSUMER_ASN_BARCODE_PREFIX.
Test with a stack
I built a three-page PDF: page 1 is an invoice with the barcode ASN00042, page 2 a PATCHT separator sheet, page 3 a contract with ASN00043. After dropping it into the consume folder, Paperless created two documents, the first with ASN 42, the second with ASN 43.
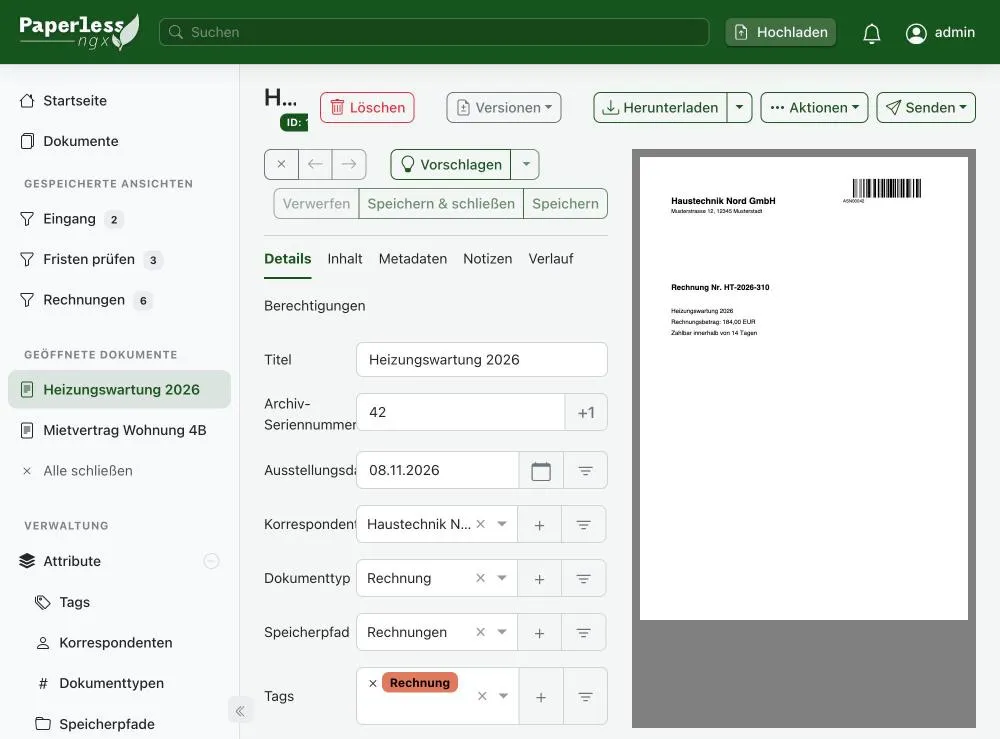
The separator page is gone and Paperless distributed the pages cleanly. My workflow then recognized the maintenance contract through the word “Kündigungsfrist” and tagged it accordingly.
The ASN must be unique. If you upload the same file a second time, Paperless rejects it with “Given ASN 42 already exists”. The error appears in the log; the document itself is not created twice.
Scan with your phone
On the go you use an app that uploads to your Paperless through the API. The Paperless developers keep a list in their wiki. I only name apps that appear there:
- Android: Paperless Mobile, Paperless NGX Uploader for the share dialog, Waraq for Paperless 3.
- iOS: Swift Paperless, Less Paper and QuickScan.
The apps need your server’s address and a user. Tip: create a separate user in Paperless for the app and give it a long password. The apps are best for receipts you get on the go and want to capture immediately.
Common mistakes
Files stay in the consume folder. Check the log with sudo docker compose logs paperless. A common cause is wrong ownership: Paperless runs with user ID 1000 and must be able to read and delete in the folder.
The scanner reports “access denied”. The UID or GID in the Samba container does not match the folder, or user name or password are wrong. Test the share with smbclient first.
Files take a long time to appear. If the consume folder sits on a network drive, Linux does not always notice new files right away. Set PAPERLESS_CONSUMER_POLLING=10 so that Paperless checks every ten seconds.
A document is missing although the file is gone. Look in the log with sudo docker compose logs paperless. It shows whether Paperless rejected the file, for example because of a duplicate ASN.
FAQ
Frequently asked questions
What is the consume folder in Paperless-ngx?
The consume folder is Paperless's entrance. Paperless picks up every file that appears there, recognizes the text and stores it in the archive. Afterwards the file disappears from the folder.
How do I scan directly into Paperless-ngx?
Share the consume folder on the network via Samba and set up Scan to Folder or Scan to SMB on the scanner with server, share name, user and password.
How do I assign tags while scanning?
Set PAPERLESS_CONSUMER_RECURSIVE and PAPERLESS_CONSUMER_SUBDIRS_AS_TAGS to true. Paperless then turns the names of subfolders in the consume folder into tags.
How do I split a stack into single documents?
Enable PAPERLESS_CONSUMER_ENABLE_BARCODES and place a separator sheet with the barcode PATCHT between the documents. Paperless splits the PDF at these sheets.
Can I scan with my phone into Paperless-ngx?
Yes. Apps such as Paperless Mobile for Android or Swift Paperless for iOS upload photos and scans through the API. You only need your server's address and a user.