Install Paperless-ngx on Your VPS with Docker & Caddy
Install Paperless-ngx with Docker on your VPS and securely access your documents from anywhere. Complete guide with Caddy reverse proxy and WireGuard VPN.
Table of Contents
- Introduction
- Step 1: Rent a Server
- Step 2: Rent a Domain
- Step 3: Configure the Domain
- Step 4: Reinstall the Server
- Step 5: Establish an SSH Connection
- Step 6: Install Docker and Docker Compose
- Step 7: Prepare Caddy
- Step 8: Install WG-Easy
- Step 9: Configure the Proxy (for WG-Easy)
- Step 10: Establish a WireGuard Connection
- Step 11: Block External Connections (for WG-Easy UI)
- Step 12: Install Paperless-ngx
- Step 13: Create a Paperless-ngx User
- Step 14: Configure the Paperless-ngx Proxy
- Step 15: Configure Paperless-ngx
- Step 16: Archive Documents
- Step 17: Back Up Paperless-ngx
- Step 18: Updating
- Conclusion
Introduction
This blog post covers installing Paperless-ngx on a VPS (Virtual Private Server) to set up a paperless office. A VPS lets you access your documents from anywhere, provides security through professional data centers, and can be flexibly adapted to your needs. I also created a German video tutorial that you can watch on YouTube:
Install Paperless-ngx on a VPS (Link to YouTube)
Below you will find the steps from the video summarized concisely.
If you prefer to install Paperless-ngx on a Synology NAS, you can find a suitable guide here: Install Paperless-ngx on a Synology NAS.
Key Takeaways
| Aspect | Description |
|---|---|
| What is Paperless-ngx? | An open-source document management system (DMS) for digital files. It makes archiving and quickly retrieving documents like invoices, contracts, and receipts easy. |
| Why use a VPS? | Worldwide access to documents, high data security in professional data centers, scalable resources, and professional hosting. |
| Additional tools | Docker for a simplified and standardized installation, Caddy as a reverse proxy for secure HTTPS access, WireGuard for a protected VPN connection to the server. |
| Prerequisites | A computer with WireGuard and Visual Studio Code (or another SSH client/text editor), a Docker-compatible server (VPS), a domain with the ability to create subdomains, optionally a mail server with SMTP access. |
Paperless-ngx
Paperless-ngx is an open-source document management system that makes it easy for users to scan, organize, and find their documents. It enables the archiving of invoices, contracts, receipts, and other important documents. Paperless-ngx is the successor to the Paperless project and has been further developed for modern requirements. It offers a range of features that make paperless work easier.
Development History
A brief overview of the development of Paperless and Paperless-ngx (many releases have been omitted for clarity):
First Commit
Paperless project published on GitHub.
v0.3.0
First official release of Paperless.
v1.0.0
Version 1.0.0 of Paperless released. Automatic tagging introduced.
v1.2.0
Option to skip OCR, improved automatic data extraction
v2.1.0
UI improvements
v2.2.0
Upgrade to Django 2.0 and Python 3.7, improved tagging
v2.3.0
Text file support, online document viewing
v2.4.0
Batch editing of documents
v2.5.0
Optimized thumbnail generation with optipng
v2.7.0
Last release of Paperless
v0.9 ng
First release of Paperless-ng
v0.9.2 ng
UI overhauled
v0.9.4 ng
Search and UI improved.
v0.9.5 ng
OCR improved (OCRmyPDF), originals and archive files are now saved, tags can be set via subfolders in the Consume directory, API with token authentication, many frontend improvements.
v1.0.0 ng
Version 1.0.0 of Paperless-ng released.
v1.2.1 ng
Last release of Paperless-ng
v1.6.0 ngx
First release of Paperless-ngx
v1.7.0 ngx
Drag and drop, download buttons, update check, password prompt for PDFs, extended filter options, interactive tags, additional pagination, barcode splitting, loading screen, progress bar, text filter criteria, document navigation, date input, and color themes were optimized.
v1.11.0 ngx
Email content (EML files) can be archived, settings moved for easier setup.
v1.14.0 ngx
Multi-user support with a permissions system.
v2.0.0 ngx
Version 2.0.0 of Paperless-ngx released. Django 4.2.5 and Python 3.11 are now used. Document links can be shared (Share Links).
v2.3.0 ngx
Workflows and workflow rules for advanced automation.
v2.4.0 ngx
Current major version of Paperless-ngx at the time of writing. Extended caching for suggestions and metadata, introduction of help tooltips, warning for outdated documentation, and app branding customization.
Features of the Paperless-ngx DMS
With Paperless-ngx you can:
- Tag documents for easy identification — archive and retrieve invoices, contracts, and receipts effortlessly.
- Search content with ease.
Paperless-ngx comes with OCR (Optical Character Recognition) technology that converts scanned documents into searchable PDFs. The software also supports automatic document classification and automatic metadata recognition.
When running on a server, Paperless-ngx can be accessed from any device as long as a browser is available.
Reasons for Installing on a VPS
Installing on a VPS is particularly practical for several reasons.
Central Access
A VPS allows you to access your documents from anywhere with an internet connection. You are not limited to your local network and can work from anywhere.
Data Security
VPS providers typically offer highly secure data centers, protecting you from data loss due to physical damage such as fire or theft.
Scalability
With a VPS, you can adjust server resources as your requirements grow — meaning more storage or computing power whenever you need it.
Professional Hosting Environment
A VPS provides a professional hosting environment with dedicated IP addresses and a fast internet connection.
These aspects make using a VPS for Paperless-ngx an attractive option for businesses and individuals looking for an efficient and secure document management solution.
Additional Tools
We are not limited to Paperless-ngx alone — we integrate additional software to optimize the process. A key tool here is Docker, which simplifies and standardizes the installation and configuration of Paperless-ngx. I also use Caddy as a reverse proxy to make the application easily and securely available via HTTPS. With WireGuard, we establish a protected VPN connection to our VPS.
After following this guide, you should be able to set up a fully functional paperless office.
Prerequisites
- A computer with:
- WireGuard: For the secure VPN connection to the server.
- Visual Studio Code (recommended): For comfortable work on the server via SSH. Any other SSH client and text editor will also work.
- A Docker-compatible server: A VPS running Docker and Docker Compose.
- A domain with the option to create subdomains: For accessing Paperless-ngx and other services.
- A mail server with SMTP support (optional): To send files directly via email to Paperless-ngx for archiving.
Now let’s walk through the individual steps to set up your digital document management.
Step 1: Rent a Server
First, we need a server. I recommend renting a VPS from a provider of your choice. I personally use Netcup. They offer a simple and quick way to rent a VPS.
You can also check for vouchers here.
Costs currently start at around €3.25 per month. Root servers (from around €9.81 per month) offer significantly better performance thanks to dedicated CPU cores, but you don’t necessarily need this if you primarily use the server for Paperless-ngx.
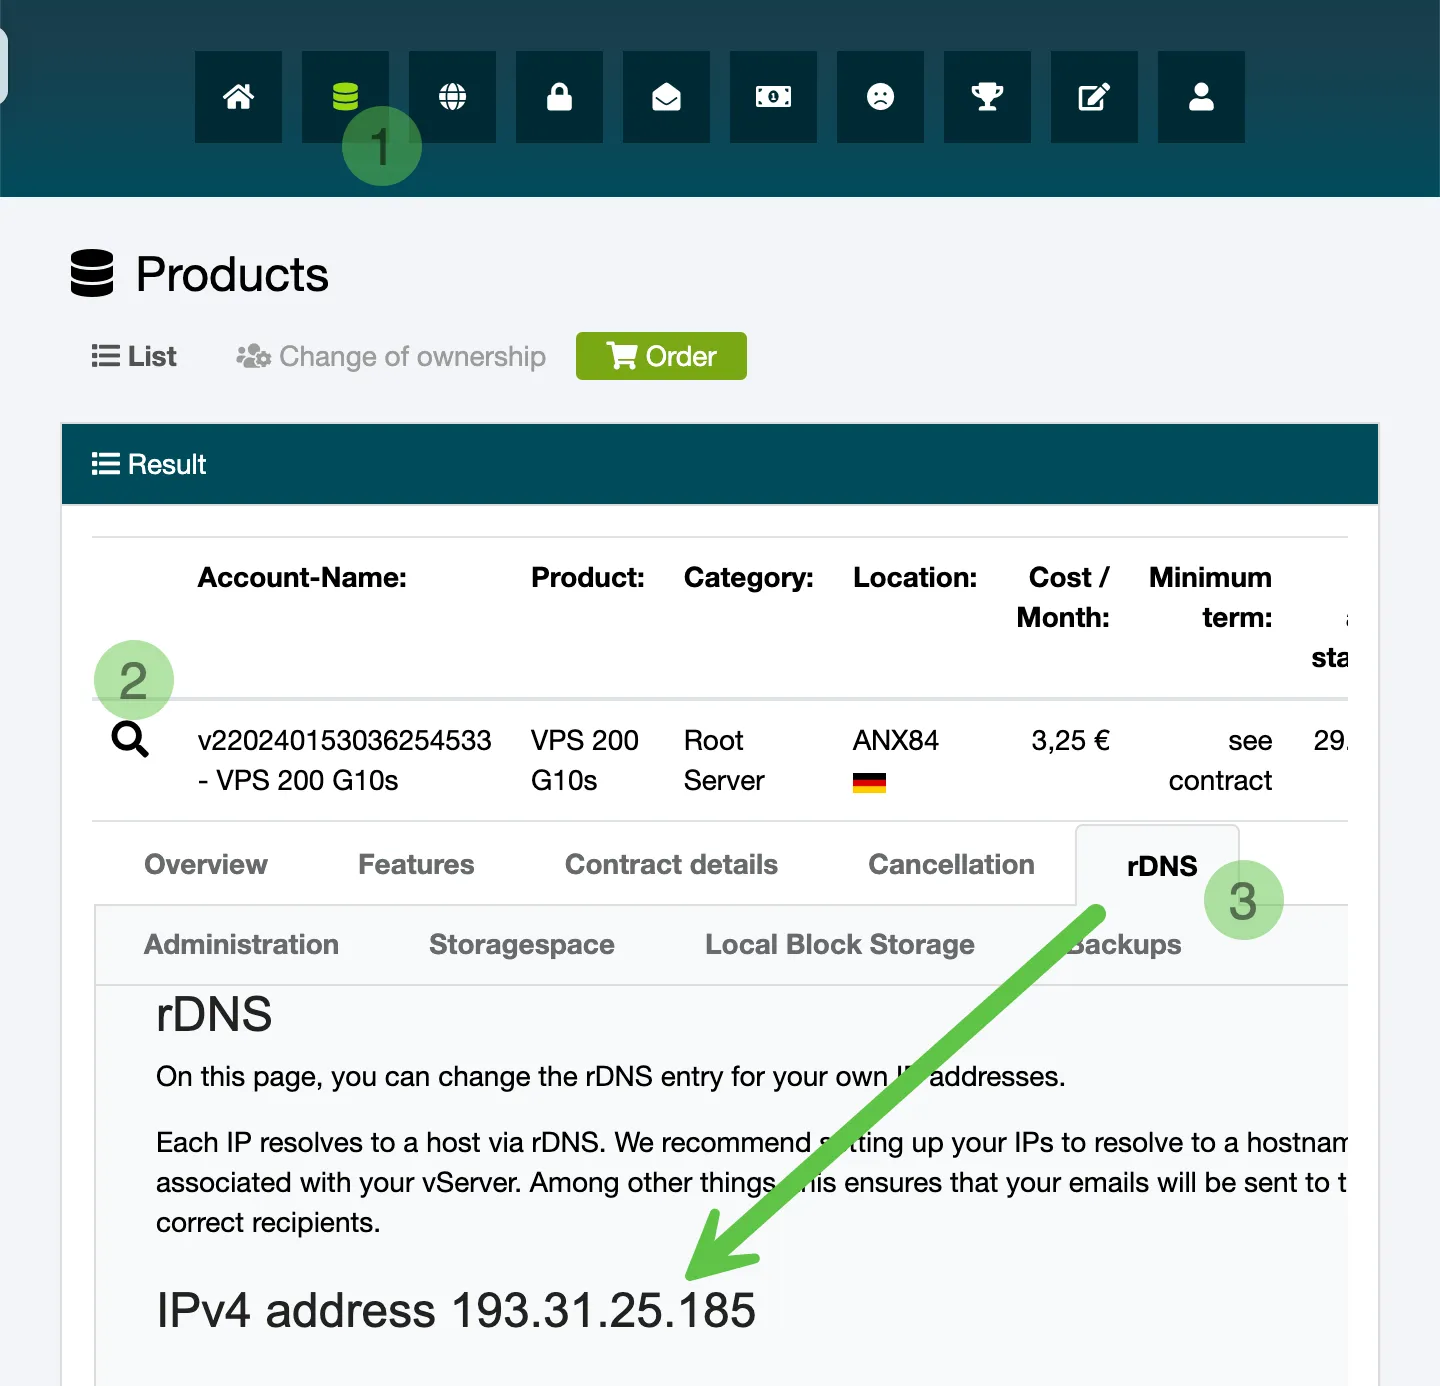
Once you have rented a VPS, you can find the IP address in the CCP (Customer Control Panel). It should also be included in the confirmation email.
Step 2: Rent a Domain
Next, we need a domain. Here, too, you should use a provider of your choice. The domain and server do not need to be with the same provider. However, I also use Netcup for this. At this point you have two options:
- Rent an additional domain
- Rent a web hosting package with an inclusive domain
The additional domain has the advantage of being cheaper (currently around €5.04 per year for a .de domain). However, the web hosting packages (from around €2.17 per month) offer additional features such as email inboxes and web space.
Step 3: Configure the Domain
After renting the domain, you need to configure it to point to your server. To do this, log into your domain provider’s CCP and navigate to your domain’s DNS settings.
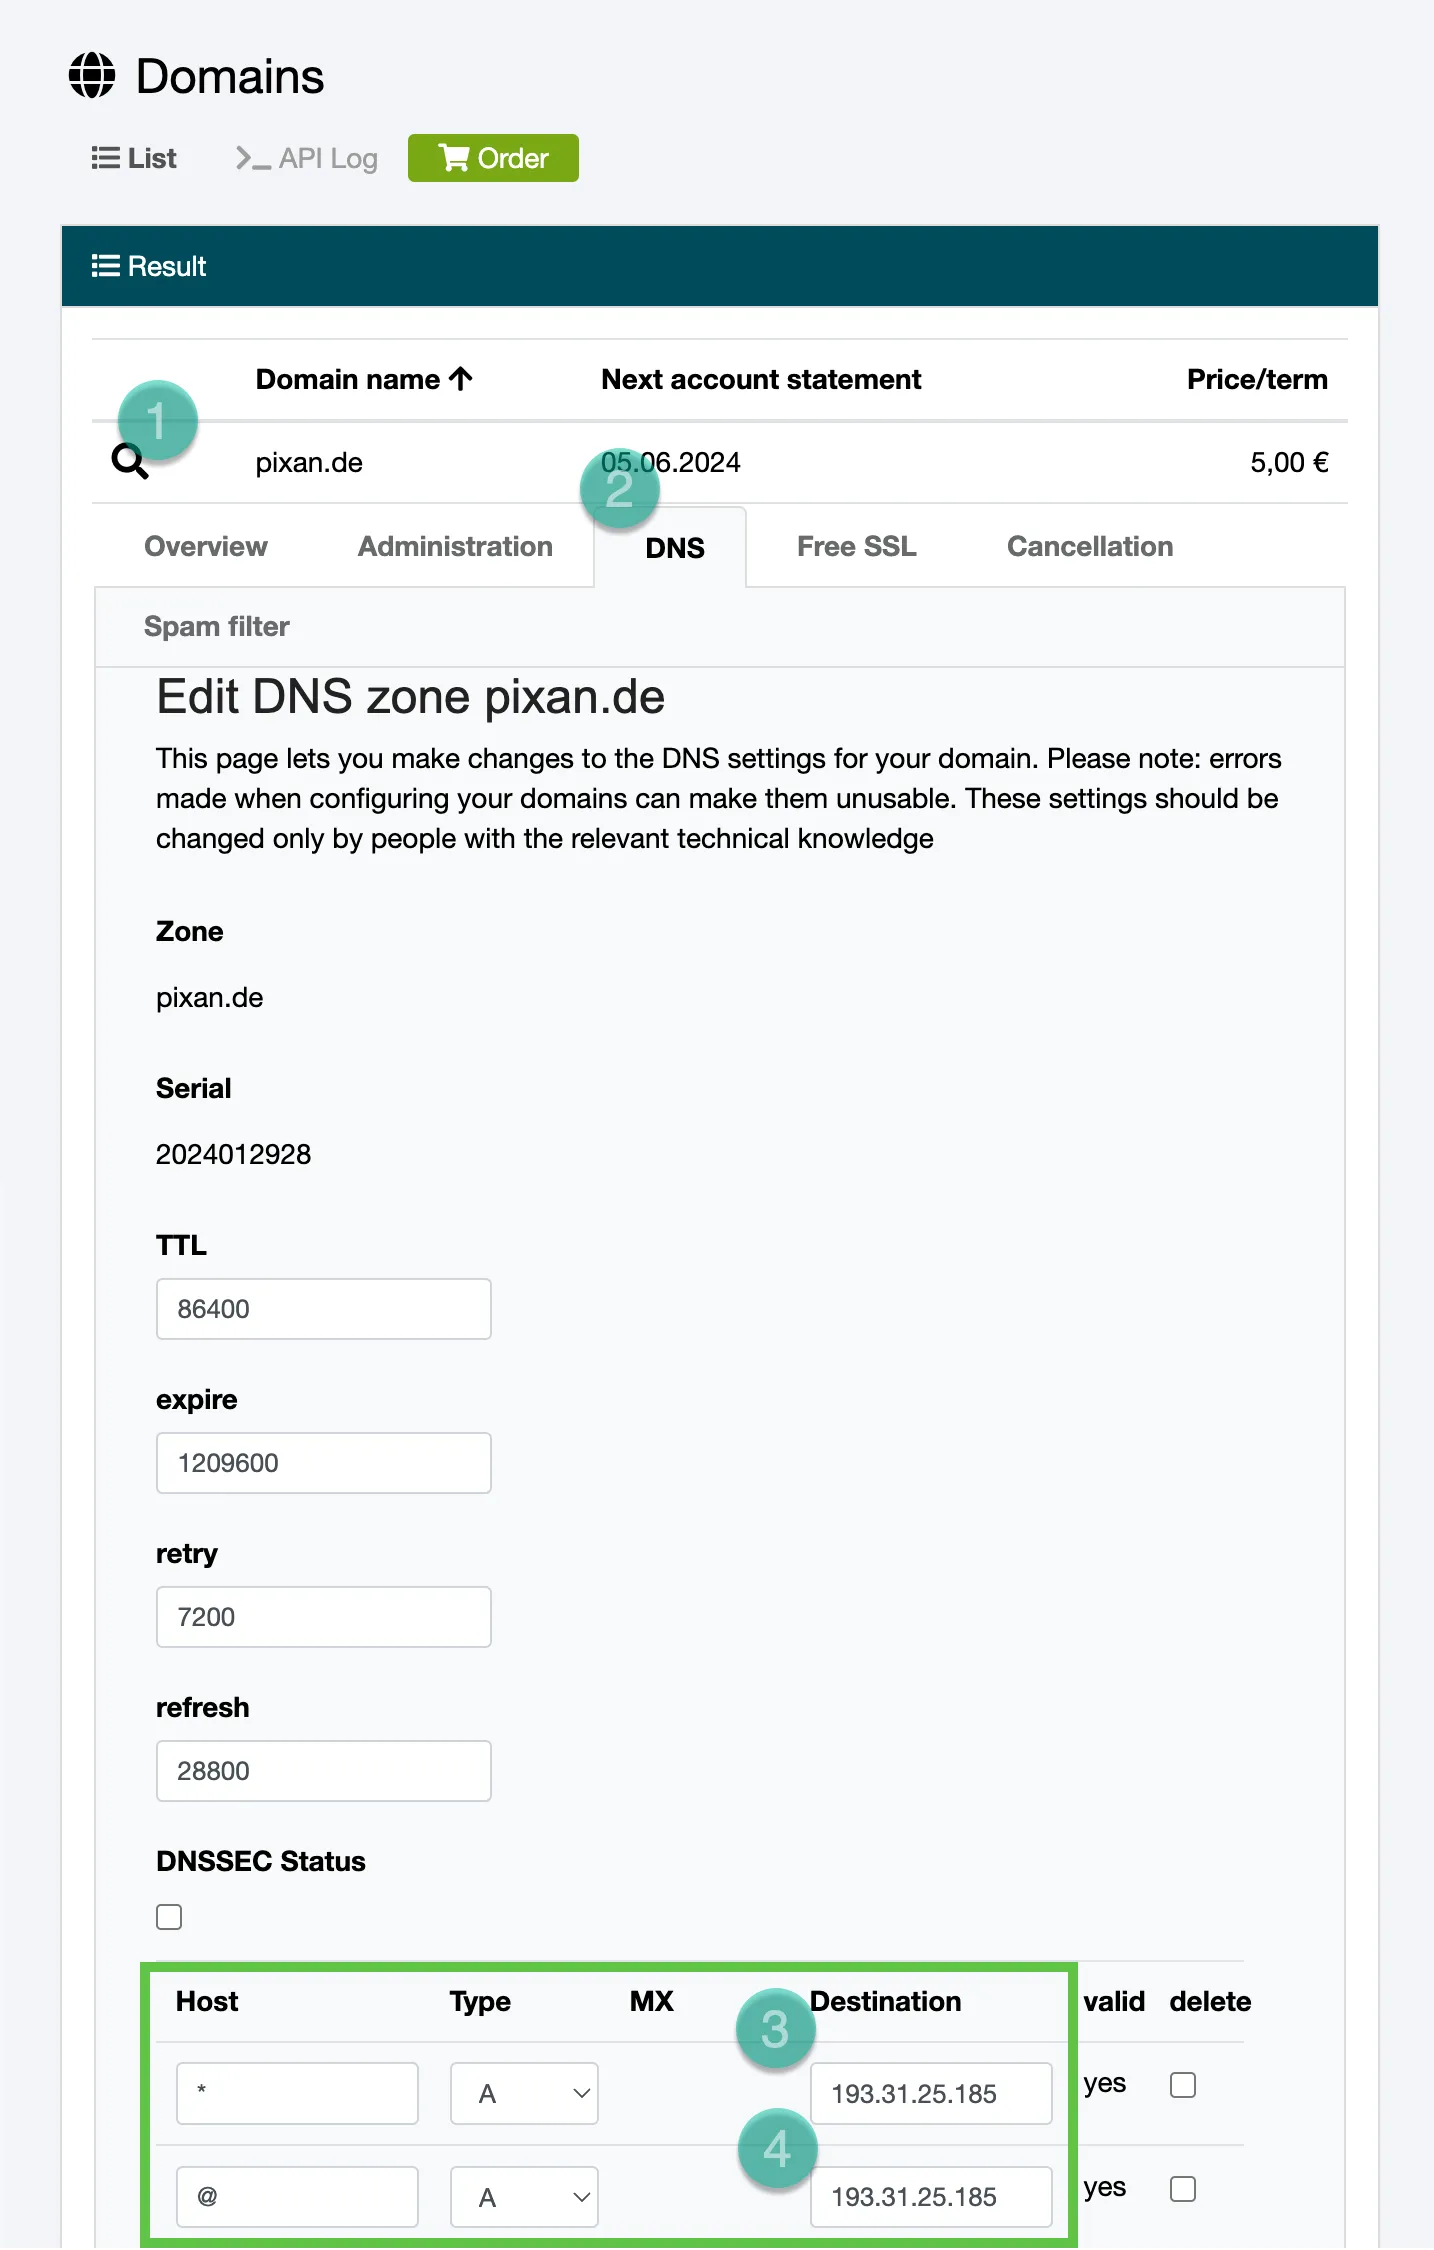
There, add two new A records:
- Host:
@(This represents the main domain, e.g.your-domain.com) Target/Value: The IP address of your server. - Host:
*(This is a wildcard entry for all subdomains, e.g.sub.your-domain.com) Target/Value: The IP address of your server.
Note for Netcup web hosting users: If you have a web hosting package with Netcup, first delete the existing entries for “@” and “*” (both A records and AAAA records, if present). The remaining entries (e.g. MX records responsible for email) must stay in place so that email inboxes and web space continue to work. Steps may vary with other providers.
Now you need to wait until the DNS changes propagate worldwide. This can take anywhere from a few minutes to 24 hours. You can test it in the terminal with ping your-domain.com (replace your-domain.com with your actual domain). When the IP address of your server is returned, the domain is ready.
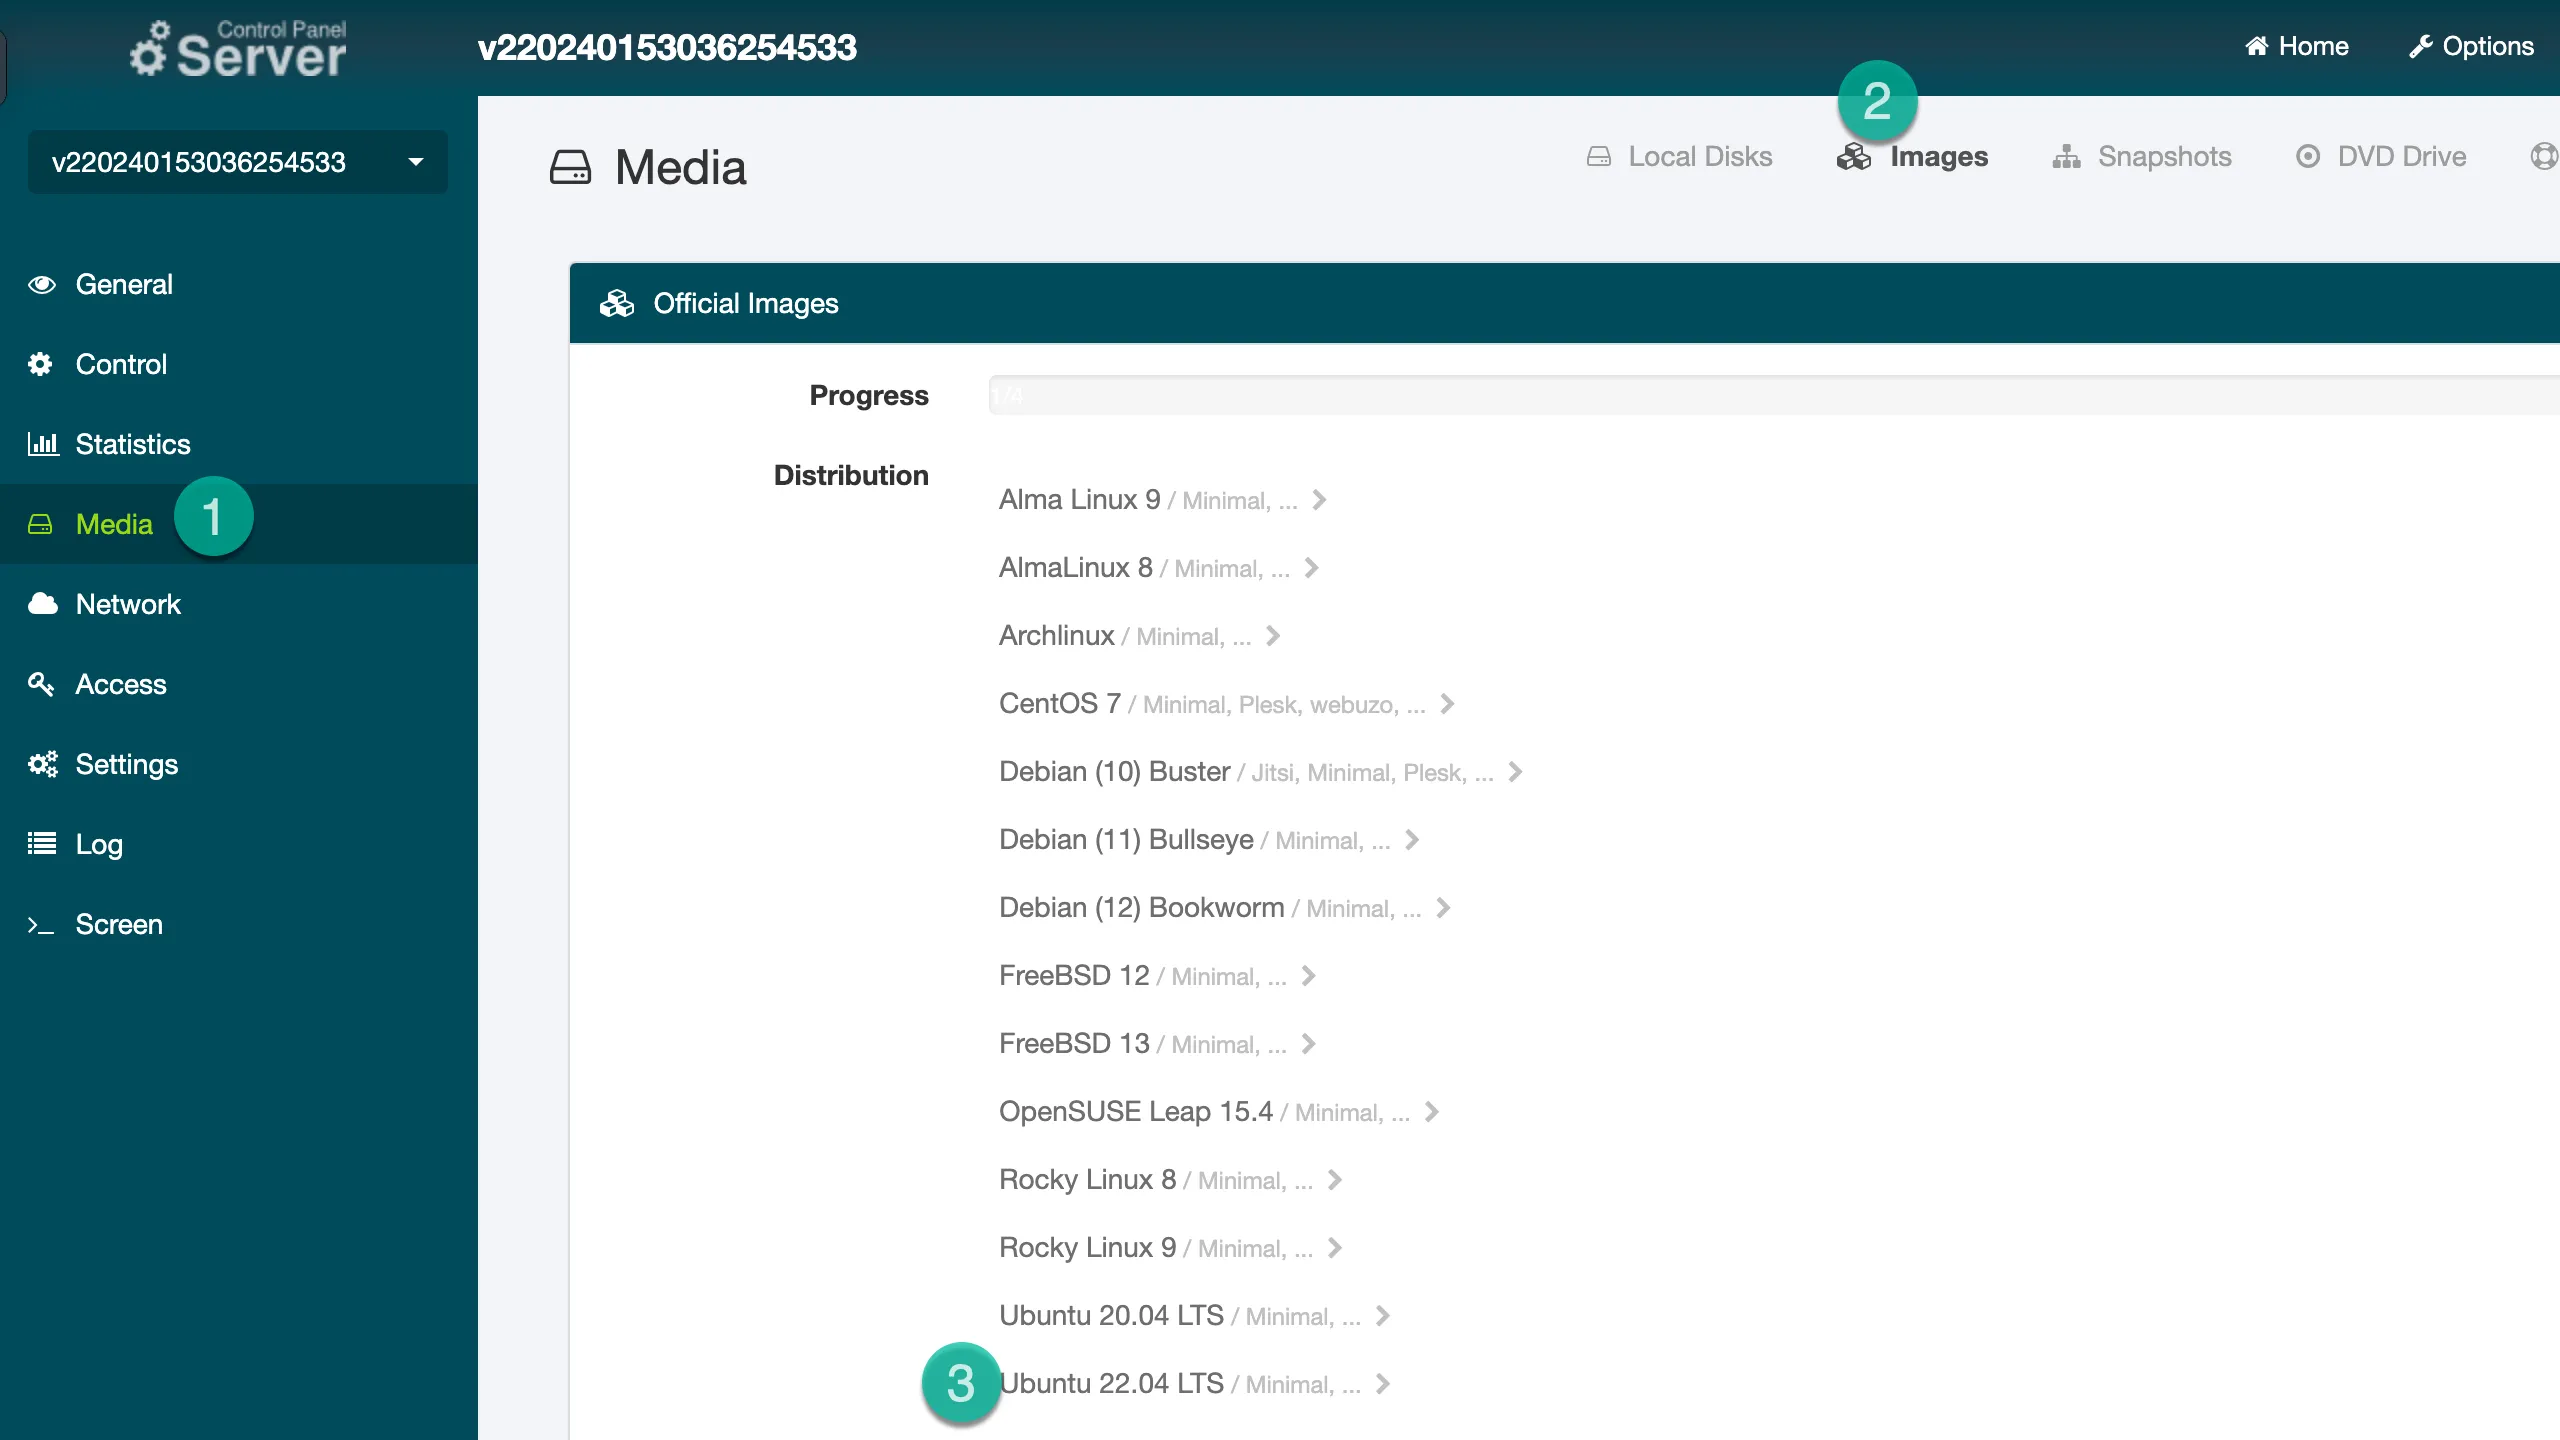
Step 4: Reinstall the Server
You can now log in to the server control panel and select your server. Under “Media” and then “Images” (or similar menu items), you can select a new operating system. I recommend Ubuntu 22.04 LTS (Long Term Support, updates until April 2027).
During the installation, you should create a user with sudo privileges. Make sure to remember the username and password.
Step 5: Establish an SSH Connection
Once the installation is complete, you can connect to your server via SSH. We use VSCode for this. Install the Remote-SSH plugin and click the icon in the bottom left corner. There you can select “Remote-SSH: Connect to Host…” and configure your SSH connection. The command ssh username@your-server-ip (e.g. ssh myuser@123.45.67.89) in your local computer’s terminal should also connect you.
Once the connection is established, you can open your user’s home folder in VSCode’s Explorer and edit files there. You can also use the integrated terminal to run commands on the server:
sudo apt update && sudo apt upgrade -yStep 6: Install Docker and Docker Compose
Next, we install Docker and Docker Compose. Docker Compose is now a Docker plugin and gets installed together with Docker. Run the following commands to install Docker:
sudo apt-get install ca-certificates curl
sudo install -m 0755 -d /etc/apt/keyrings
sudo curl -fsSL https://download.docker.com/linux/ubuntu/gpg -o /etc/apt/keyrings/docker.asc
sudo chmod a+r /etc/apt/keyrings/docker.asc

echo \
  "deb [arch=$(dpkg --print-architecture) signed-by=/etc/apt/keyrings/docker.asc] https://download.docker.com/linux/ubuntu \
  $(. /etc/os-release && echo "$VERSION_CODENAME") stable" | \
  sudo tee /etc/apt/sources.list.d/docker.list > /dev/null
sudo apt-get update
sudo apt-get install docker-ce docker-ce-cli containerd.io docker-buildx-plugin docker-compose-plugin -yStep 7: Prepare Caddy
We use Caddy as a reverse proxy. A reverse proxy receives requests from the internet (typically on port 80 for HTTP and 443 for HTTPS) and forwards them to the appropriate internal services (our Docker containers). Caddy also automatically handles SSL certificates for HTTPS.
First, we create a Docker network so Caddy can communicate with the other containers:
sudo docker network create proxyNow we create a folder for Caddy and set up the necessary files:
mkdir caddy
cd caddy
mkdir data config
touch docker-compose.yml Caddyfile
Enter the following into the docker-compose.yml file (in the ~/caddy directory):
networks:
    proxy:
        external: true
        name: proxy

services:
    caddy:
        image: caddy:2
        container_name: caddy
        restart: unless-stopped
        ports:
            - 80:80
            - 443:443
        volumes:
            - ./data:/data
            - ./config:/config
            - ./Caddyfile:/etc/caddy/Caddyfile:ro
        networks:
            - proxy
Step 8: Install WG-Easy
WG-Easy is a simple web interface for managing WireGuard VPN connections. We install it to establish a secure VPN connection to our server.
cd ~
mkdir wireguard
cd wireguard
mkdir data
touch docker-compose.yml
Enter the following into the docker-compose.yml file (in the ~/wireguard directory):
networks:
    proxy:
        name: proxy
        external: true

services:
    wg-easy:
        environment:
            - WG_HOST=wireguard.example.com
            - PASSWORD=YourSecurePasswordHere
        image: ghcr.io/wg-easy/wg-easy:10
        container_name: wg-easy
        volumes:
            - ./data:/etc/wireguard
        ports:
            - "51820:51820/udp"
        restart: unless-stopped
        cap_add:
            - NET_ADMIN
            - SYS_MODULE
        sysctls:
            - net.ipv4.ip_forward=1
            - net.ipv4.conf.all.src_valid_mark=1
        networks:
            - proxy
Important: Change the environment variables WG_HOST (to your desired subdomain for WireGuard, e.g. vpn.your-domain.com) and PASSWORD (to a strong password for the WG-Easy web interface).
Now you can start the WG-Easy container:
sudo docker compose up -d(Make sure you are in the ~/wireguard directory when running this command.)
Step 9: Configure the Proxy (for WG-Easy)
Now we add the configuration for Caddy so that WG-Easy is accessible via your subdomain. Open the Caddyfile (in the ~/caddy directory) and enter the following:
{
    acme_ca https://acme-v02.api.letsencrypt.org/directory
    email   your-email@example.com
}

wireguard.example.com {
    reverse_proxy wg-easy:51821
}
Important: Replace your-email@example.com and wireguard.example.com with your actual values.
Now you can start (or restart, if already running) Caddy:
cd ~/caddy
sudo docker compose up -d
Step 10: Establish a WireGuard Connection
Now you can visit the WireGuard subdomain you just configured in your browser (e.g. https://wireguard.example.com). The WG-Easy website should appear. Log in with the password you set in Step 8. Through the interface, you can create a new client (VPN user). The configuration file can be downloaded or displayed as a QR code.
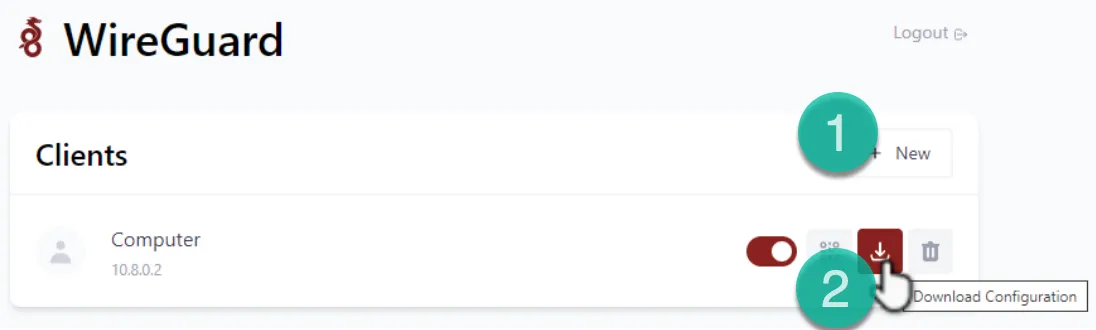
You can import the configuration file on your computer, smartphone, etc. using the WireGuard app. After importing the configuration file, you can establish the VPN connection.
Step 11: Block External Connections (for WG-Easy UI)
To increase security, we now block direct access to the WG-Easy web interface from the internet. It should only be accessible through the VPN connection. To do this, we modify the Caddyfile (in the ~/caddy directory):
{
    acme_ca https://acme-v02.api.letsencrypt.org/directory
    email   your-email@example.com
}

wireguard.example.com {
    @blocked not remote_ip private_ranges
    respond @blocked 403
    reverse_proxy wg-easy:51821
}
Restart Caddy to apply the changes:
cd ~/caddy
sudo docker compose down
sudo docker compose up -d
Test whether you can still reach the WG-Easy interface without an active VPN connection (you should not be able to) and then with an active VPN connection (you should).
Step 12: Install Paperless-ngx
Now we can install Paperless-ngx. First, we create a new folder along with the necessary subfolders and files:
cd ~
mkdir paperless
cd paperless
mkdir consume data media export redis db db-backup
touch docker-compose.yml
We also need our user ID (UID) and group ID (GID) for file permissions. Run the following command, replacing yourusername with the username you use on the server:
id yourusernameThe output should look something like this (the numbers may vary):
uid=1000(yourusername) gid=1000(yourusername) groups=1000(yourusername)Note down the UID and GID (in this example, both are 1000).
Enter the following into the docker-compose.yml file (in the ~/paperless directory):
networks:
    internal:
        external: false
    proxy:
        name: proxy
        external: true

services:
    broker:
        container_name: paperless-redis
        image: redis:7
        networks:
            - internal
        restart: unless-stopped
        volumes:
            - ./redis:/data

    db:
        container_name: paperless-db
        image: postgres:16
        networks:
            - internal
        restart: unless-stopped
        volumes:
            - ./db:/var/lib/postgresql/data
        environment:
            POSTGRES_DB: paperless
            POSTGRES_USER: paperless
            POSTGRES_PASSWORD: YourStrongDatabasePassword
            POSTGRES_INITDB_ARGS: "--encoding=UTF-8 --lc-collate=C --lc-ctype=C"

    webserver:
        container_name: paperless
        image: ghcr.io/paperless-ngx/paperless-ngx:2.4
        networks:
            - internal
            - proxy
        restart: unless-stopped
        depends_on:
            - db
            - broker
        healthcheck:
            test: ["CMD", "curl", "-f", "http://localhost:8000"]
            interval: 30s
            timeout: 10s
            retries: 5
        volumes:
            - ./data:/usr/src/paperless/data
            - ./media:/usr/src/paperless/media
            - ./export:/usr/src/paperless/export
            - ./consume:/usr/src/paperless/consume
        environment:
            PAPERLESS_REDIS: redis://broker:6379
            PAPERLESS_DBHOST: db
            PAPERLESS_DBPASS: YourStrongDatabasePassword
            USERMAP_UID: 1000
            USERMAP_GID: 1000
            PAPERLESS_OCR_LANGUAGES: deu eng
            PAPERLESS_SECRET_KEY: YourVerySecretRandomKeyHere
            PAPERLESS_ALLOWED_HOSTS: "localhost,paperless.example.com"
            PAPERLESS_TIME_ZONE: Europe/Berlin
            PAPERLESS_OCR_LANGUAGE: deu
            PAPERLESS_FILENAME_FORMAT: "{created_year}/{correspondent}/{title}"
            PAPERLESS_TIKA_ENABLED: 1
            PAPERLESS_TIKA_GOTENBERG_ENDPOINT: http://gotenberg:3000/
            PAPERLESS_TIKA_ENDPOINT: http://tika:9998
            PAPERLESS_URL: "https://paperless.example.com"

    db-backup:
        container_name: paperless-db-backup
        image: postgres:16
        volumes:
            - ./db-backup:/dump
            - /etc/localtime:/etc/localtime:ro
        environment:
            PGHOST: db
            PGDATABASE: paperless
            PGUSER: paperless
            PGPASSWORD: YourStrongDatabasePassword
            BACKUP_NUM_KEEP: 10
            BACKUP_FREQUENCY: 7d
        entrypoint: |
            bash -c 'bash -s <<EOF
            trap "break;exit" SIGHUP SIGINT SIGTERM
            sleep 2m
            while /bin/true; do
                pg_dump -Fc > /dump/dump_$(date +%Y-%m-%d_%H_%M_%S).psql
                (ls -t /dump/dump*.psql | head -n $$BACKUP_NUM_KEEP; ls /dump/dump*.psql) | sort | uniq -u | xargs -r rm -- {}
                sleep $$BACKUP_FREQUENCY
            done
            EOF'
        networks:
            - internal

    gotenberg:
        image: gotenberg/gotenberg:8
        restart: unless-stopped
        environment:
            CHROMIUM_DISABLE_ROUTES: 1
        command:
            - "gotenberg"
            - "--chromium-disable-javascript=true"
            - "--chromium-allow-list=file:///tmp/.*"
        networks:
            - internal

    tika:
        image: apache/tika:2.9.1.0
        restart: unless-stopped
        networks:
            - internal
Important adjustments:
- Replace
YourStrongDatabasePasswordin all three places with your own secure password. - Change
USERMAP_UIDandUSERMAP_GIDto the values you obtained earlier with theidcommand. - Adjust
PAPERLESS_OCR_LANGUAGESandPAPERLESS_OCR_LANGUAGEto match the languages of your documents (e.g.engfor English). You can find a list of language codes in the Paperless-ngx documentation. - Replace
YourVerySecretRandomKeyHereforPAPERLESS_SECRET_KEYwith a long, random string. - Adjust
PAPERLESS_ALLOWED_HOSTSandPAPERLESS_URLto match your domain (e.g.paperless.your-domain.com).
Now you can start Paperless-ngx:
sudo docker compose up -d(Make sure you are in the ~/paperless directory.)
Step 13: Create a Paperless-ngx User
We need a superuser account to be able to log in to Paperless-ngx. Run one of the following commands:
sudo docker exec -it paperless python3 manage.py createsuperuserOr alternatively, if the command above does not properly handle interactive input:
sudo docker exec -it paperless sh
python3 manage.py createsuperuser
exit
Follow the prompts to set a username, email address (optional), and password.
Step 14: Configure the Paperless-ngx Proxy
Finally, we add the configuration for Paperless-ngx to the Caddyfile (in the ~/caddy directory) so that it is accessible via your subdomain and also restricted to WireGuard access only:
{
    acme_ca https://acme-v02.api.letsencrypt.org/directory
    email   your-email@example.com
}

wireguard.example.com {
    @blocked not remote_ip private_ranges
    respond @blocked 403
    reverse_proxy wg-easy:51821
}

paperless.example.com {
    @blocked not remote_ip private_ranges
    respond @blocked 403
    reverse_proxy paperless:8000
}
Restart Caddy:
cd ~/caddy
sudo docker compose down
sudo docker compose up -d
Step 15: Configure Paperless-ngx
Now you can log in to Paperless-ngx via your VPN connection (e.g. https://paperless.example.com) and adjust the configuration. Navigate to your domain and log in with your superuser account. There you can adjust settings and add documents.
An important step is setting up the mail server (under Settings → Email) to archive files directly via email, if desired.
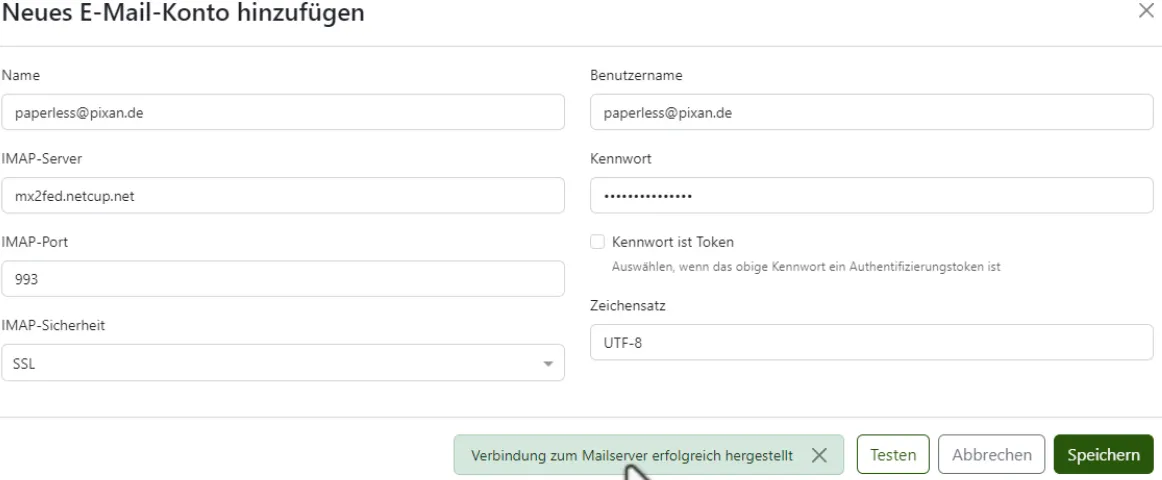
Don’t forget to also set up one or more email rules for this.
You can also add additional users and assign them specific permissions.
Step 16: Archive Documents
Now you can add and archive documents. You have several options:
- Drag and drop files into the web interface.
- Place files in the
consumefolder on the server (e.g. via SFTP over the VPN connection). Paperless-ngx monitors this folder and automatically processes new files. - Send files by email to a configured email address that Paperless-ngx checks.
- Use mobile apps like Paperless Mobile (for Android) or other compatible apps.
Supported formats include PDFs, Office documents (Word, Excel, PowerPoint, LibreOffice), text files, and EML files (emails).
Step 17: Back Up Paperless-ngx
Finally, you should back up your Paperless-ngx instance. The docker-compose.yml already includes a backup container for the PostgreSQL database. Backups are stored in the ~/paperless/db-backup directory.
Additionally, you should regularly back up the ~/paperless/media directory (containing original files and thumbnails) and the ~/paperless/data directory (containing configuration, search index, etc.).
You can also use the built-in document_exporter to export all documents including metadata:
sudo docker exec -it paperless python3 manage.py document_exporter ../exportThe exported files are then located in the ~/paperless/export folder on your server and should also be backed up. Tools like BorgBackup or Rclone are suitable for external backups.
Step 18: Updating
You should update your installation regularly.
Update the server:
sudo apt update && sudo apt upgrade -yUpdate Docker images: For each service (Caddy, WG-Easy, Paperless-ngx), run the following commands in the respective directory:
cd ~/caddy
sudo docker compose pull
sudo docker compose down && sudo docker compose up -d
cd ~/wireguard
sudo docker compose pull
sudo docker compose down && sudo docker compose up -d
cd ~/paperless
sudo docker compose pull
sudo docker compose down && sudo docker compose up -d
You can also use tools like Watchtower to automatically update Docker images. However, be aware that automatic updates can carry risks if a new version introduces incompatible changes.
Paperless-ngx versioning:
Paperless-ngx uses Semantic Versioning (SemVer), e.g. 2.4.0.
- The first number (Major version, e.g.
2) changes with major, potentially incompatible changes. - The second number (Minor version, e.g.
.4) changes with new features that should be backward compatible. - The third number (Patch version, e.g.
.0) changes with bug fixes and security updates that are backward compatible.
In our configuration image: ghcr.io/paperless-ngx/paperless-ngx:2.4, the latest 2.4.x version is always used (e.g. 2.4.1, 2.4.2, etc. as they are released). If you want to update to a new minor version (e.g. 2.5) or major version (e.g. 3.0), you need to explicitly change the version number in the image tag in the docker-compose.yml file. Always read the Paperless-ngx release notes before such updates to stay informed about potential breaking changes.
PostgreSQL updates:
With PostgreSQL, you should not simply update the major version (e.g. from 16 to 17) in the Docker image without performing a careful database migration. This is a more complex process and typically requires a backup and restore or the use of pg_upgrade. Minor point releases (e.g. 16.1 to 16.2) are generally unproblematic.
It is also not strictly necessary to always use the latest major version as long as security updates are available for your current version. Always check whether the latest version is supported by your other components (if relevant).
Conclusion
Congratulations! You have successfully installed Paperless-ngx on a VPS. You can now securely access your documents from anywhere and manage them efficiently. If you have any questions or comments, feel free to leave them in the comments.
Related Articles
Install Nextcloud on a VPS with Docker: Complete Guide
Set up your own private cloud with Nextcloud on a VPS using Docker and Caddy as a reverse proxy. Beginner-friendly step-by-step guide – start your cloud today!
How to Install Paperless-ngx on a Synology NAS with Docker
Learn how to install Paperless-NGX on your Synology NAS — a powerful open-source document management system — using Docker and Portainer. Step-by-step guide.
Backups with Duplicati & Docker: Secure Data Protection
Protect your Docker data and databases reliably with Duplicati. Set up automated backups, including cloud storage. Open source, flexible, and easy to configure.
Paperless-ngx Backup & Restore: The Right Strategy
Create a secure, incremental Paperless-ngx backup with Docker and restore your documents in an emergency. The complete step-by-step guide for your DMS setup.