Self-Host Vaultwarden Password Manager on Synology NAS
Install Vaultwarden on your Synology NAS with Docker. Self-host your passwords securely and privately. Complete step-by-step setup guide for your NAS.
Table of Contents
- Why a Self-Hosted Password Manager Makes Sense
- Prerequisites for Installation
- Installing the Password Manager Vaultwarden with Docker
- Setting up the Reverse Proxy
- Initial Setup and User Management
- Disabling the Admin Area
- Integration with Browsers and Mobile Devices
- Importing and Managing Data
- Updating and Maintaining Vaultwarden
- Advantages Over Cloud-Based Alternatives
- Conclusion and Recommendation
- Additional Resources
CAUTION
Please be aware that the original version of this blog post was written in German. This English translation has been provided for your convenience. While all efforts have been made to maintain accuracy, there may be some translation errors. I apologize for any confusion or misunderstandings that may arise from the translated text. Corrections are welcome via comments or email.
In a digital world where we use numerous login credentials daily, secure password management has become essential. This comprehensive guide explores how to set up Vaultwarden, an open-source password manager, on a Synology NAS using Docker. This self-hosted solution offers complete control over your sensitive password data while providing powerful features for generating, storing, and synchronizing passwords across all your devices. The entire setup requires minimal hardware resources and delivers enterprise-grade security without subscription fees.
Why a Self-Hosted Password Manager Makes Sense
While cloud-based password managers like 1Password or Synology C2 Password offer convenient services, a self-hosted solution gives me complete control over my data. Vaultwarden, an open-source Bitwarden derivative, enables exactly that: all my passwords are encrypted and stored exclusively on my own hardware. This approach eliminates concerns about third-party access to sensitive information and removes dependency on external services that might change pricing or policies over time. The security model remains robust as the encrypted data never leaves my infrastructure unless I specifically choose to access it remotely through my own configured systems.
What particularly convinces me about Vaultwarden is the user-friendliness combined with a comprehensive range of functions. I can generate secure passwords, store them in an encrypted vault, and synchronize them across various devices and browsers like Chrome, Firefox, and Edge – all without dependence on external cloud services. The interface is intuitive enough for everyday users while providing advanced options for power users. With clients available for virtually every platform, I can access my passwords securely from anywhere while maintaining complete ownership of the underlying data and infrastructure.
Prerequisites for Installation
For my setup, I use a Synology NAS, specifically a DS220+ Synology NAS(Amazon affiliate link), equipped with 10 GB RAM(Amazon affiliate link). Fortunately, Vaultwarden has only minimal hardware requirements. I only need a system with approximately
| System requirements | Minimum |
|---|---|
| CPU | 0.2 cores |
| RAM | 128 MB |
| Storage | 200 MB |
These modest requirements mean that even older or entry-level NAS models should be perfectly capable of running this password manager without performance issues. The resource efficiency of Vaultwarden is one of its standout features compared to other self-hosted password management solutions.
The instructions in this guide can also be applied to other Docker-compatible devices, making them versatile regardless of your specific hardware setup. Whether you’re using a dedicated server, a Raspberry Pi, or another NAS brand, the core configuration remains similar with minor adjustments. A reverse proxy manager in the network is necessary, regardless of whether it’s hosted on another device or directly on the Synology NAS. Similarly, having a domain is beneficial for secure external access, though this could be a purchased domain or a free dynamic DNS service depending on your needs and budget.
Installing the Password Manager Vaultwarden with Docker
Docker should be installed on the NAS as a prerequisite for this setup. I’ve detailed the DiskStation setup process here. Portainer is optional but serves as a useful tool for managing containers through a web interface rather than relying solely on command-line operations. For this guide, I’ll focus on using Portainer to simplify the deployment process, though the same configuration could be applied using Docker Compose directly through SSH if preferred. The Docker package can be installed directly from the Synology Package Center, making the initial setup straightforward.
Next, I create a dedicated folder for my password manager’s persistent data, which ensures that configurations and passwords remain intact even if the Docker container is updated or rebuilt. I navigate to my preferred storage location in the File Manager and create a new folder named vaultwarden-data.
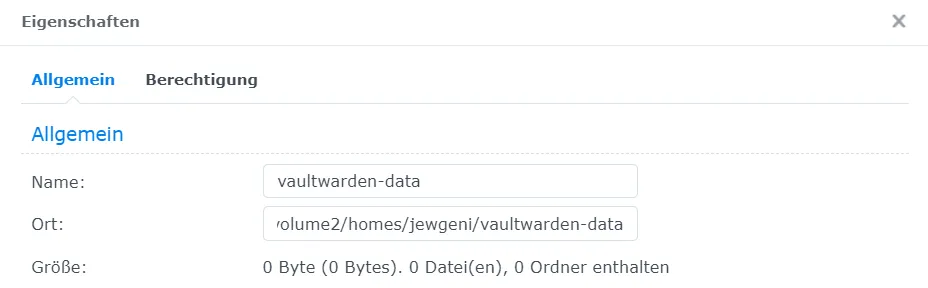
I carefully note the full path (for example, /volume1/docker/vaultwarden-data) as I’ll need it later in the configuration file. This folder will store the encrypted database and other persistent settings that should survive container updates.
Now I’ll install Vaultwarden using Docker Compose. Since I’m using Portainer, I create a new stack and enter the configuration code that defines the container settings
version: "3"

networks:
    internal:
        external: false

services:
    vaultwarden:
        container_name: vaultwarden
        image: vaultwarden/server
        restart: unless-stopped
        volumes:
            - /path-to-folder:/data # Modify to the actual folder path on your NAS e.g., /volume1/docker/vaultwarden-data:/data
        ports:
            - 1234:80 # Change the left side port as needed
            - 3012:3012 # Change the left side port as needed
        environment:
            - WEBSOCKET_ENABLED=true # Enables real-time sync
            - ADMIN_TOKEN=secure password # Admin login token
        networks:
            - internal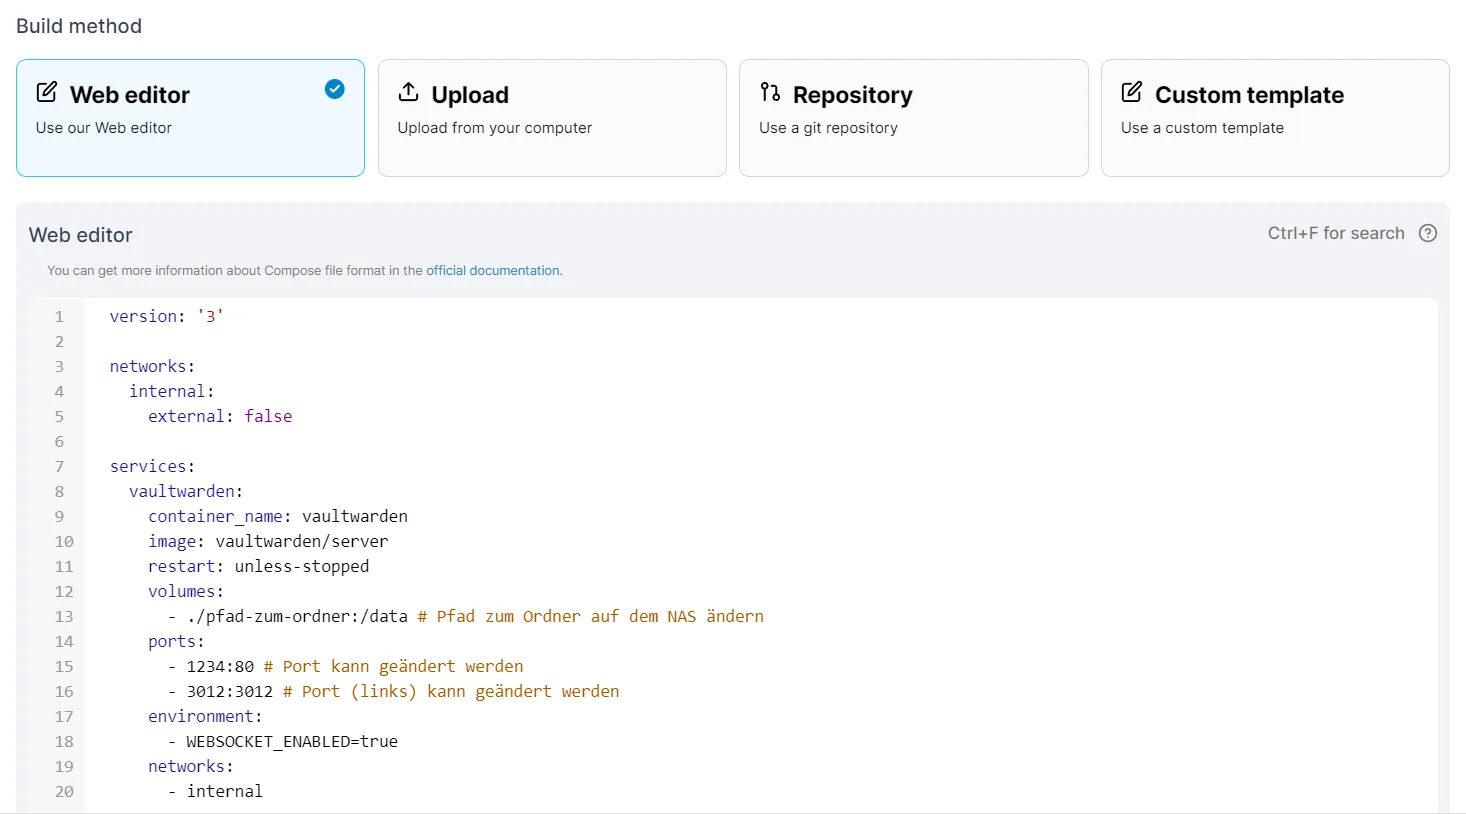
The YAML configuration specifies the image to use, network settings, port mappings, and environment variables like enabling WebSocket support for real-time synchronization. I make sure to customize the volume path to point to my previously created data folder and set a secure ADMIN_TOKEN for accessing the administrative interface. After reviewing the configuration, I deploy the stack and wait for Portainer to pull the necessary images and start the container.
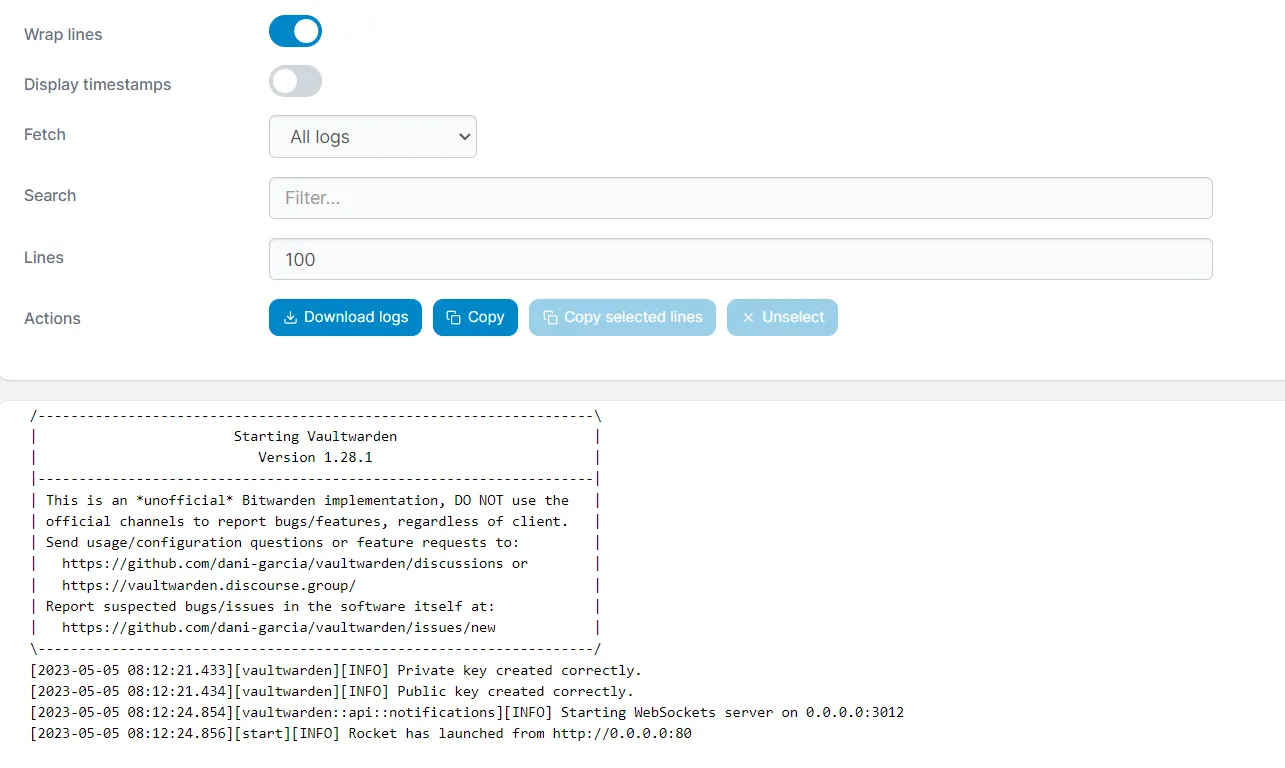
After creating the stack, I check the logs to see if the server has started successfully. When I see the message that the server is operational, I can proceed with configuring external access through the reverse proxy. The logging information also provides valuable troubleshooting data if there are any issues with the initial setup, such as port conflicts or permission problems with the data directory.
Setting up the Reverse Proxy
To access my password manager from outside my home network, I need to set up a reverse proxy that securely forwards external requests to the Vaultwarden container. Setting up a proxy host varies depending on which reverse proxy software you use, with options including Nginx Proxy Manager, Caddy, Traefik, or the built-in Synology reverse proxy application. The key requirements remain consistent: we need to properly route both standard web traffic and WebSocket connections to enable real-time synchronization between devices.
For those using Caddy as their reverse proxy, the configuration involves specifying the domain and setting up appropriate reverse proxy rules for different URL paths. The configuration needs to handle three distinct routing requirements: standard web traffic, WebSocket connections for real-time updates, and the negotiation endpoint that helps establish WebSocket connections. Each of these requires slightly different proxy settings to function correctly, particularly regarding header passthrough and connection upgrades.
# Input your domain here
vaultwarden.domain.de {
encode gzip


# Reference ports from docker-compose.yml and NAS IP
reverse_proxy /notifications/hub/negotiate 192.123.123.40:1234


# Websocket port from docker-compose.yml
reverse_proxy /notifications/hub 192.123.123.40:3012


# Redirect to the first port again
reverse_proxy 192.123.123.40:1234
}
For Nginx Proxy Manager users, the setup involves creating a new proxy host entry that points to the Vaultwarden container’s IP address and port.
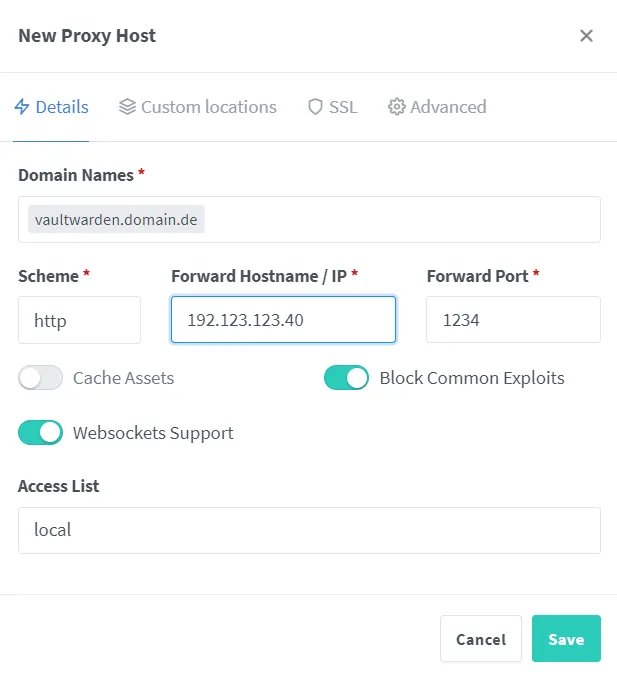
Additionally, obtaining a Let’s Encrypt SSL certificate is crucial for securing the connection, as password managers should always be accessed over HTTPS to prevent credential interception.
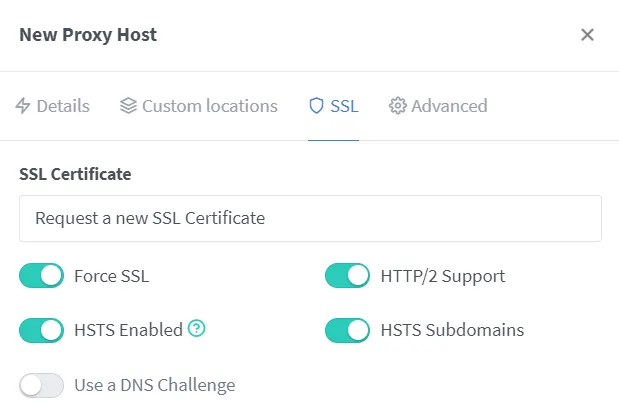
The advanced settings in Nginx Proxy Manager need careful configuration to properly route WebSocket connections and ensure all authentication and synchronization features work correctly across devices.
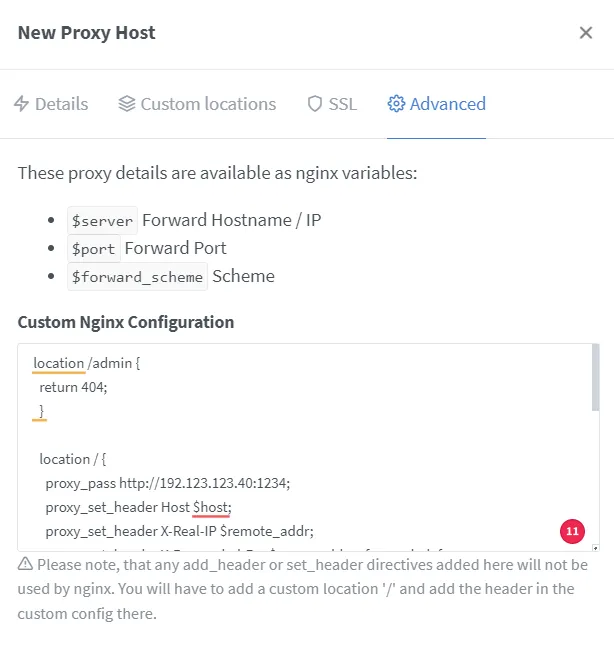
The advanced Nginx configuration requires specific location blocks that handle different aspects of the Vaultwarden service. The main location block handles general web traffic, while specialized blocks for /notifications/hub and /notifications/hub/negotiate ensure that real-time notifications and WebSocket connections function correctly. This separation is critical for ensuring that password changes on one device are immediately reflected across all other connected clients, providing a seamless user experience.
# location /admin {
# return 404;
# }


  location / {
    proxy_pass http://192.123.123.40:1234;
    proxy_set_header Host $host;
    proxy_set_header X-Real-IP $remote_addr;
    proxy_set_header X-Forwarded-For $proxy_add_x_forwarded_for;
    proxy_set_header X-Forwarded-Proto $scheme;
  }


  location /notifications/hub {
    proxy_pass http://192.123.123.40:3012;
    proxy_set_header Upgrade $http_upgrade;
    proxy_set_header Connection "upgrade";
  }


  location /notifications/hub/negotiate {
    proxy_pass http://192.123.123.40:1234;
    proxy_set_header Host $host;
    proxy_set_header X-Real-IP $remote_addr;
    proxy_set_header X-Forwarded-For $proxy_add_x_forwarded_for;
    proxy_set_header X-Forwarded-Proto $scheme;
  }
Adjust ports and IP addresses as required.
Initial Setup and User Management
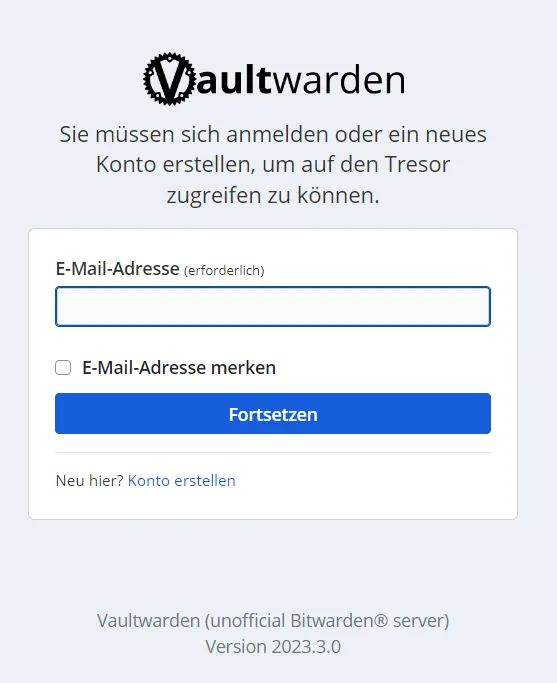
Now I can access my new password manager for the first time by opening a browser and navigating to my domain. The initial setup involves creating a new user account, which will serve as the main account for managing passwords. This first account has special significance as it establishes the foundation for the password vault, though additional users can be added later if family sharing is desired. The registration process includes creating a strong master password that will encrypt all stored data.
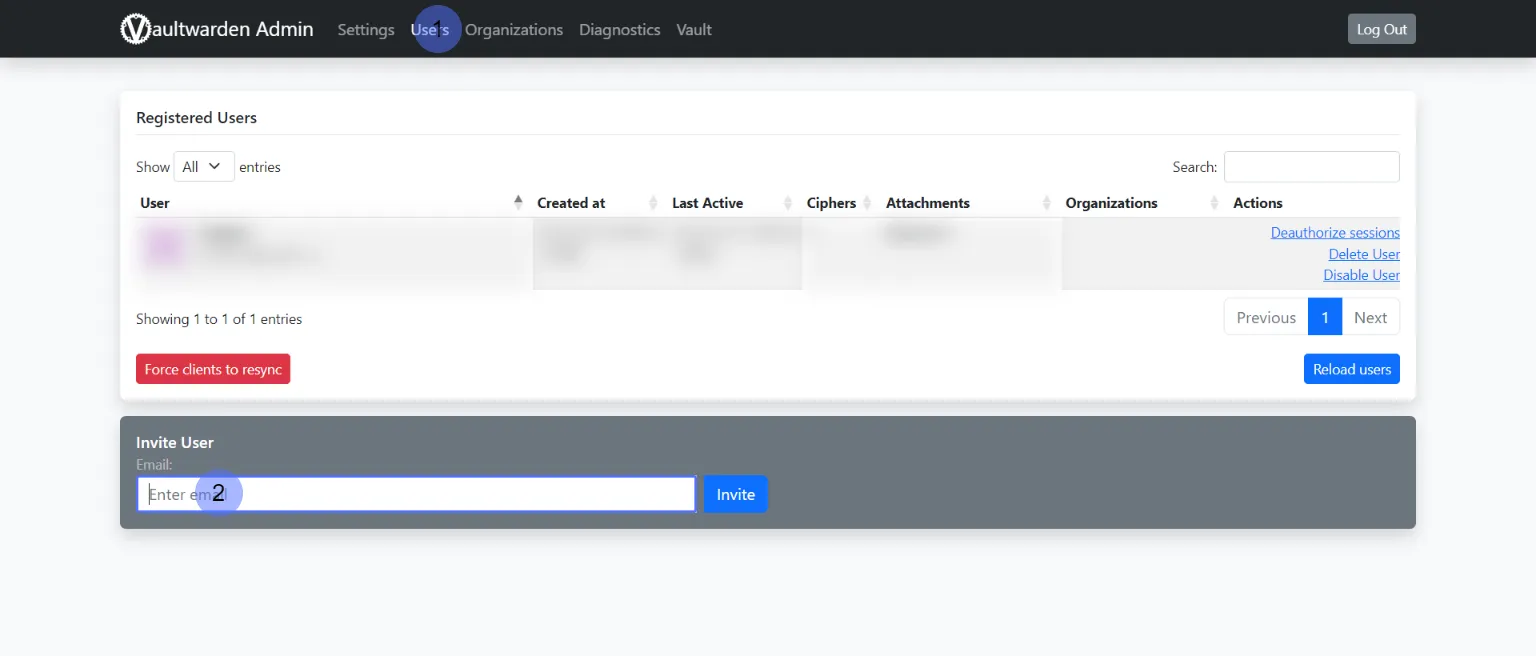
Next, I want to configure the administration area to customize settings and manage users. To do this, I access the URL with the addition /admin and log in with the admin token that I defined earlier in the Docker Compose file. The admin interface provides numerous configuration options including general settings, email configuration, user management, and security policies. This separation between the user vault and administrative functions provides a clean security boundary between day-to-day password management and system administration.
Under “General Settings,” I adjust the domain and disable the registration of new users, as I want to be the only user initially. If I want to add other family members later, I can either temporarily reactivate registration or send invitations through the admin area in the “Users” menu item. This invitation system provides a controlled way to grant access to trusted individuals without opening registration to the public, which could pose a security risk for a self-hosted system.
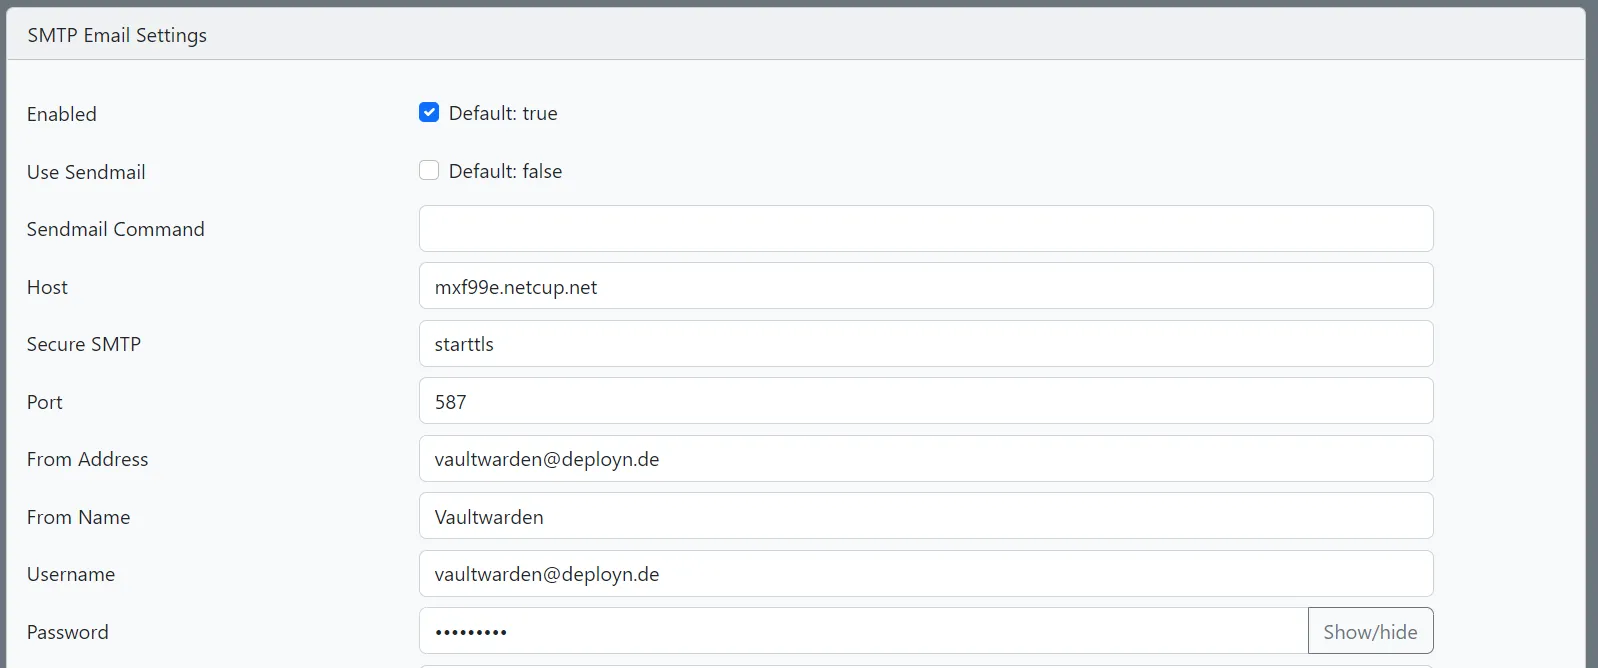
Next, I set up the email settings to enable important notifications. Under “SMTP Email Settings”, I enter the data of my email provider so that Vaultwarden can send notifications, such as for invitations or password change1. This involves configuring the server address, port, authentication credentials, and security settings for the email connection. Having email properly configured ensures that important security notifications reach users promptly and that invitation and recovery workflows function correctly.
Disabling the Admin Area
As an optional security measure, the admin area can be disabled after initial configuration by modifying the Nginx configuration. This involves uncommenting a specific location block in the proxy settings that returns a 404 error for any requests to the /admin path. This additional precaution prevents potential attackers from even attempting to access the administrative interface, providing defense in depth. The admin area can always be re-enabled by reverting this change whenever administrative tasks need to be performed.
location /admin {
 return 404;
 }


 [...]
Integration with Browsers and Mobile Devices
The major advantage of a password manager like Vaultwarden is its seamless integration with browsers and mobile devices. To use my passwords automatically in Chrome, Firefox, or Edge, I install the official Bitwarden extension from the respective browser store. Since Vaultwarden is fully compatible with the official Bitwarden clients, I can use the entire ecosystem of applications without any compatibility issues. This compatibility is a significant benefit of the Vaultwarden project, as it leverages the polished user interfaces developed by the Bitwarden team.
When logging into the browser extension for the first time, I need to provide the URL of my self-hosted server rather than using the default Bitwarden cloud. Instead of the standard Bitwarden URL, I enter my own domain (e.g., https://vaultwarden.mydomain.de). After that initial configuration and authentication, the extension functions identically to the standard Bitwarden client, offering password generation, auto-fill, and secure storage. The extension will remember this custom server URL for future sessions, making day-to-day use completely seamless.
On mobile devices with Android and iOS, the setup follows a similar process with equally smooth integration. I download the official Bitwarden app from the App Store or Google Play, navigate to the settings, and change the server URL to my own domain. After logging in with my credentials, I have full access to all my secure passwords on mobile devices. Both platforms offer integration with the system-level password managers, allowing Vaultwarden to populate login forms in other apps and providing biometric authentication options for convenient yet secure access.
Importing and Managing Data
Since I previously used another password manager, importing my existing data into Vaultwarden is an important step in the migration process. Vaultwarden supports importing from various sources such as 1Password, LastPass, KeePass, and many others. This broad import compatibility makes it easy to switch from virtually any existing password manager without losing historical data. The import process handles not just passwords but also secure notes, credit card information, and personal identity data depending on the source format.
To perform the import, I first export my data from the old password manager as a CSV file or in another supported format. Then, I navigate to “Tools” > “Import” in the Vaultwarden web interface and select the appropriate format from the dropdown menu. After uploading the file, Vaultwarden processes the import and adds all items to my vault. Following the import, I should verify that key entries were transferred correctly by checking that usernames, passwords, URLs, and any custom fields appear as expected in the new system.
Updating and Maintaining Vaultwarden
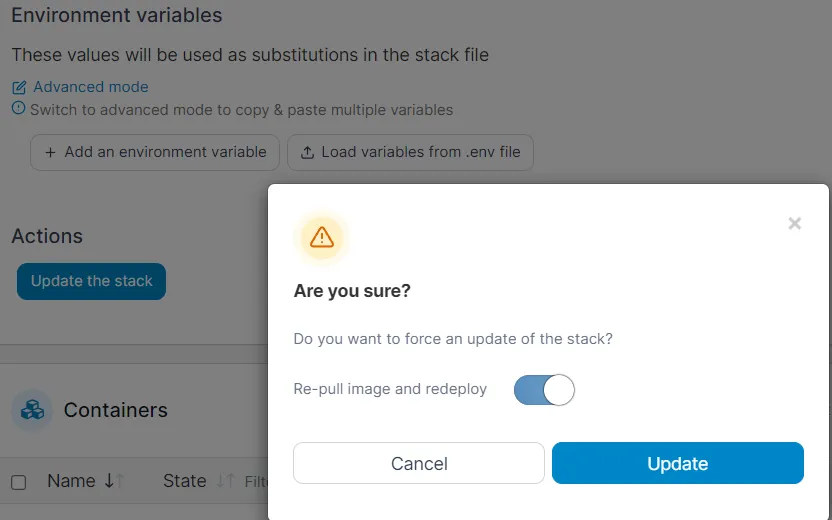
Maintaining Vaultwarden is pleasantly straightforward, requiring minimal ongoing effort to keep the system secure and up-to-date. To apply updates, I simply use Portainer to access the stack editor, press “Update the stack” and activate the option to pull the image. This process downloads and installs the latest version of Vaultwarden without manual intervention. The persistent volume configuration ensures that all passwords and settings are preserved during the update process, making regular updates a low-risk maintenance task.
It’s important to regularly check for updates, as they often contain security improvements and bug fixes that help protect the stored credentials. I’ve set up notifications in GitHub for new releases, which provides automatic alerts when updates are available. Alternatively, Releases can be checked manually by visiting the Vaultwarden GitHub repository. Keeping the software updated is a critical security practice, especially for applications that store sensitive information like passwords.
Advantages Over Cloud-Based Alternatives
Compared to commercial solutions like Synology C2 Password or 1Password, the self-hosted password manager offers several decisive advantages that make it appealing for privacy-conscious users and those who value flexibility. The first and perhaps most significant benefit is full control over data storage – all passwords remain exclusively on my own hardware rather than being stored on third-party servers. This arrangement eliminates concerns about provider data policies, potential breaches of cloud services, or changes in terms of service that might affect data privacy.
Another major advantage is the absence of subscription costs that typically accompany cloud-based password managers. While commercial services often charge monthly or annual fees, particularly for family or team usage, the self-hosted solution has no ongoing costs beyond the electricity used by the NAS that’s likely already running for other purposes. This cost advantage becomes more pronounced when considering multiple users, as Vaultwarden allows unlimited user accounts without additional fees.
The self-hosted approach also offers significantly greater customizability than cloud alternatives. I can configure the environment according to my specific needs, adjust security policies, control user access precisely, and integrate with my existing infrastructure. This flexibility extends to backup strategies, allowing me to incorporate password backups into my existing data protection workflows rather than relying on a provider’s backup policies.
Of course, self-management requires more technical knowledge and some maintenance effort compared to a turnkey cloud solution. Users must handle updates, ensure proper network security, and take responsibility for backups. However, for many users, particularly those already maintaining a home server or NAS, these responsibilities are minimal compared to the benefits of data sovereignty, cost savings, and customization options.
Conclusion and Recommendation
After setting up and using Vaultwarden on my Synology NAS, I’ve found that the password manager runs stably, synchronizes reliably between all my devices, and provides all the functionality I need for comprehensive password management. The system has proven robust even with daily use across multiple platforms, demonstrating that self-hosted password management is not just theoretically possible but practically viable for everyday users with basic technical skills.
Who is this solution suitable for? If you already own a Synology NAS or similar network-attached storage device, are moderately technically proficient, and value having control over your sensitive data, Vaultwarden represents an excellent choice. The minimal system requirements ensure that even older or entry-level NAS models should handle the workload without issues. For users already invested in maintaining their digital independence, adding password management to existing self-hosted services is a natural extension.
If you don’t want to operate your own hardware or prefer a solution with professional support, commercial services like Synology C2 Password, 1Password, or the cloud version of Bitwarden might be more suitable options. These services offer similar functionality without requiring technical setup or ongoing maintenance responsibilities. They trade some degree of data control for convenience, which represents a reasonable choice for many users depending on their priorities and technical comfort level.
However, the most important consideration transcends the specific implementation: using any password manager is vastly superior to not using one at all1. The days of reusing passwords or choosing weak, memorable credentials should be firmly in the past given the increasing sophistication of cyber threats. Whether self-hosted or cloud-based, a password manager enables the use of strong, unique passwords for each service while maintaining convenience – a crucial step in modern digital security.
Additional Resources
How to Create a Secure Password with Vaultwarden
How Secure is Vaultwarden Compared to Cloud Solutions
Which Password Manager is Better: Self-Hosted or Cloud Service?
How to Keep Passwords Secure Outside the Password Manager
How Does Synology C2 Password Differ from Self-Hosted Vaultwarden?
How to Integrate Vaultwarden in Chrome for Automatic Password Entry
How Does Automatic Password Entry Work in Vaultwarden?
Can I Migrate My Passwords from 1Password to Vaultwarden?
How to Use Vaultwarden on an Android Smartphone
What is the Difference Between Bitwarden and Vaultwarden?
How to Set Up Vaultwarden on an iOS Device
How Do My Passwords Synchronize Between All Devices?
What Best Practices are Recommended for Password Management with Vaultwarden?
Related Articles
Calibre on Synology NAS: Manage E-Books with Docker
Install Calibre on your Synology NAS with Docker. Manage and organize your e-books, convert formats, and use Calibre-Web as a web interface on your NAS.
Self-Host Vaultwarden with Docker, Caddy, and Fail2Ban
Host your own password manager with Vaultwarden. Install it as a Docker container, configure Caddy as reverse proxy, and secure access with Fail2Ban. Complete guide.
Crater on Synology NAS: Create Invoices Easily with Docker
Install Crater on your Synology NAS with Docker. Create invoices, track expenses and payments with this free, open-source billing solution for your NAS.
Firefly III - Personal finance manager on Synology (Docker)
Install the free personal finance software Firefly III on your Synology NAS with Docker. Manage income and expenses privately and clearly on your own server.