Setting up Ubuntu Homeserver with Docker (Intel-Nuc)
Set up your Ubuntu homeserver step-by-step: from base configuration to your first Docker containers. The complete guide for beginners. Start building today.

Table of Contents
CAUTION
Please note that initially, I wrote this blog post in German. This translation is for your convenience. Although every effort has been made to ensure accuracy, there may be translation errors. I apologize for any discrepancies or misunderstandings resulting from the translation. I am grateful for any corrections in the comments or via mail.
Introduction
In this comprehensive guide, we will walk through the process of setting up an Ubuntu homeserver using Docker and Docker-Compose. This server will act as the primary device behind your router, handling external requests and performing various other tasks.
Requirements
To get started, ensure you have the following:
- A server capable of running Ubuntu
- A monitor and keyboard for initial installation
- An internet connection (preferably without DS-Lite)
- Your own domain
- A USB stick or SD card with at least 2 GB of free memory
- A client computer (e.g., a Windows PC) to set up the server
- Ideally, a router that supports DDNS and VPN (such as the Fritz!Box 7590) (affiliate link)
Ubuntu Server
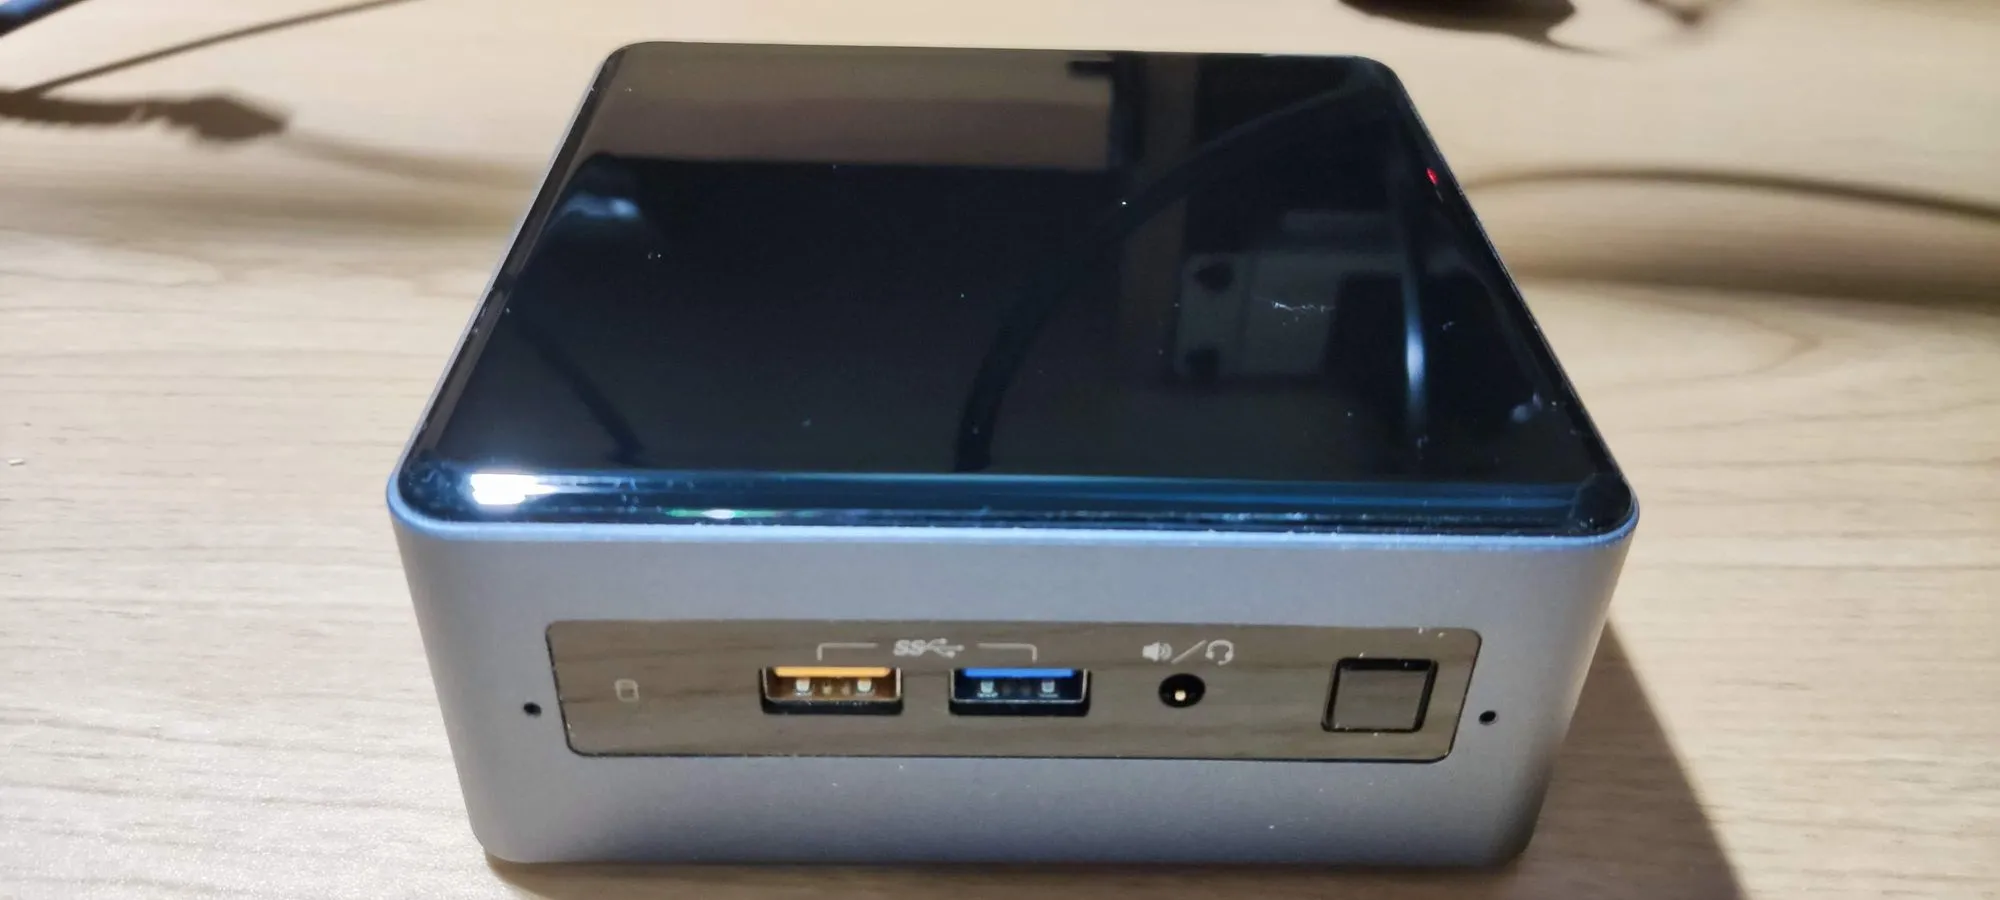
The prerequisite for this guide is a computer that can run Ubuntu. In principle, it can be almost any desktop PC or laptop. However, for this setup, I recommend using an
Intel NUC
(Amazon affiliate link) due to its advantages over other devices.
Intel Nuc
While a Raspberry Pi could be used, an Intel NUC offers several advantages:
- More processing power than a Raspberry Pi 4
- x86_64 CPU instead of ARM, eliminating compatibility issues
- SATA port for easy storage expansion
- Upgradeable RAM
The main drawback of an Intel NUC is the constant fan noise, whereas a Raspberry Pi is passively cooled by default.
Although the initial cost of an Intel NUC is higher, it offers superior performance. For example, an Intel NUC with a J4005 processor, 8 GB RAM, and a 512 GB SSD typically costs around €240.
| Hardware | Price (approx.) |
|---|---|
| Intel NUC* | 135 € |
| Gskill 2x4GB RAM* | 45 € |
| Crucial 500GB SSD](https://amzn.to/3vemQat)\* | 60 € |
The power consumption of an Intel NUC is slightly higher than that of a Raspberry Pi 4. While the Raspberry Pi consumes around 3.5 watts at idle, the Intel NUC with a J4005 processor requires approximately 5.5 watts. I use the Nuc as a proxy manager and DNS server, and it also runs several other services. I measured the power consumption with the Brennenstuhl energy meter (Amazon Affiliate Link). I came up with an average consumption of approx. 10-11 watts. You can further optimize power usage with tools like TLP.
Electricity cost calculator
Calculate your electricity costs using the form below:
Ergebnis
Alternative Options
Of course, many more options could be used. For example, it is possible to convert a computer no longer in use into a server or set up a server yourself.
There are other options available for setting up a homeserver. For instance, you can repurpose an unused computer or build a server from scratch. Older computers may be less energy-efficient, while building your own server allows for customization and potentially higher performance. However, building a server can be expensive. Alternatively, you can consider using (possibly used) PCs with energy-efficient CPUs, such as the small ThinkCentre from Lenovo Amazon Affiliate Link .
Before we proceed, I would like to acknowledge the sources I’ve referenced in this guide. These include the “Silverbox” Repository from ovk by ovk and the Docker-Traefik Repository from htpcBeginner.
Installation
After selecting the device, the next step is to install the operating system.
Preparation
For a NUC, the individual parts may need to be installed, and the BIOS updated (click to expand)
The hard disk and RAM need to be installed into the housing.

Connect the NUC to a monitor and keyboard.
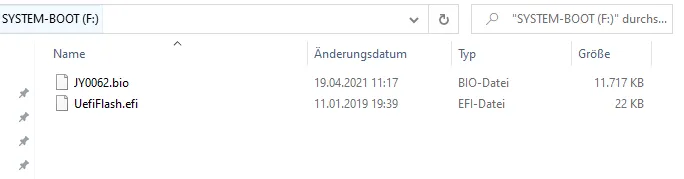
Upon the first boot, install a BIOS update instead of the operating system, if available. To do this, place the BIOS files onto a USB stick.
Follow the manufacturer’s instructions (typically accessed by pressing F2 to enter the BIOS and navigate to BIOS update).
While in the BIOS, disable unnecessary features, such as WLAN.
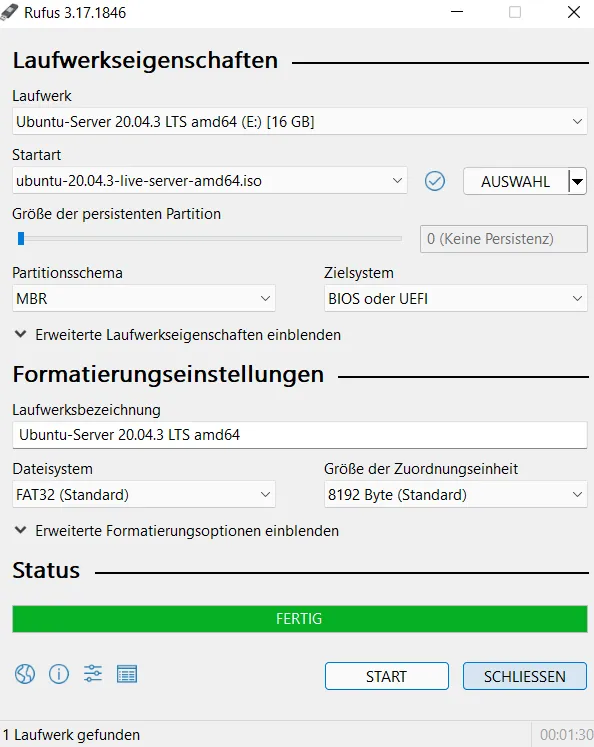
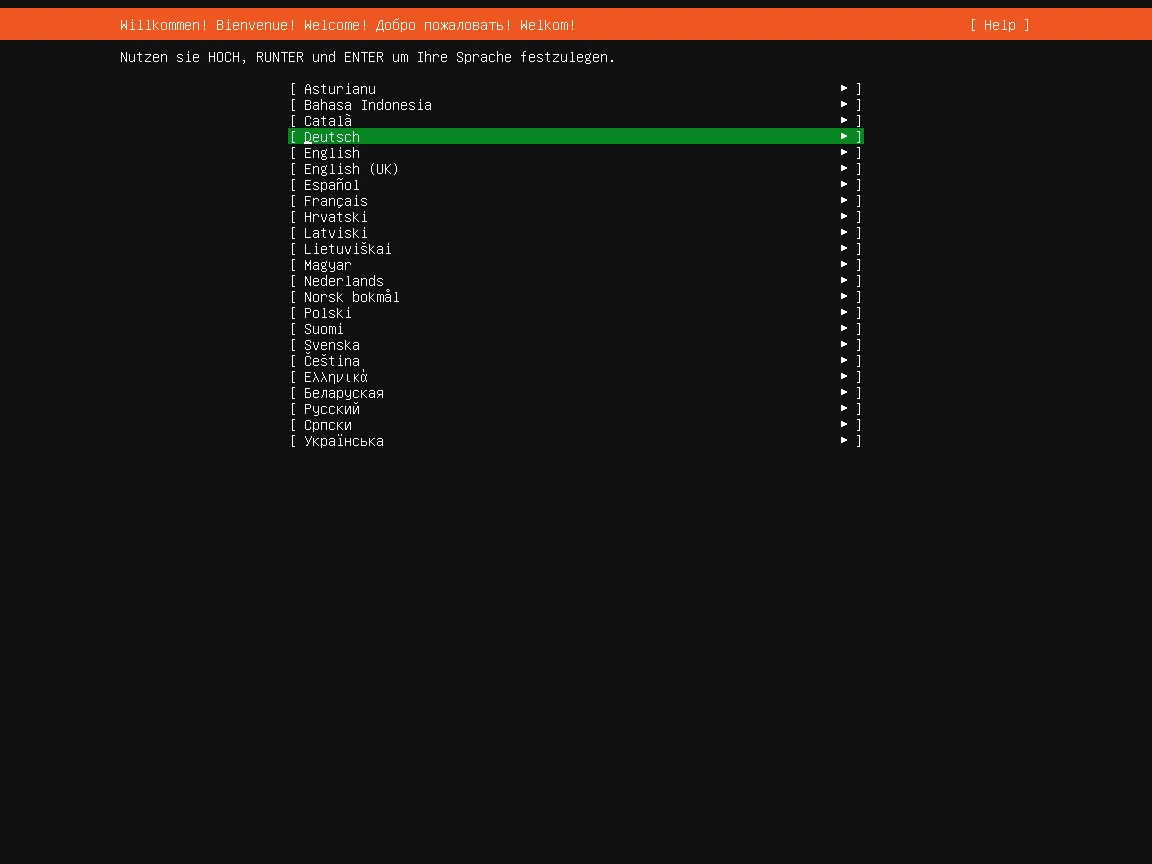
I will be installing Ubuntu 20.04 Server as the operating system. Ubuntu 20.04 (Focal Fossa) will receive updates until 2025. Unlike the desktop version, Ubuntu Server does not have a graphical user interface.
The ISO file must be written to a USB stick using Rufus to create a bootable USB stick.
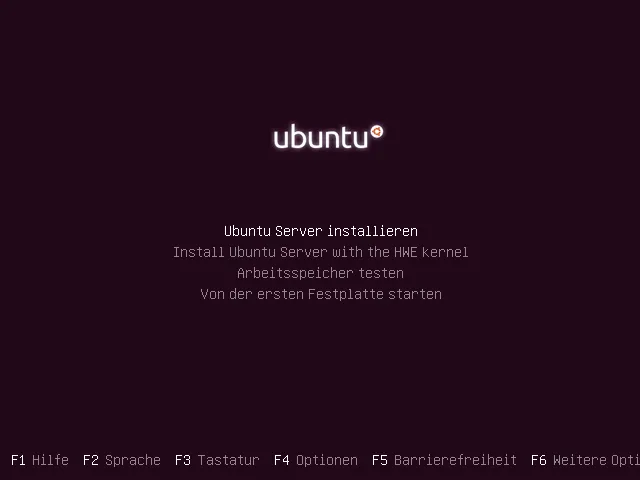
Boot the server using this USB stick; you may need to access the boot menu at startup (on the NUC, the BIOS can be opened by default with F2).
Proceed with the Ubuntu installation.
The installer may prompt you to download a newer version; confirm this when prompted.
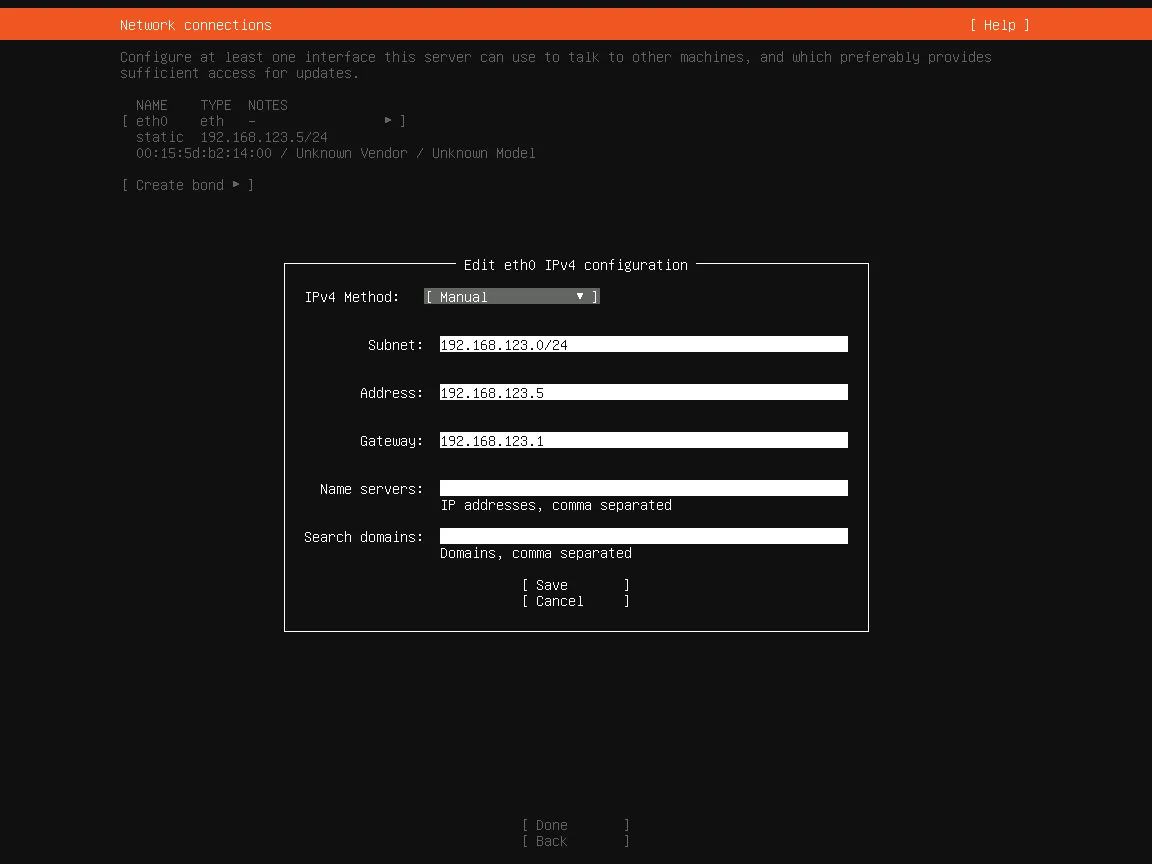
Static IP Address Assignment
In the Internet settings, switch from automatic IP address assignment to manual assignment. This is important for IPv4 since I will not be using IPv6. The subnet typically consists of several network addresses. By default, it is 192.168.0.0/24, 192.168.1.0/24, or 192.168.178.0/24. The gateway is usually the IP address of the modem.
On Windows, find the default gateway and your own IP address by opening the terminal and entering ipconfig. On macOS, use route get default | grep gateway.
If manually entering an address, choose one outside the DHCP range of the router (or another DHCP server). You may need to reduce the DHCP range for this.
On a Fritz!Box, this setting can be found under Network > Network settings > IPv4 settings

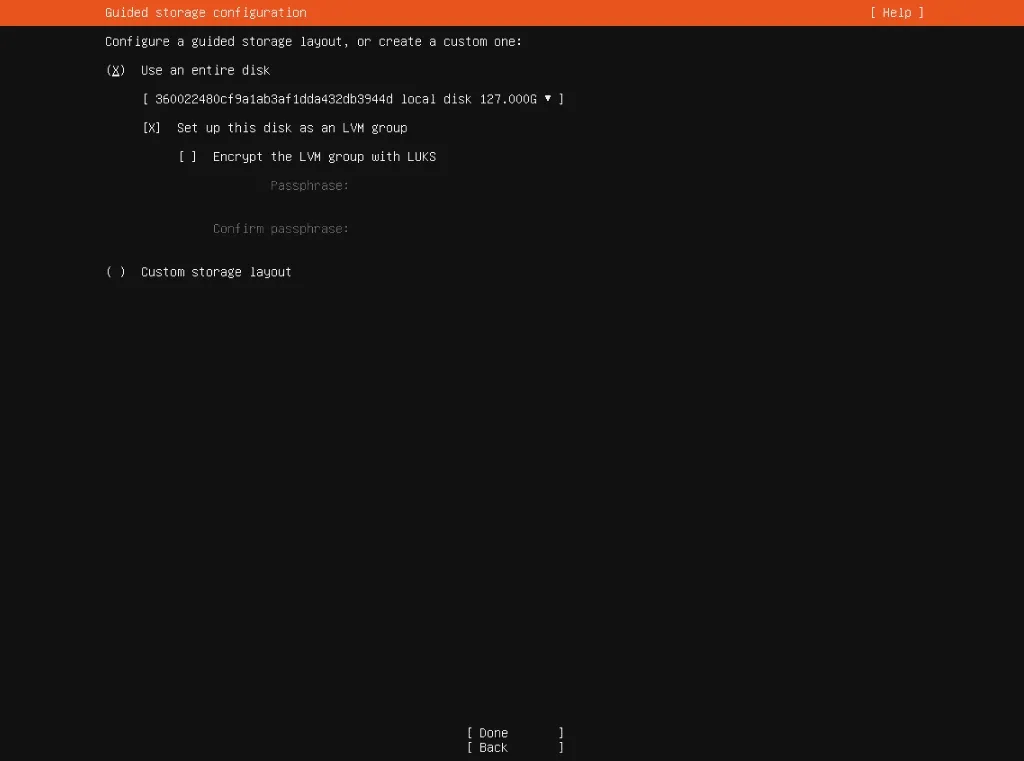
Disk Partitioning
Partition the hard disk using a custom layout:
Some computers have difficulty recognizing boot files not stored at the beginning of the hard disk. Therefore, creating a separate /boot partition at the beginning of the hard disk may be necessary. I opt for a 1 GB ext4 partition for the /boot directory.
Then, I allocate almost all of the free space for an Ubuntu - LVM. This part of the storage can be encrypted if desired. However, I am not certain if encryption provides additional security (except in cases of physical theft).
Within this volume manager, I add two logical volumes: one for swap and another for storing regular data.
The appropriate storage size depends on several factors and cannot be specified in general. Ubuntu Users
The recommended swap size for Ubuntu is calculated below:
Recommended SWAP size:
At least: 0 GB | Maximal: 0 GB
Having more swap than necessary ties up memory. Additionally, it’s important to note that SSD access is slower than RAM, and SSD cells have a limited lifespan. Each write cycle wears out a memory cell, rendering it unusable at some point.
If you require a swap partition larger than twice the size of your RAM, consider upgrading your RAM.
I use the remaining space as an ordinary ext4 partition to be booted under /.
Contrary to my GIF, it is not necessary or useful to assign the entire space to the “Volume Group” for quicker responsiveness to future changes. Also, some GB should be left unallocated.
Conclusion
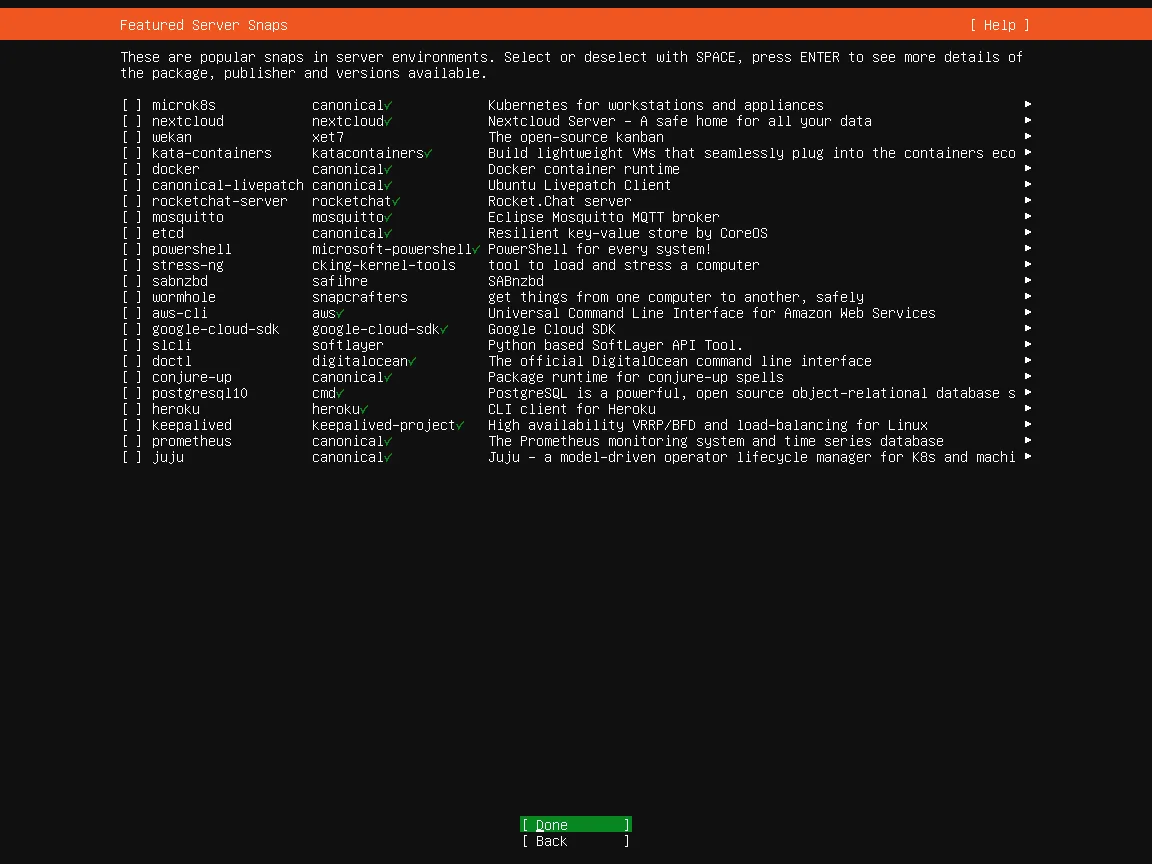
I opt for OpenSSH to be installed automatically as I want remote access to the server later.
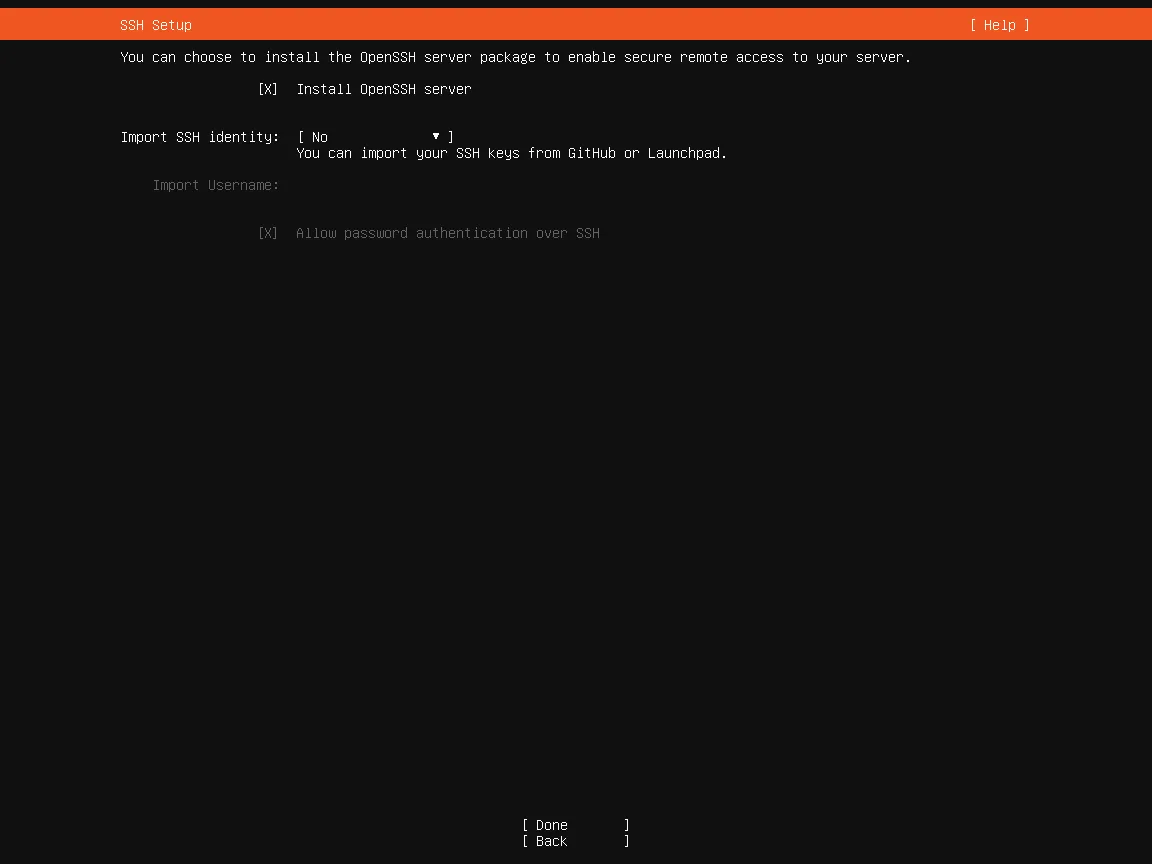
I am not interested in the additional services as I do not need them.
Follow the installer’s instructions. Once installation is complete, remove the bootable storage medium. The server then boots and prompts for the password for hard disk encryption.
Caution! The keyboard layout may have changed by this point. If the password contains special characters or the letters Y and Z, they may have been mapped differently at this point.
If the server indicates that the password is incorrect, try using a keyboard with a Qwerty layout again.

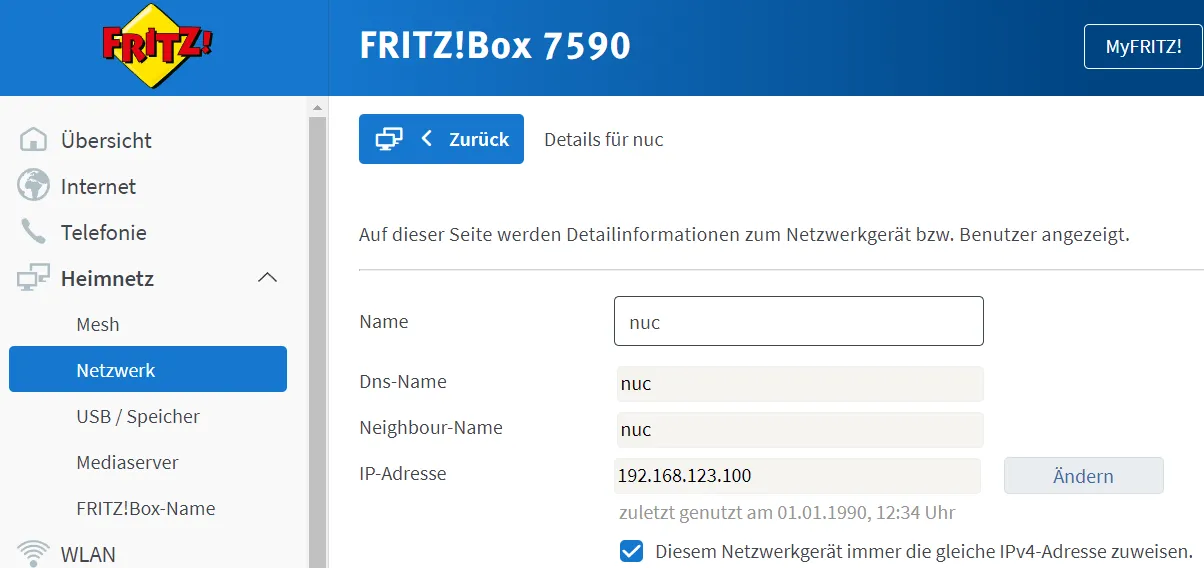
After entering the correct password, the login screen is displayed. Do not log in directly at this point. For security reasons, assign a static IP address to the server in the router.
The installation is now complete.
First steps
Establish SSH connection
You should now be able to connect to the server via SSH. I recommend installing the programs Git (including Git Bash) and VSCode (with the Remote - SSH extension) (both free of charge). Alternatively, you can use the standard terminal.
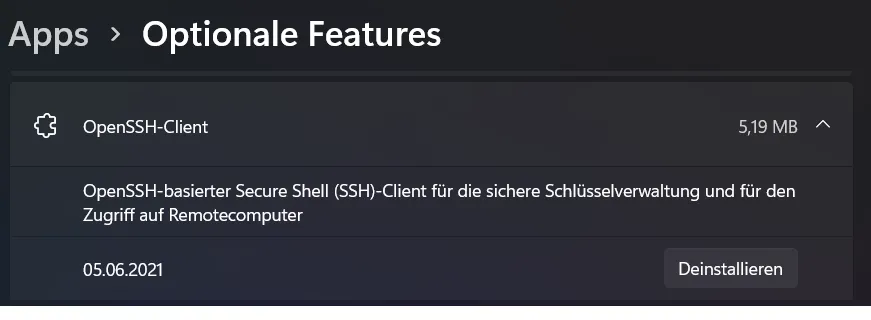
For Windows, you may need to add the OpenSSH client via Control Panel > Apps > Optional Features.
You can then connect in the terminal using the command:
ssh username@ip-addressIn Visual Studio Code, you can connect to the server by clicking on the icon at the bottom left (yellow in my case).
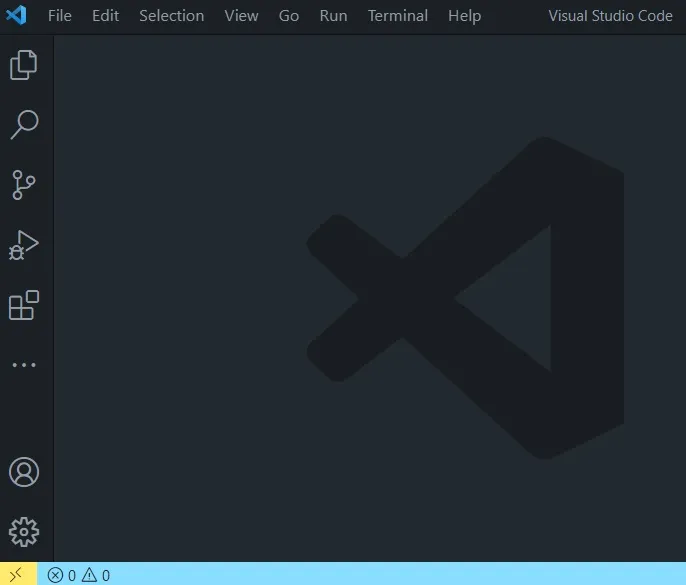
You can also open a terminal there.
Update server
Update the server by running:
apt update
sudo apt update
sudo apt upgrade
If you encounter errors stating that specific URLs cannot be resolved, you may need to change the DHCP server:
sudo ls /etc/netplanThe command ls /etc/netplan outputs a list of all files in the directory /etc/netplan. There should be at least one file in the directory, which we want to customize. You can view more information and hidden files by executing sudo ls -Al /etc/netplan instead.
There should be at least one file in the directory, which we want to customize.
sudo vim /etc/netplan/00-installer-config.yamlVim is a text editor. To exit a file, enter :q. To customize a file, switch to insert mode with I. After editing, leave insert mode with Esc and save and exit with :x or exit without saving with :q! Vim is installed almost everywhere by default.
network:
    ethernets:
        eth0:
            dhcp4: no
            addresses: [192.168.123.5/24]
            gateway4: 192.168.123.1
            nameservers:
                addresses: [8.8.8.8]
    version: 2
Do not change the network name (in my case “eth0”), but adapt the remaining addresses. The server’s address may be different, and the “24” stands for the subnet. The gateway is the address of the router. Enter a DNS server address under Nameservers.addresses, e.g., 8.8.8.8 for Google DNS, 1.1.1.1 for Cloudflare DNS, or 176.9.93.198 for dnsforge.de. This is a temporary setting that we will change later.
sudo netplan apply
sudo apt update
sudo apt upgrade
This time the update should work.
Deactivate IPv6
Although IPv6 is the future, I have encountered issues with it. I had to switch off IPv6 on my last server with Unbound for internal routing to work properly. I’m doing the same this time. I will reconsider IPv6 when forced to do without IPv4.
I deactivate IPv6 on my router under Internet > Access data > IPv6.
Deactivate IPv6 in the router](@/assets/images/blog/ubuntu-homeserver-setup/images/ipv6deaktivieren.png)
Then I deactivate it on my server as well.
sudo vim /etc/default/grubChange the following lines:
GRUB_CMDLINE_LINUX_DEFAULT=""
GRUB_CMDLINE_LINUX=""
to
GRUB_CMDLINE_LINUX_DEFAULT="ipv6.disable=1"
GRUB_CMDLINE_LINUX="ipv6.disable=1"
Apply the changes and reboot:
sudo update-grub
sudo reboot
Note that after the server restarts, you will need to enter the server’s decryption password again before connecting via SSH. Make sure the keyboard layout is set correctly.
Using Dropbear for Remote Server Decryption
To avoid connecting a keyboard and monitor after each reboot, set up Dropbear for remote decryption:
- Install Dropbear
sudo apt install dropbear-initramfsIgnore any irrelevant error messages during installation.
- Change the Dropbear server port:
sudo vim /etc/dropbear-initramfs/configComment out the line
#DROPBEAR_OPTIONS=""(remove the “#” at the beginning of the line).
Add the following options:
DROPBEAR_OPTIONS="-I 180 -j -k -p 2222 -s"- Set up SSH key for authentication
On your client PC, create a new file named “nuc_dropbear” (without file extension) in the ~/.ssh (~ is the home directory) directory. To do this, enable file extensions and display of hidden folders if necessary.
Open a new terminal and run the command
ssh-keygen -t rsa -f ~/.ssh/nuc_dropbearIf prompted to overwrite the file, choose yes. On Windows, use the complete path if the terminal reports that the file does not exist:
ssh-keygen -t rsa -f C:\Users\username\.ssh\nuc_dropbearOpen the generated file with a text editor (not Microsoft Publisher) and copy its content.
- Configure authorized keys on the server:
On the server, run the command
sudo vim /etc/dropbear-initramfs/authorized_keysPaste the content of the ...\nuc_dropbear.pub file into this new file.
- Update initrams.
Rund the command:
sudo update-initramfs -u- Test the configuration
Reboot the server using:
sudo rebootConnect to the server using SSH, but this time use port 2222 and the root user:
ssh -o "HostKeyAlgorithms ssh-rsa" -i ~/.ssh/nuc_dropbear -p 2222 root@ip-addressOnce connected, enter the following command to unlock decryption:
cryptroot-unlockAfter entering the decryption password, the connection will be disconnected. You can then log in again using your regular user account.
Disabling ICMP Forwarding for Enhanced Security
To improve security, you can disable ICMP forwarding by following these steps:
- Open the terminal and run
sudo vim /etc/sysctl.conf. - Comment out the following lines:
net.ipv4.conf.all.accept_redirects = 0
net.ipv4.conf.all.send_redirects = 0
net.ipv4.conf.all.accept_source_route = 0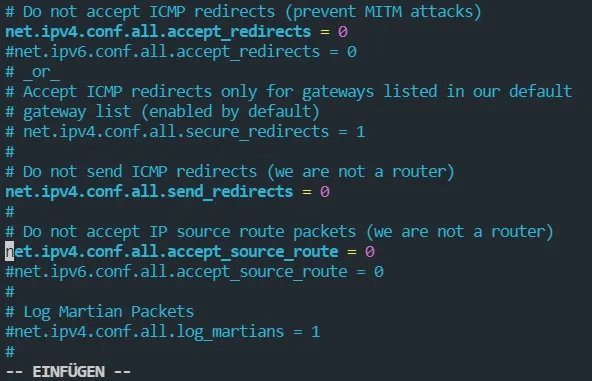
Uninstalling Snapd
To uninstall Snapd, run the following command:
sudo apt autoremove --purge snapdAdding TRIM to the Encrypted Partition
To add the TRIM function to the encrypted partition, follow these steps. However, this is associated with security risks.
If it is imperative that information about unused sectors must not be available to attackers, TRIM must always be disabled. source
- Open the crypttab file:
sudo vim /etc/crypttab- Add “,discard” after the word “luks”.
Removal of Temporary Files
You can move the /tmp folder from the SSD to RAM. This has advantages because RAM is faster and the SSD is not so heavily loaded by many small write operations. You should also be aware of the disadvantages: the RAM can overflow, the files in the directory disappear when restarting and there is a security risk with multi-user systems, as the temporary files could be read by another user. More information on swapping can be found in this wiki.
- Open the fstab file:
sudo vim /etc/fstab- Add the following line:
tmpfs /tmp tmpfs defaults,noatime,nosuid,nodev,mode=1777,size=2G 0 0With this setting, the directory may be a maximum of 2 GB. If you have less than 8 GB RAM installed, 2 GB is too much.
Time to restart the server.
sudo rebootChanging SSH Connection
To create a key for the usual login, similar to Dropbear, and adjust SSH settings, follow these steps:
- On your client computer, create a new SSH key:
ssh-keygen -t rsa -f ~/.ssh/nuc- Copy the content of nuc.pub and paste it to the server:
cd ~
mkdir .ssh
sudo vim ~/.ssh/authorized_keys
With cd I change the directory to ~. With mkdir I create a new directory “.ssh”. I paste the copied content into the new file.
- Adapt the SSH configuration file (if using VSCode):
Host Nuc
  HostName ip-address of the server
  IdentityFile ~/.ssh/nuc
  User username
[...]
Now I should be able to log in without a password.
If this does not work, you can also try copying with cat. First delete the folder on the server.
sudo rm -r ~/.sshThen start a terminal on the client compouter.
cat ~/.ssh/nuc.pub | ssh user@ip-address "mkdir -p ~/.ssh && touch ~/.ssh/authorized_keys && chmod -R go= ~/.ssh && cat >> ~/.ssh/authorized_keys"Now the SSH settings of the server should be adjusted.
sudo vim /etc/ssh/sshd_configYou can change some settings:
# $OpenBSD: sshd_config,v 1.103 2018/04/09 20:41:22 tj Exp $


# This is the sshd server system-wide configuration file.  See
# sshd_config(5) for more information.


# This sshd was compiled with PATH=/usr/bin:/bin:/usr/sbin:/sbin


# The strategy used for options in the default sshd_config shipped with
# OpenSSH is to specify options with their default value where
# possible, but leave them commented.  Uncommented options override the
# default value.


Include /etc/ssh/sshd_config.d/*.conf


#Port 22
AddressFamily any
#ListenAddress 0.0.0.0
#ListenAddress ::


HostKey /etc/ssh/ssh_host_rsa_key
#HostKey /etc/ssh/ssh_host_ecdsa_key
HostKey /etc/ssh/ssh_host_ed25519_key


# Ciphers and keying
#RekeyLimit default none


# Logging
#SyslogFacility AUTH
#LogLevel INFO


# Authentication:


LoginGraceTime 1m
PermitRootLogin no
#StrictModes yes
MaxAuthTries 4
MaxSessions 5


PubkeyAuthentication yes


# Expect .ssh/authorized_keys2 to be disregarded by default in future.
#AuthorizedKeysFile .ssh/authorized_keys .ssh/authorized_keys2


#AuthorizedPrincipalsFile none


#AuthorizedKeysCommand none
#AuthorizedKeysCommandUser nobody


# For this to work you will also need host keys in /etc/ssh/ssh_known_hosts
HostbasedAuthentication no
# Change to yes if you don't trust ~/.ssh/known_hosts for
# HostbasedAuthentication
#IgnoreUserKnownHosts no
# Don't read the user's ~/.rhosts and ~/.shosts files
IgnoreRhosts yes


# To disable tunneled clear text passwords, change to no here!
PasswordAuthentication no
PermitEmptyPasswords no


# Change to yes to enable challenge-response passwords (beware issues with
# some PAM modules and threads)
ChallengeResponseAuthentication no


# Kerberos options
#KerberosAuthentication no
#KerberosOrLocalPasswd yes
#KerberosTicketCleanup yes
#KerberosGetAFSToken no


# GSSAPI options
#GSSAPIAuthentication no
#GSSAPICleanupCredentials yes
#GSSAPIStrictAcceptorCheck yes
#GSSAPIKeyExchange no


# Set this to 'yes' to enable PAM authentication, account processing,
# and session processing. If this is enabled, PAM authentication will
# be allowed through the ChallengeResponseAuthentication and
# PasswordAuthentication.  Depending on your PAM configuration,
# PAM authentication via ChallengeResponseAuthentication may bypass
# the setting of "PermitRootLogin without-password".
# If you just want the PAM account and session checks to run without
# PAM authentication, then enable this but set PasswordAuthentication
# and ChallengeResponseAuthentication to 'no'.
UsePAM yes


AllowAgentForwarding no
AllowTcpForwarding local
#GatewayPorts no
X11Forwarding no
#X11DisplayOffset 10
#X11UseLocalhost yes
#PermitTTY yes
PrintMotd no
#PrintLastLog yes
TCPKeepAlive no
#PermitUserEnvironment no
#Compression delayed
ClientAliveInterval 60
ClientAliveCountMax 2
#UseDNS no
#PidFile /var/run/sshd.pid
#MaxStartups 10:30:100
#PermitTunnel no
#ChrootDirectory none
#VersionAddendum none


# no default banner path
Banner none


# Allow client to pass locale environment variables
AcceptEnv LANG LC_*


# override default of no subsystems
Subsystem sftp /usr/lib/openssh/sftp-server


# Example of overriding settings on a per-user basis
#Match User anoncvs
# X11Forwarding no
# AllowTcpForwarding no
# PermitTTY no
# ForceCommand cvs server
PasswordAuthentication yes
In order for a connection to be established, the server may have to be removed from the known_hosts in the ~/.ssh/ directory on the client PC.
Docker Installation
To install Docker, follow these steps:
Installation of Docker Engine
Open the terminal and run the following commands:
sudo apt install ca-certificates curl gnupg lsb-release
curl -fsSL https://download.docker.com/linux/ubuntu/gpg | sudo gpg --dearmor -o /usr/share/keyrings/docker-archive-keyring.gpg
echo \
  "deb [arch=$(dpkg --print-architecture) signed-by=/usr/share/keyrings/docker-archive-keyring.gpg] https://download.docker.com/linux/ubuntu \
  $(lsb_release -cs) stable" | sudo tee /etc/apt/sources.list.d/docker.list > /dev/null
sudo apt update
sudo apt-get install docker-ce docker-ce-cli containerd.io
Installation of Docker Compose
To install Docker Compose, execute the following commands:
sudo mkdir -p /usr/local/lib/docker/cli-plugins/
sudo curl -SL https://github.com/docker/compose/releases/download/v2.23.3/docker-compose-linux-x86_64 -o /usr/local/lib/docker/cli-plugins/docker-compose
sudo chmod +x /usr/local/lib/docker/cli-plugins/docker-compose
You can check for a newer version on the release page in Github. If a newer version is available, make sure to update the URL accordingly.
Testing Docker
To check if Docker is working properly, run the following command:
sudo docker run hello-worldTo verify the Docker Compose version, use the command:
docker compose versionIf no errors occur, you can delete the container and image you just created with the following commands:
sudo docker container prune
sudo docker image prune -a
DNS
To manage DNS on your server, we will use AdGuard Home.
Installation of AdGuard Home
First, we will install AdGuard Home, an alternative to pi-hole, NextDNS or Blocky. We will run AdGuard Home via Docker. Let’s create a new directory for our containers:
sudo mkdir -p /root/docker/containers
sudo chmod 700 /root/docker/containers
sudo mkdir /root/docker/containers/adguard
sudo chmod 700 /root/docker/containers/adguard
Next, create a directory for the data:
sudo mkdir -p /srv/adguard/data
sudo mkdir /srv/adguard/data/work
sudo mkdir /srv/adguard/data/conf
sudo chmod -R 750 /srv/adguard
Now, create a new Docker Compose file:
sudo vim /root/docker/containers/adguard/docker-compose.ymlAdd the following content to the file:
version: "3"

services:
    adguard:
        image: adguard/adguardhome:latest
        container_name: adguard
        restart: unless-stopped
        ports:
            - "53:53/tcp"
            - "53:53/udp"
            - "80:80/tcp"
            - "3000:3000/tcp"
        volumes:
            - /srv/adguard/data/work:/opt/adguardhome/work
            - /srv/adguard/data/conf:/opt/adguardhome/conf
        environment:
            TZ: Europe/Berlin
Start the container by running the following command:
sudo docker compose -f /root/docker/containers/adguard/docker-compose.yml up -dYou might encounter an error stating that port 53 is already in use.
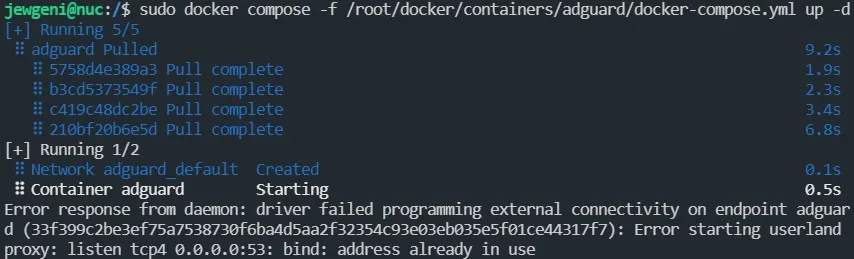
To resolve this, you can check which ports are currently in use with the command sudo netstat -lnptu. . Port 53 is usually used by systemd-resolv. To change this, open the resolved.conf file:
sudo vim /etc/systemd/resolved.confComment out the line #DNSStubListener=yes and change it to DNSStubListener=no. Then restart the resolver and the container.
sudo systemctl restart systemd-resolved
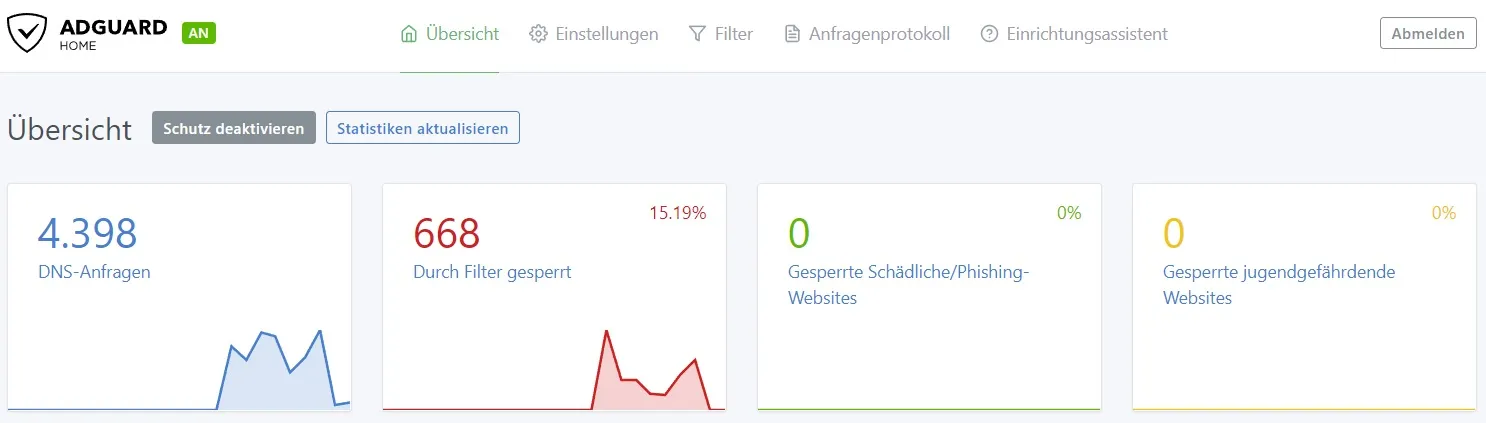
sudo docker compose -f /root/docker/containers/adguard/docker-compose.yml up -dIf no errors occur, you can try accessing the AdGuard Home dashboard via a web browser using port 3000 (e.g., 192.168.123.150:3000). You should be greeted by the installer.
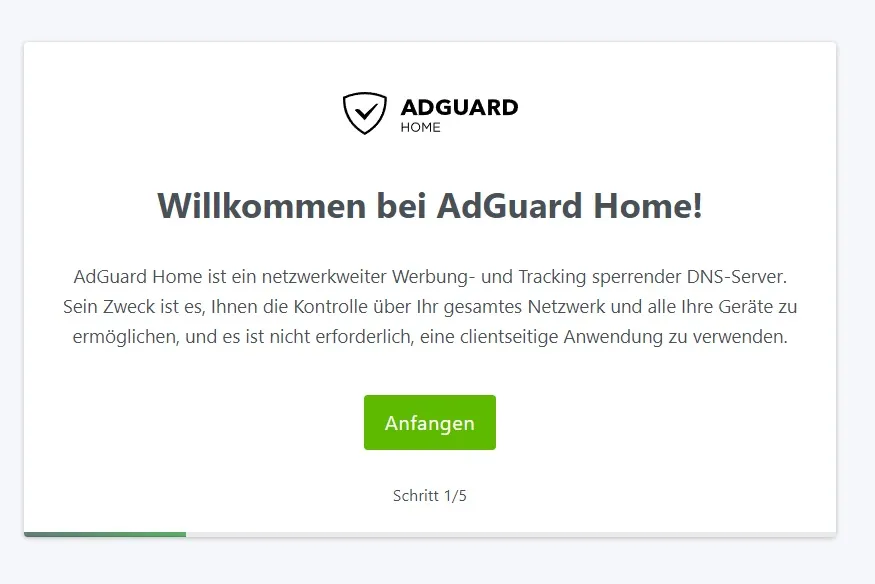
I leave the second page and create a user account on the third. I am not making any other settings but logging in with the account I have just created.
Under Filter > DNS blacklist, you can add blacklists by selecting from the predefined options. After selecting the desired lists, click “Check for updates”. Consider adding a whitelist as well. You can find whitelists online, such as the Whitelist from Hl2Guide or a shorter one available in my repository.
To make changes to the AdGuard container, stop it and edit the compose file:
sudo docker compose -f /root/docker/containers/adguard/docker-compose.yml down
sudo vim /root/docker/containers/adguard/docker-compose.yml
Update the file as follows:
version: "3"

services:
    adguard:
        image: adguard/adguardhome:latest
        container_name: adguard
        restart: unless-stopped
        ports:
            - "53:53/tcp"
            - "53:53/udp"
            - "85:80/tcp"
        volumes:
            - /srv/adguard/data/work:/opt/adguardhome/work
            - /srv/adguard/data/conf:/opt/adguardhome/conf
        environment:
            TZ: Europe/Berlin
Remove port 3000 and change the public port from 80 to 85 (since port 80 will be used for other services later).
Next, modify the resolver configuration by creating a new file:
sudo mkdir /etc/systemd/resolved.conf.d
sudo vim /etc/systemd/resolved.conf.d/adguard.conf
Add the following text to the new file:
[Resolve]
DNS=127.0.0.1
DNSStubListener=no
Activate this configuration:
mv /etc/resolv.conf /etc/resolv.conf.backup
ln -s /run/systemd/resolve/resolv.conf /etc/resolv.conf
sudo systemctl restart systemd-resolved
Finally, update the previously modified file:
sudo vim /etc/netplan/00-installer-config.yamlSet the nameserver to 127.0.0.1.
Apply the changes:
sudo netplan applyStart the container:
sudo docker compose -f /root/docker/containers/adguard/docker-compose.yml up -dThe AdGuard web interface should now be accessible on port 85.
Router Settings
To ensure that the DNS server is used by devices on your network, update the settings on your router.
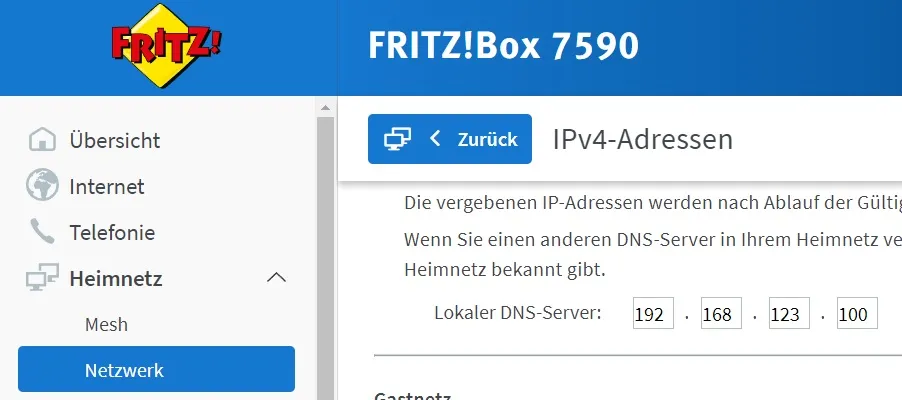
On a Fritz!Box router, you can find this setting under Network > Network settings > IPv4 addresses. Enter the IP address of your server there.
Additionally, set the IP address of the AdGuard server as your preferred DNS server under Internet > Access data > DNS server.
The AdGuard dashboard should now show that the server has processed DNS queries.
Setting Up a Proxy Server
Setting up a proxy server can enhance your network’s security and performance. You can choose between Traefik, Caddy, Nginx and Apache and others. Here’s a step-by-step guide to help you set up the Nginx Proxy Manager on your server.
Installation of Nginx Proxy Manager
First, create a new directory for the Nginx Proxy Manager Nginx Proxy Manager container and its data:
sudo mkdir /srv/nginxproxymanager
sudo mkdir /srv/nginxproxymanager/data
sudo mkdir /srv/nginxproxymanager/certs
sudo mkdir /srv/nginxproxymanager/db
sudo chmod -R 750 /srv/nginxproxymanager
sudo mkdir /root/docker/containers/nginxproxymanager
sudo chmod 700 /root/docker/containers/nginxproxymanager
Next, create a network for the proxy server:
sudo docker network create npmThen, create a folder for your Docker Secrets:
sudo mkdir /root/docker/secrets/
sudo chown root:root /root/docker/secrets/
sudo chmod 600 /root/docker/secrets/
Store your password and root password for the database in the Docker Secrets:
sudo bash -c 'echo $(openssl rand -base64 32) > /root/docker/secrets/npm-password.txt'
sudo bash -c 'echo $(openssl rand -base64 32) > /root/docker/secrets/npm-root-password.txt'
Now, create the Docker Compose file:
sudo vim /root/docker/containers/nginxproxymanager/docker-compose.ymlversion: "3.7"
networks:
npm:
name: npm
internal:
external: false
secrets:
npm-password:
file: /root/docker/secrets/npm-password.txt
npm-root-password:
file: /root/docker/secrets/npm-root-password.txt
services:
npm-app:
image: "jc21/nginx-proxy-manager"
container_name: npm-app
restart: unless-stopped
ports:
- "80:80"
- "443:443"
- "81:81"
environment:
DB_MYSQL_HOST: "npm-db"
DB_MYSQL_PORT: 3306
DB_MYSQL_USER: "npm"
DB_MYSQL_NAME: "npm"
DB_MYSQL_PASSWORD__FILE: /run/secrets/npm-password
DISABLE_IPV6: "true"
networks:
- npm
- internal
volumes:
- /srv/nginxproxymanager/data:/data
- /srv/nginxproxymanager/certs:/etc/letsencrypt
secrets:
- npm-password
npm-db:
image: "jc21/mariadb-aria"
container_name: npm-db
restart: unless-stopped
environment:
MYSQL_ROOT_PASSWORD__FILE: /run/secrets/npm-root-password
MYSQL_DATABASE: "npm"
MYSQL_USER: "npm"
MYSQL_PASSWORD__FILE: /run/secrets/npm-password
networks:
- internal
volumes:
- /srv/nginxproxymanager/db:/var/lib/mysql
secrets:
- npm-password
- npm-root-passwordStart the Docker Compose stack:
sudo docker compose -f /root/docker/containers/nginxproxymanager/docker-compose.yml up -dVerify the setup:
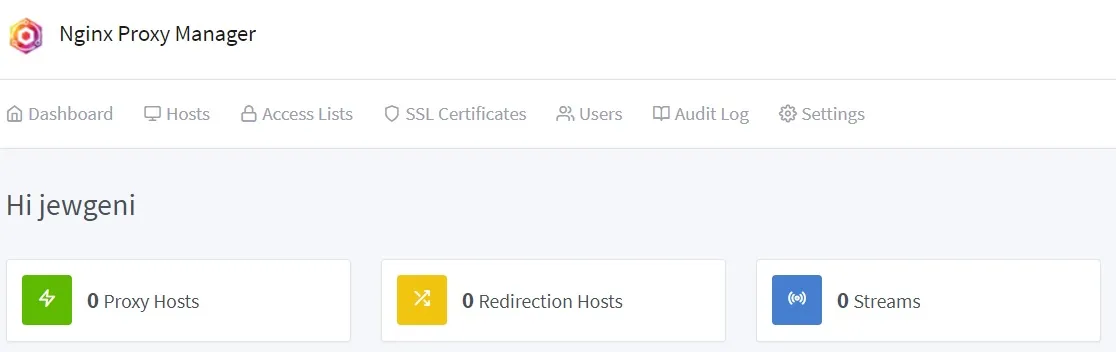
sudo docker logs npm-appIf everything is working, log in using the server’s IP address and port 81 with the standard account:
Username: admin@example.com
Password: changeme
You should now land in the dashboard.
DDNS Setup
The next step is to set up a domain routed to the home network. If your router supports dynamic DNS adjustments, configure it; otherwise, follow these steps.
Domain Update Script
Purchase a domain from a provider like netcup (Affiliate Link). Here, a .de domain costs 5 Euros per year permanently.
. Obtain an API key and API password from netcup’s CCP.
We need PHP to update the DNS entries if we do not have web space at Netcup. Instead of executing the script from Lars-Sören Steck directly, put it in a Docker container.
sudo mkdir /root/docker/containers/ddns
sudo chmod 700 /root/docker/containers/ddns
sudo git clone https://github.com/stecklars/dynamic-dns-netcup-api /root/docker/containers/ddns/script
sudo vim /root/docker/containers/ddns/Dockerfile
Now we create the Dockerfile.
FROM php:8.1-cli
COPY ./script .
ENTRYPOINT ["php", "./update.php"]
It is short, but should do the trick.
The config must then be adapted.
sudo cp /root/docker/containers/ddns/script/config.dist.php /root/docker/containers/ddns/script/config.php
sudo vim /root/docker/containers/ddns/script/config.php
Adjust the configuration with your customer number, API key, and API password. The line with DOMAINLIST must look something like this at the end:
...
define('DOMAINLIST', 'mydomain.com: *');
...
This updates all subdomains of the domain meinedomain.com that do not have a more specific assignment.
Create the Docker Compose file
sudo vim /root/docker/containers/ddns/docker-compose.ymlversion: "3.7"
services:
ddns:
container_name: ddns
build:
context: /root/docker/containers/ddns
dockerfile: Dockerfile
image: ddnsWe test the container and look at the logs:
sudo docker compose -f /root/docker/containers/ddns/docker-compose.yml up --build
Automatic DDNS update
The container must now be started automatically.
sudo vim /etc/systemd/system/ddns.service[Unit]
Description=Dynamic DNS Service
Requires=docker.service
After=docker.service
[Service]
Type=oneshot
ExecStart=/usr/bin/docker compose -f /root/docker/containers/ddns/docker-compose.yml up --buildHere, too, we test whether everything works:
sudo systemctl daemon-reload
sudo systemctl start ddns.service
sudo systemctl status ddns.service
The log should show that the IP address has not been updated but has remained unchanged. Now, you can create a timer that restarts the container at a specific interval.
sudo vim /etc/systemd/system/ddns.timer[Unit]
Description=Dynamic DNS Service
[Timer]
OnBootSec=5min
OnUnitInactiveSec=30min
[Install]
WantedBy=timers.targetOnUnitInacticeSec defines a timer relative to the time at which the unit that the timer activates was last deactivated. This means the container is restarted if it has not been active in the last 30 minutes.
sudo systemctl enable ddns.timer
sudo systemctl start ddns.timer
sudo systemctl status ddns.timer
sudo systemctl list-timers
Routing
Our domain now points to the public IP address of our home network. However, the request still needs to be forwarded to the proxy.
Release HTTP and HTTPS
Therefore, we set up port forwarding. Port 80 and 443 must be forwarded to the server in the router.
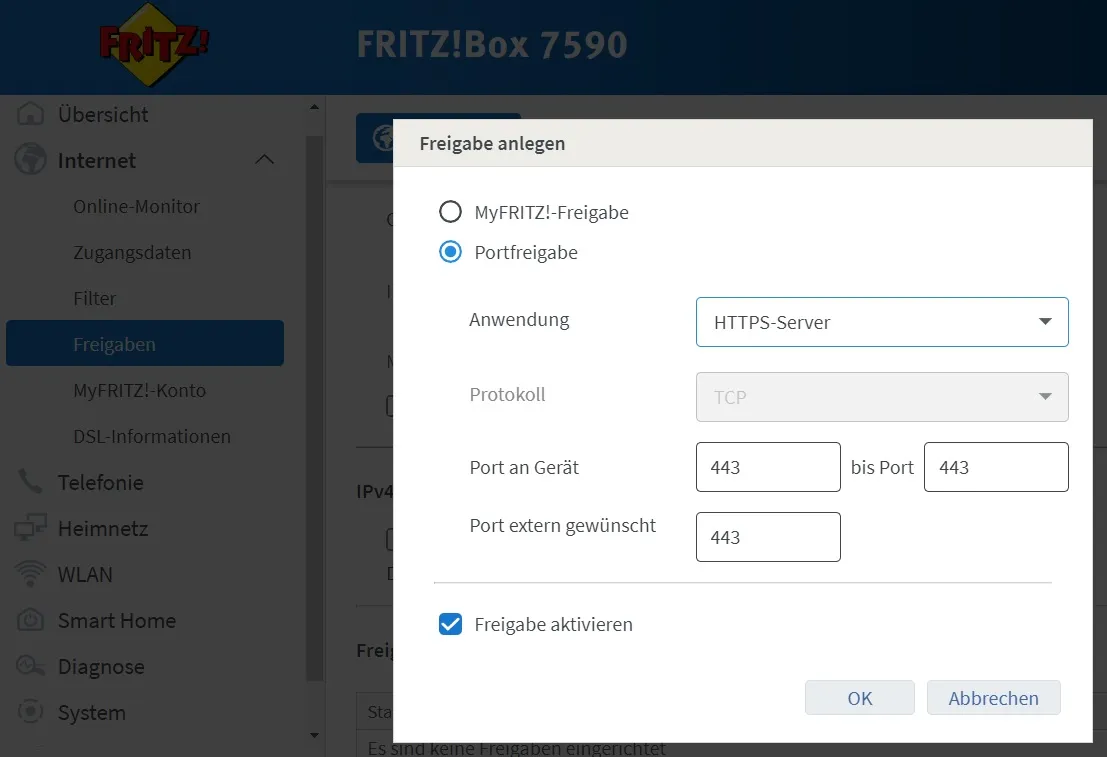
This causes all http and https requests to land on port 80/443 on the server. They are then forwarded there by the proxy.
Local routing
When I am in my home network, I would like the request to a subdomain not to be blocked. I would also prefer a direct route to the server.
DNS rebind protection can be disabled in the router.

I then created a user-defined filter rule in Adguard.
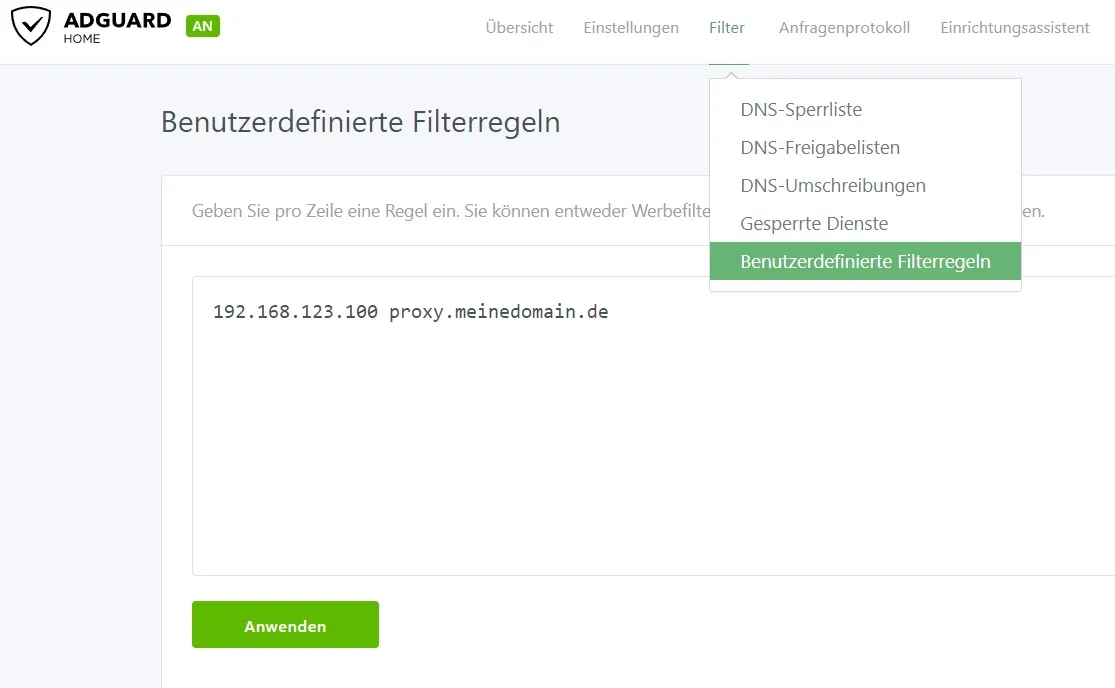
Alternatively, this can also be achieved with a DNS rewrite. This method is more advantageous if the domain is not used elsewhere.

The rule ensures that all subdomain requests are forwarded directly to the server. If we use filter rules, we can set that not only proxy.domain.de but also adguard.domain.de are forwarded to the server’s internal domain.
We can either enter this as follows:
192.168.178.100 adguard.domain.de proxy.domain.deOr as follows:
192.168.178.100 adguard.domain.de
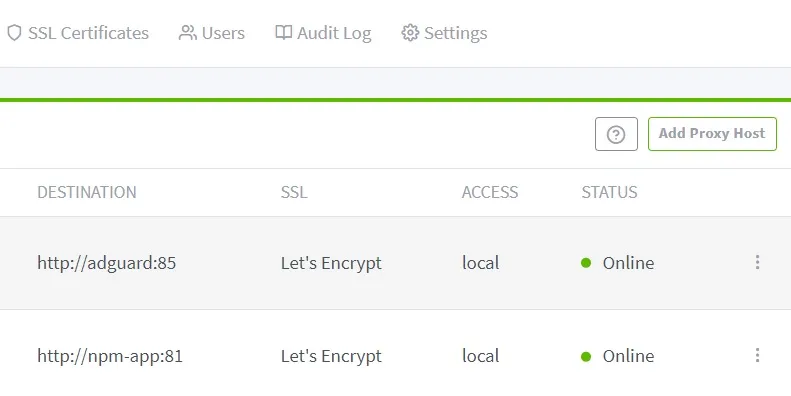
192.168.178.100 proxy.domain.deProxy Host
We call up the Nginx Proxy Manager dashboard again. First we want a new filter rule to allow only local access.
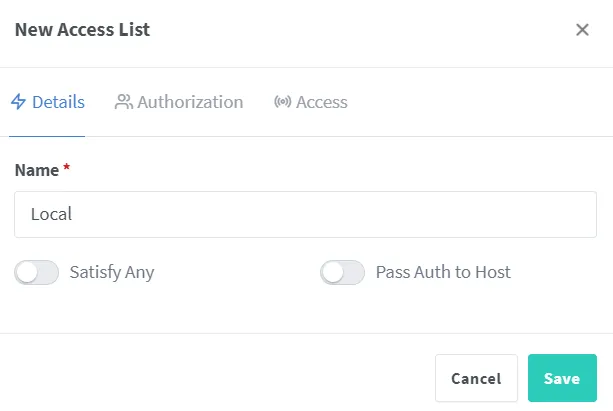
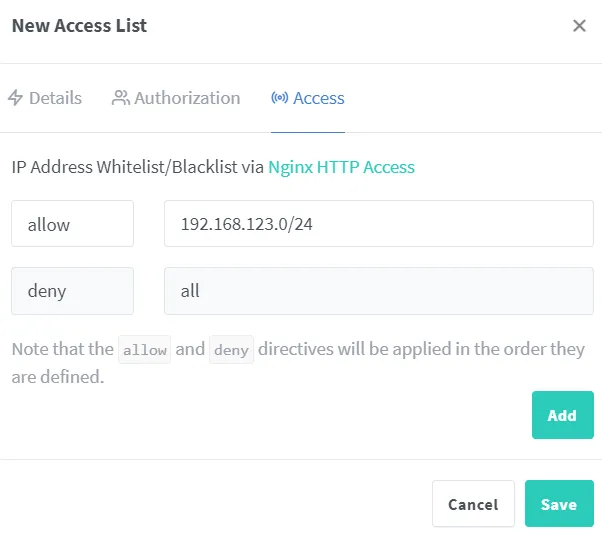
The only setting that should be changed is the filter by IP address. The request should be rejected if the client’s IP address is outside the home network. The subnet must be adapted to your own network.
We then need a new proxy host.
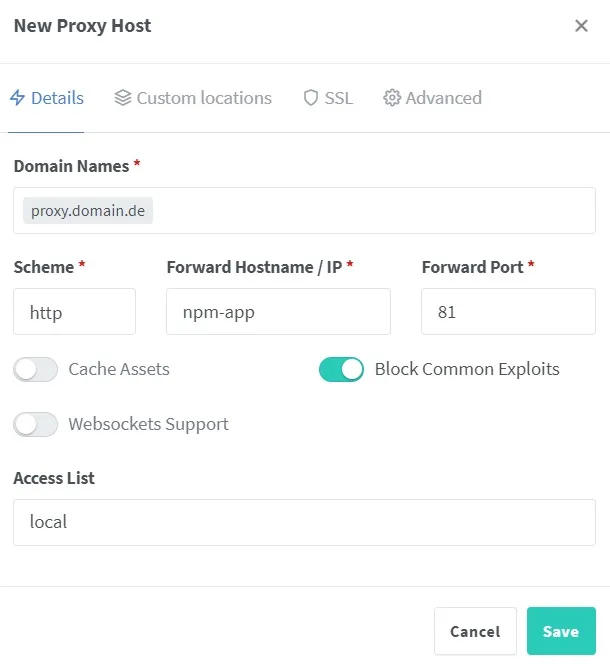
We forward the requests to the host “npm-app”. The entry must be adjusted if the host was named differently in the Docker-Compose file. The filter rule just created can be selected under the Access List. After the proxy host has been created, it must be edited again. This time in the SSL area. Here, you can select that a new certificate should be issued. We also want to force SSL.
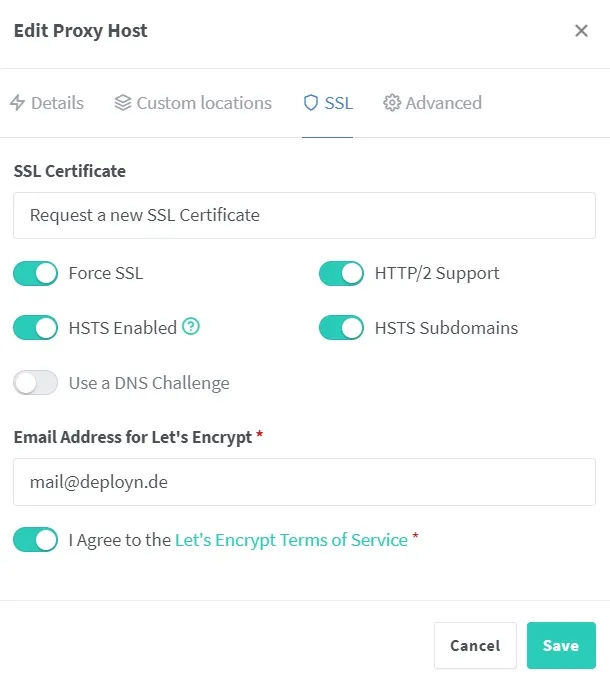
We test whether this works by calling up the domain specified in the browser. Then, we try this on a cell phone not connected to the WLAN. The expected behavior is now that the Nginx Proxy Manager opens on the device in the network. In addition, the domain is now redirected to https://, and a lock symbol appears in the address bar. As soon as we test it with a device outside the network, the error 403 occurs.
We also set up a proxy host for Adguard using the same principle.
As soon as we test the functionality, we realize it does not work. One reason is that Adguard listens internally on port 80, not 85 (unless you changed it during setup). Secondly, Adguard is located on an isolated network. Therefore, we need to change the port from 85 to 80 in the Proxy Manager and adjust the network in the Docker-Compose.yml. To do this, we stop the container and edit the Compose file.
sudo docker compose -f /root/docker/containers/adguard/docker-compose.yml down
sudo vim /root/docker/containers/adguard/docker-compose.ymlversion: "3"
networks:
npm:
name: npm
services:
adguard:
image: adguard/adguardhome:latest
container_name: adguard
restart: unless-stopped
ports:
- "53:53/tcp"
- "53:53/udp"
volumes:
- /srv/adguard/data/work:/opt/adguardhome/work
- /srv/adguard/data/conf:/opt/adguardhome/conf
environment:
TZ: Europe/Berlin
networks:
- npmThe publication of the public port 85 for forwarding to the internal port 80 is no longer necessary. Adguard Home can now only be reached via the configured domain, no longer directly via the IP address, including the port.
sudo docker compose -f /root/docker/containers/adguard/docker-compose.yml up -dNow the proxy host should work. We can also change the Nginx Proxy Manager itself.
sudo docker compose -f /root/docker/containers/nginxproxymanager/docker-compose.yml down
sudo vim /root/docker/containers/nginxproxymanager/docker-compose.ymlversion: "3.7"
networks:
npm:
name: npm
internal:
external: false
secrets:
npm-password:
file: /root/docker/secrets/npm-password.txt
npm-root-password:
file: /root/docker/secrets/npm-root-password.txt
services:
npm-app:
image: "jc21/nginx-proxy-manager"
container_name: npm-app
restart: unless-stopped
ports:
- "80:80"
- "443:443"
environment:
DB_MYSQL_HOST: "npm-db"
DB_MYSQL_PORT: 3306
DB_MYSQL_USER: "npm"
DB_MYSQL_NAME: "npm"
DB_MYSQL_PASSWORD__FILE: /run/secrets/npm-password
DISABLE_IPV6: "true"
networks:
- npm
- internal
volumes:
- /srv/nginxproxymanager/data:/data
- /srv/nginxproxymanager/certs:/etc/letsencrypt
secrets:
- npm-password
npm-db:
image: "jc21/mariadb-aria"
container_name: npm-db
restart: unless-stopped
environment:
MYSQL_ROOT_PASSWORD__FILE: /run/secrets/npm-root-password
MYSQL_DATABASE: "npm"
MYSQL_USER: "npm"
MYSQL_PASSWORD__FILE: /run/secrets/npm-password
networks:
- internal
volumes:
- /srv/nginxproxymanager/db:/var/lib/mysql
secrets:
- npm-password
- npm-root-passwordsudo docker compose -f /root/docker/containers/nginxproxymanager/docker-compose.yml up -dEverything is set up, your proxy manager should be ready to use.
Firewall Configuration with UFW
Set up UFW rules to allow necessary traffic and restrict access to specific ports and IP ranges.
sudo ufw limit ssh comment "SSH"
sudo ufw allow proto tcp from any to any port 80 comment "Nginx Proxy Manager"
sudo ufw allow proto tcp from any to any port 443 comment "Nginx Proxy Manager"
sudo ufw route allow proto tcp from any to any port 80 comment "Nginx Proxy Manager"
sudo ufw route allow proto tcp from any to any port 443 comment "Nginx Proxy Manager"
sudo ufw allow proto tcp from 192.168.123.0/24 to any port 53 comment "DNS TCP"
sudo ufw allow proto udp from 192.168.123.0/24 to any port 53 comment "DNS UDP"
sudo ufw route allow proto tcp from 192.168.123.0/24 to any port 53 comment "DNS TCP"
sudo ufw route allow proto udp from 192.168.123.0/24 to any port 53 comment "DNS UDP"
sudo ufw logging off
sudo ufw enable
Of course, the subnet for port 53 must also be adapted here.
But Docker doesn’t care about these rules, as soon as you enable a port above this, the firewall is bypassed. That’s why I continue to follow the instructions from this repository.
sudo vim /etc/ufw/after.rulesInsert here at the end of the file:
# BEGIN UFW AND DOCKER
*filter
:ufw-user-forward - [0:0]
:ufw-docker-logging-deny - [0:0]
:DOCKER-USER - [0:0]
-A DOCKER-USER -j ufw-user-forward


-A DOCKER-USER -j RETURN -s 10.0.0.0/8
-A DOCKER-USER -j RETURN -s 172.16.0.0/12
-A DOCKER-USER -j RETURN -s 192.168.0.0/16


-A DOCKER-USER -p udp -m udp --sport 53 --dport 1024:65535 -j RETURN


-A DOCKER-USER -j ufw-docker-logging-deny -p tcp -m tcp --tcp-flags FIN,SYN,RST,ACK SYN -d 192.168.0.0/16
-A DOCKER-USER -j ufw-docker-logging-deny -p tcp -m tcp --tcp-flags FIN,SYN,RST,ACK SYN -d 10.0.0.0/8
-A DOCKER-USER -j ufw-docker-logging-deny -p tcp -m tcp --tcp-flags FIN,SYN,RST,ACK SYN -d 172.16.0.0/12
-A DOCKER-USER -j ufw-docker-logging-deny -p udp -m udp --dport 0:32767 -d 192.168.0.0/16
-A DOCKER-USER -j ufw-docker-logging-deny -p udp -m udp --dport 0:32767 -d 10.0.0.0/8
-A DOCKER-USER -j ufw-docker-logging-deny -p udp -m udp --dport 0:32767 -d 172.16.0.0/12


-A DOCKER-USER -j RETURN


-A ufw-docker-logging-deny -m limit --limit 3/min --limit-burst 10 -j LOG --log-prefix "[UFW DOCKER BLOCK] "
-A ufw-docker-logging-deny -j DROP


COMMIT
# END UFW AND DOCKER
sudo systemctl restart ufwIf an error occurs, you can check what happened.
sudo systemctl status ufwIf there is an error with the line containing *filter, the COMMIT at the original end of the file must be changed to #COMMIT.
The firewall should now work.
Docker Socket Proxy for Enhanced Security
To increase security a little more, I create a Docker socket proxy. The apps that need access to the socket can connect to this instead of using the main one.
Create a Docker network for the socket proxy.
sudo docker network create socket_proxySet up a Docker Compose file for the socket proxy container.
sudo mkdir /root/docker/containers/socketproxy/
sudo chmod 700 /root/docker/containers/socketproxy/
sudo vim /root/docker/containers/socketproxy/docker-compose.ymlversion: "3.7"
networks:
socket_proxy:
name: socket_proxy
services:
socketproxy:
image: "fluencelabs/docker-socket-proxy"
container_name: socketproxy
restart: unless-stopped
networks:
- socket_proxy
ports:
- "127.0.0.1:2375:2375"
volumes:
- /var/run/docker.sock:/var/run/docker.sock
privileged: true
environment:
- LOG_LEVEL=info
# 0: No access to the API.
# 1: Access to the API.
- EVENTS=1
- PING=1
- VERSION=1
- AUTH=1
- SECRETS=0
- POST=1
- BUILD=1
- COMMIT=1
- CONFIGS=1
- CONTAINERS=1
- DISTRIBUTION=1
- EXEC=1
- IMAGES=1
- INFO=1
- NETWORKS=1
- NODES=0
- PLUGINS=0
- SERVICES=1
- SESSION=0
- SWARM=0
- SYSTEM=0
- TASKS=1
- VOLUMES=1It is important not to release port 2375. If you want to allow various other devices in the network to use the socket proxy (then - 127.0.0.1:2375:2375 must also be changed to - 2375:2375), you should make sure that the port can really only be reached by the devices that you expect. The firewall may then have to be configured more restrictively.
For me it is enough that at least a few functions cannot be reached.
sudo docker compose -f /root/docker/containers/socketproxy/docker-compose.yml up -dUpdate the firewall rules to allow access to the socket proxy port.
sudo ufw allow proto tcp from 127.0.0.1 to any port 2375 comment "Docker Socket"
sudo ufw route allow proto tcp from 127.0.0.1 to any port 2375 comment "Docker Socket"
sudo ufw reload
sudo ufw enable
Setting up a Dashboard with Flame
Next, having a dashboard from which the internal services or other bookmarks can be accessed would be nice. Quasi a separate start page for the “Internet”. Instead of Homer I use Flame this time.
I want a new secret for the password. Change the password of course, it should not contain '.
sudo bash -c 'echo anyPassword > /root/docker/secrets/flame-password.txt'
sudo mkdir -p /srv/flame/data
sudo chmod -R 750 /srv/flame
sudo mkdir /root/docker/containers/flame/
sudo chmod 700 /root/docker/containers/flame/
sudo vim /root/docker/containers/flame/docker-compose.yml
With this Docker Compose file we can use the socket we just created.
version: '3.6'


networks:
  npm:
    name: npm
  socket_proxy:
    name: socket_proxy


services:
  flame:
    image: pawelmalak/flame
    container_name: flame
    restart: unless-stopped
    networks:
      - npm
      - socket_proxy
    volumes:
      - /srv/flame/data:/app/data
    secrets:
      - password
    environment:
      - PASSWORD__FILE=/run/secrets/password
      - DOCKER_HOST=tcp://socketproxy:2375
    restart: unless-stopped


secrets:
  password:
    file: /root/docker/secrets/flame-password.txt
sudo docker compose -f /root/docker/containers/flame/docker-compose.yml up -dAn entry should now be created in Adguard. The proxy host should forward to Host: flame; Port: 5005. It may be necessary to re-enter the network before the changes take effect.
In the settings of Flame it is necessary to change the Docker socket for the integration with Docker.
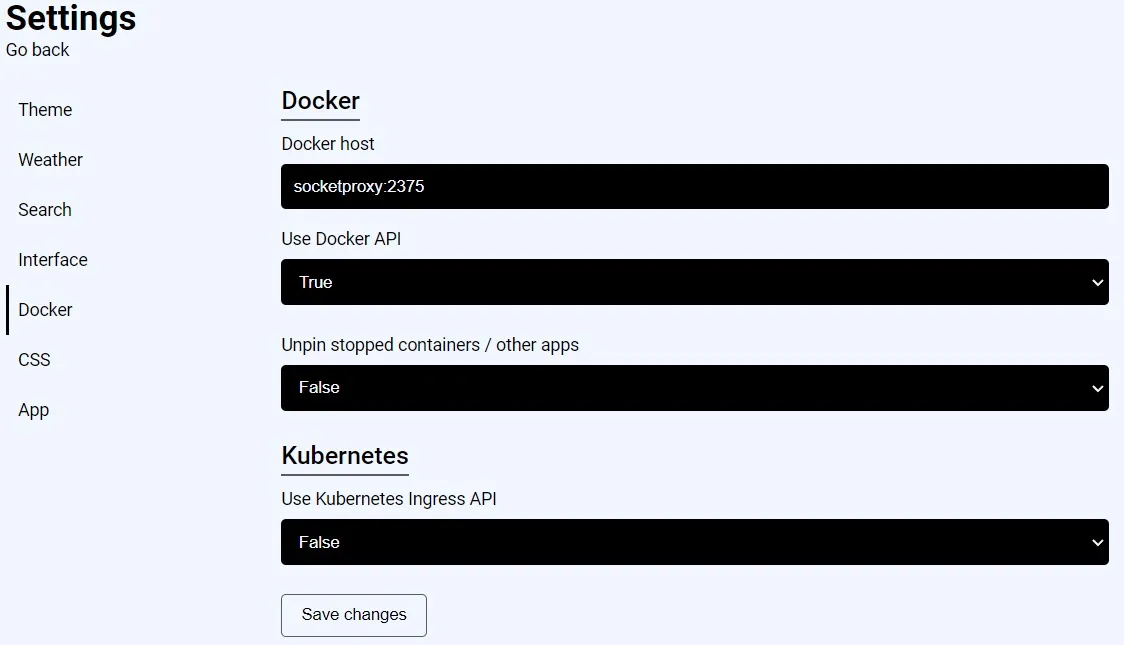
Now we can test the integration.
sudo vim /root/docker/containers/adguard/docker-compose.ymlThe label section is now added here.
version: "3"

services:
    adguard:
        image: adguard/adguardhome:latest
        container_name: adguard
        restart: unless-stopped
        ports:
            - "53:53/tcp"
            - "53:53/udp"
        volumes:
            - /srv/adguard/data/work:/opt/adguardhome/work
            - /srv/adguard/data/conf:/opt/adguardhome/conf
        environment:
            TZ: Europe/Berlin
        labels:
            - flame.type=app
            - flame.name=Adguard Home
            - flame.url=https://adguard.meinedomain.de
            - flame.icon=advertisements
sudo vim /root/docker/containers/nginxproxymanager/docker-compose.ymlversion: "3.7"
networks:
npm:
name: npm
internal:
external: false
secrets:
npm-password:
file: /root/docker/secrets/npm-password.txt
npm-root-password:
file: /root/docker/secrets/npm-root-password.txt
services:
npm-app:
image: "jc21/nginx-proxy-manager"
container_name: npm-app
restart: unless-stopped
ports:
- "80:80"
- "443:443"
environment:
DB_MYSQL_HOST: "npm-db"
DB_MYSQL_PORT: 3306
DB_MYSQL_USER: "npm"
DB_MYSQL_NAME: "npm"
DB_MYSQL_PASSWORD__FILE: /run/secrets/npm-password
DISABLE_IPV6: "true"
networks:
- npm
- internal
volumes:
- /srv/nginxproxymanager/data:/data
- /srv/nginxproxymanager/certs:/etc/letsencrypt
secrets:
- npm-password
labels:
- flame.type=app
- flame.name=Nginx Proxy Manager
- flame.url=https://proxy.meinedomain.de
- flame.icon=arrow-decision-outline
npm-db:
image: "jc21/mariadb-aria"
container_name: npm-db
restart: unless-stopped
environment:
MYSQL_ROOT_PASSWORD__FILE: /run/secrets/npm-root-password
MYSQL_DATABASE: "npm"
MYSQL_USER: "npm"
MYSQL_PASSWORD__FILE: /run/secrets/npm-password
networks:
- internal
volumes:
- /srv/nginxproxymanager/db:/var/lib/mysql
secrets:
- npm-password
- npm-root-passwordsudo docker compose -f /root/docker/containers/adguard/docker-compose.yml down
sudo docker compose -f /root/docker/containers/adguard/docker-compose.yml up -d
sudo docker compose -f /root/docker/containers/nginxproxymanager/docker-compose.yml down
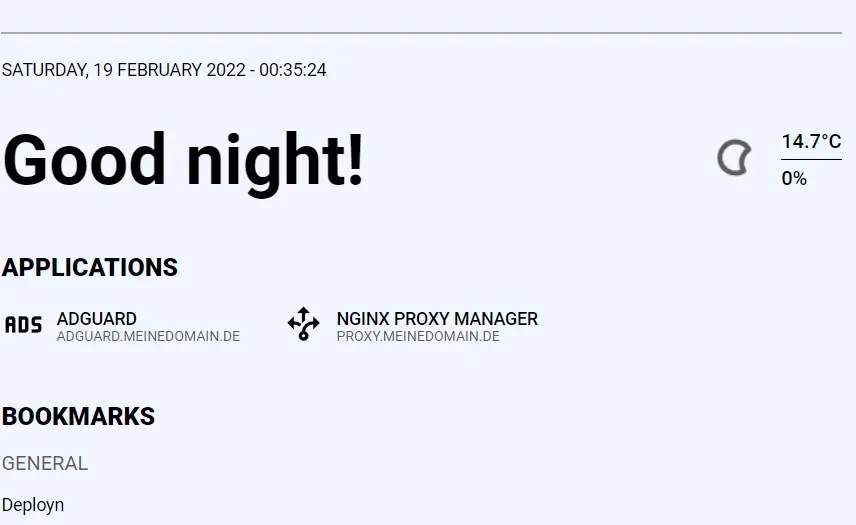
sudo docker compose -f /root/docker/containers/nginxproxymanager/docker-compose.yml up -dIf Flame has been updated, Adguard and the Nginx Proxy Manager should appear under Applications.
Git Server with OneDev
Next, I need a Git server. I generally like to install Gitea for this, and I would still recommend a Raspberry Pi. But this time, I want to test an integrated CI/CD. That’s why I’m installing OneDev now.
The process should be known mainly by now. I want to use a PostgreSQL database for Onedev. For this, I need a password. Unfortunately, the problem is that Docker Secrets are not supported.
sudo bash -c 'echo "DB_PWD=$(openssl rand -base64 32)" > /root/docker/containers/onedev/.env'
sudo mkdir /root/docker/containers/onedev
sudo chmod 700 /root/docker/containers/onedev
sudo mkdir -p /root/docker/containers/onedev/data
sudo mkdir /root/docker/containers/onedev/db
sudo chmod -R 750 /root/docker/containers/onedev
sudo vim /root/docker/containers/onedev/docker-compose.ymlversion: "3.7"
networks:
npm:
name: npm
socket_proxy:
name: socket_proxy
internal:
external: false
services:
onedev-app:
container_name: onedev-app
image: 1dev/server
restart: unless-stopped
networks:
- npm
- internal
- socket_proxy
volumes:
- /srv/onedev/data:/opt/onedev
environment:
DOCKER_HOST: tcp://socket_proxy:2375
hibernate_dialect: io.onedev.server.persistence.PostgreSQLDialect
hibernate_connection_driver_class: org.postgresql.Driver
hibernate_connection_url: jdbc:postgresql://onedev-db/onedev
hibernate_connection_username: onedev
hibernate_connection_password: $DB_PWD
labels:
- flame.type=app
- flame.name=OneDev
- flame.url=https://onedev.meinedomain.de
- flame.icon=git
depends_on:
- onedev-db
onedev-db:
container_name: onedev-db
image: postgres:14
restart: unless-stopped
networks:
- internal
volumes:
- /srv/onedev/db:/var/lib/postgresql/data
environment:
POSTGRES_PASSWORD: $DB_PWD
POSTGRES_USER: onedev
POSTGRES_DB: onedevsudo docker compose -f /root/docker/containers/onedev/docker-compose.yml up -dThen add an entry in Adguard for OneDev. And then create a proxy host in the Nginx Proxy Manager (with websocket support). In my example, the proxy host has the host “onedev-app” and the port number 6610. If you still need SSH access, another proxy host must be routed to port 6611.
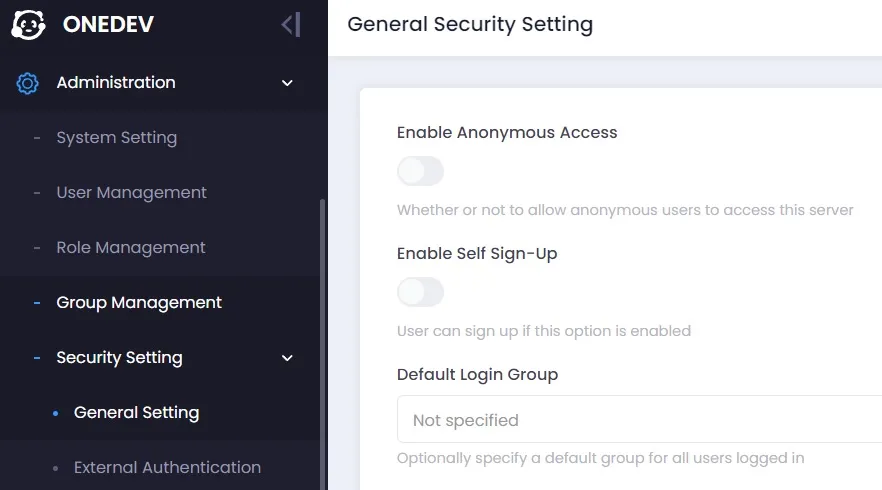
When the Onedev page is accessed, an administrator account must be created.
If you want to prevent anonymous access to your own OneDev, this can be prevented in the security settings.
If you then want the Git server to be accessible from outside, you must remove the restriction to the local network from the proxy host in the Nginx Proxy Manager.
Time Tracking with Kimai
I would like to have my own time tracker on the server. Kimai](https://www.kimai.org/) should be suitable for this. Basically, however, this is about storing data in Docker. Our previous Docker-Compose files used bind mounts. However, the “problem” with a bind mount is that the container’s content is not automatically copied to the computer, unlike a named Docker volume.
Some images are designed in such a way that they will not work with a bind mount.
But first we need passwords.
sudo mkdir /root/docker/containers/kimai
sudo chmod 700 /root/docker/containers/kimai
sudo bash -c 'echo "DB_PWD=$(openssl rand -base64 32)" > /root/docker/containers/kimai/.env'
sudo mkdir -p /srv/kimai/db
sudo chmod -R 750 /srv/kimai
sudo vim /root/docker/containers/kimai/docker-compose.ymlversion: "3.7"
networks:
npm:
name: npm
internal:
external: false
services:
kimai-app:
container_name: kimai-app
image: kimai/kimai2:apache
restart: unless-stopped
networks:
- internal
- npm
volumes:
- data:/opt/kimai/var
environment:
ADMINMAIL: mailadresse@domain.de
ADMINPASS: thePasswordToLogin
DATABASE_URL: mysql://kimai:aSecurePassword@kimai-db:3306/kimai
TRUSTED_HOSTS: nginx,localhost,127.0.0.1,kimai.mydomain.com
depends_on:
- kimai-db
labels:
- flame.type=app
- flame.name=Kimai
- flame.url=https://kimai.meinedomain.de
- flame.icon=timer
kimai-db:
container_name: kimai-db
image: mariadb:10.6
restart: unless-stopped
networks:
- internal
volumes:
- /srv/kimai/db:/var/lib/mysql
environment:
MARIADB_ROOT_PASSWORD: $DB_PWD
MARIADB_DATABASE: kimai
MARIADB_USER: kimai
MARIADB_PASSWORD: aSecurePassword
volumes:
data:sudo docker compose -f /root/docker/containers/kimai/docker-compose.yml up -dAfter an entry in AdGuard or a proxy host Hostname: kimai-app; Port: 8001 has also been created for this, you can log in to Kimai.
Updating Containers
Updating a container is done with three lines of code. As an example, I would like to update my Nginx proxy manager. I just need to pull the latest image and restart the container to do this.
sudo docker compose -f /root/docker/containers/nginx/docker-compose.yml pull
sudo docker compose -f /root/docker/containers/nginx/docker-compose.yml down
sudo docker compose -f /root/docker/containers/nginx/docker-compose.yml up -d
If I also want to eliminate the old image, I can do this with prune.
sudo docker image pruneWith sudo docker system df, you can see how much disk space Docker uses.
Conclusion
By following this step-by-step guide, you should now have a fully functional Ubuntu homeserver set up with Docker and various services like AdGuard Home, Nginx Proxy Manager, Flame dashboard, OneDev Git server, and Kimai time tracking.
If you have any questions or other comments / suggestions for improvement, please feel free to use the comments section.
Related Articles
Asustor NAS Homeserver Setup with Docker: VPN, Gitea & Calibre
Set up your Asustor NAS as a homeserver step by step: VPN, firewall, reverse proxy, Gitea and Calibre with Docker. The complete NAS homeserver guide.
Synology NAS Setup: Your First Homeserver Step-by-Step
Set up your Synology DiskStation from scratch: VPN, DDNS, Firewall, Docker, and Nginx Proxy Manager. The complete NAS homeserver setup guide for beginners.
Raspberry Pi Home Server: Docker, AdGuard & Traefik
Set up a Raspberry Pi as an energy-efficient home server with Docker, AdGuard Home, Traefik and UFW firewall. Step-by-step guide with power cost calculator.
Ugreen NAS Setup: Complete Homeserver Guide Step-by-Step
Set up your Ugreen NAS as a full homeserver: hardware prep, Docker, network config, and more. A detailed step-by-step guide to get you started quickly.