Save Power on Ubuntu Server: TLP Energy Optimization
Lower your Ubuntu server's power consumption with TLP. Optimize energy settings and measurably reduce your homeserver's electricity costs. Step-by-step setup guide.
Table of Contents
For a homeserver, power consumption is an important factor, especially when it runs around the clock. As already described here, I have an Ubuntu server which, according to Brennenstuhl energy meter (Amazon affiliate link), now only consumes 7 watts.
Power Cost Calculator
To calculate the current power costs of your server, you can use the form below:
Ergebnis
The power costs can potentially be further reduced with TLP on an Ubuntu Server.
What is TLP?
TLP is an advanced Linux tool for power management aimed at optimizing the power consumption of laptops and desktops. It automatically applies power-saving settings and controls functions such as battery management. Although some of TLP’s features, like battery management, are less relevant for desktops, it still offers effective ways to reduce power consumption.
The tlp-rdw package extends TLP with the ability to perform automatic, event-based actions on Wi-Fi and Bluetooth devices. However, without existing radio devices, tlp-rdw has limited utility.
Installing TLP
To install TLP, follow these steps via SSH:
sudo add-apt-repository ppa:linrunner/tlp
sudo apt update
sudo apt install tlp tlp-rdw
Starting TLP
After installation, TLP needs to be started:
sudo tlp startAdjusting Settings
The settings can be adjusted with any text editor. However, you should be careful, if you set something wrong, the server can be damaged.
Installing PowerTOP
PowerTOP is a useful tool for analyzing power consumption. Install it with:
sudo apt install powertopUsing PowerTOP
Start PowerTOP with the following command:
sudo powertopNavigate to the Tunables by pressing Shift + Tab. Here, PowerTOP displays optimization suggestions.
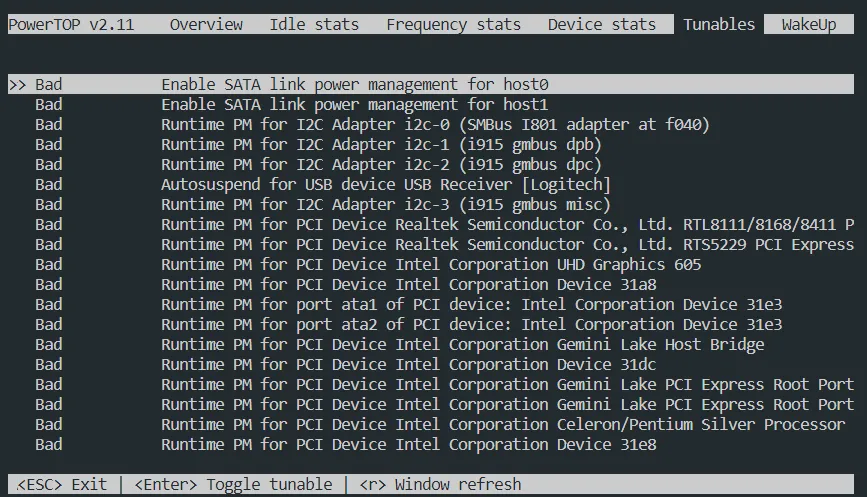
You can change the settings with Enter. They are not saved.
If I switch everything to “Good”, my power consumption drops to 4-5 watts.
If you want to create a report, you can also do this with a command.
sudo powertop --html=report.htmlYou can then download the report and insert the suggested changes as required.
Changes in tlp.conf
I made specific changes to the configuration file to optimize power management while on mains power and to manage USB devices more efficiently:
sudo vim /etc/tlp.confI adjust the following lines and comment them out (no more #):
Set Power Management on Mains Power to Auto:
#AHCI_RUNTIME_PM_ON_AC=on to
AHCI_RUNTIME_PM_ON_AC=auto
#RUNTIME_PM_ON_AC=on to RUNTIME_PM_ON_AC=auto
Enable USB Auto-Suspend:
#USB_AUTOSUSPEND=1 to USB_AUTOSUSPEND=1
These changes allow the system to dynamically adjust power management based on current usage instead of keeping it permanently enabled.
Enabling USB Autosuspend can further reduce power consumption but carries the risk of necessary USB devices entering suspend mode. Ensure that essential USB devices are not inadvertently suspended. Check and update the blacklist in the configuration file as needed to exclude critical devices.
Restarting the Server
Next, I restart my server to apply the changes:
sudo rebootResult
Did it help much? I somehow don’t know exactly. I would have to measure over a more extended period and use several measuring devices.
Despite several running services, the display is now down to 4 - 5 watts. If the values are correct, then there is hardly any additional consumption compared to the Raspberry Pi, and I save €5 a year 😁
Have you found other optimal settings? Did the installation have a more significant impact on you? I would love to read about it in the comments.
Related Articles
Setting up Ubuntu Homeserver with Docker (Intel-Nuc)
Set up your Ubuntu homeserver step-by-step: from base configuration to your first Docker containers. The complete guide for beginners. Start building today.
Ubuntu 24.04 vs. Debian 13: Docker Performance Benchmark
Is Debian really leaner and faster than Ubuntu? I benchmarked both operating systems as Docker hosts using a comprehensive script to find the real answer.
Install Mistborn: Your Own Cloud with VPN & Firewall
Install Mistborn and turn your server into a secure cloud platform with built-in firewall and WireGuard VPN. A complete step-by-step guide – get started now!
Set up server with Traefik as reverse proxy for Docker
Set up your server with Docker and configure Traefik as a reverse proxy using Docker Compose. Get automatic SSL certificates and secure container management.