Install Nextcloud on a VPS: A Guide with Docker
Set up your own cloud with Nextcloud on a VPS. ✓ Detailed instructions ✓ With Docker & Caddy ✓ Suitable for beginners

Table of Contents
- Introduction
- Nextcloud Server: A Platform for Data Sovereignty
- Reasons for Installing on a VPS
- Rent a Server
- Rent a Domain
- Configure the Domain
- Reinstall the Server
- Establish an SSH Connection
- Install Docker and Docker Compose
- Prepare Caddy
- Install Nextcloud
- Configure the Nextcloud Proxy
- Configure Nextcloud
- Create an Alias
- Add a Database
- Adding Redis
- Further Optimizations
- Nextcloud All in One
- Conclusion
Introduction
Want to set up your own personal cloud? In this step-by-step guide, I’ll show you how to install Nextcloud on a VPS (Virtual Private Server). I’ve also created a German YouTube video that walks you through the process:
Install Nextcloud on a VPS (Link to Youtube)
Below you’ll find a summary of the steps shown in the video.
Nextcloud Server: A Platform for Data Sovereignty
Nextcloud is open-source software for self-hosting files and data, offering a variety of features such as file synchronization, calendar, contacts, email, and more. It can be used as an alternative to third-party cloud services like Dropbox or Google Drive.
Development History
A brief overview of Nextcloud’s development:
v9.0.50
Erster Nextcloud Release nach der Abspaltung von ownCloud.
v10.0.0
Neue Funktionen für Systemadministratoren, um den Datenfluss zwischen Benutzern zu steuern und zu lenken.
v11.0.0
Volltextsuche als Gamechanger
v13.0.0
-
v19.0.0
-
v20.0.0
-
v23.0.0
-
v24.0.0
Benutzer-Migration leicht gemacht.
v25.0.0
-
v26.0.0
-
v27.0.0
-
v28.0.0
Verbesserte Benutzeroberfläche, Leistungsoptimierungen, Fortschritte in der Sicherheit und Benutzerfreundlichkeit.
v29.0.0
-
v30.0.0
Neuste Version mit vielen Verbesserungen.
More Than Just File Storage
Nextcloud is like a digital hub, not only facilitating file storage but also offering a whole range of other functions:
- File Synchronization and Sharing: Nextcloud allows you to synchronize files between different devices and easily share them with other users.
- Document Collaboration: The integrated office suite enables real-time collaborative editing of documents.
- Calendar, Contacts, and Email: Nextcloud offers features for managing calendars, contacts, and emails.
- Variety of Apps: An app store provides a wide selection of additional features that extend the server’s functionality.
Reasons for Installing on a VPS
Installing on a VPS is particularly practical for several reasons:
Centralized Access
A VPS allows you to access your documents from anywhere with an internet connection. You’re not limited to your local network, enabling access from anywhere.
Data Security
Your data is securely stored in professional data centers—protected from power outages, fires, or other physical risks.
Scalability
With a VPS, you can adjust server resources as your needs grow—meaning more storage space or computing power when required.
Professional Hosting Environment
A VPS offers a professional hosting environment with dedicated IP addresses and a fast internet connection.
These aspects make using a VPS for a paperless setup an attractive option for businesses and individuals looking for an efficient and secure solution for their document management.
Prerequisites
- Computer with Visual Studio Code: For working on the server.
- A Server where Docker can be installed (this is software that makes installation much easier).
- Domain with the option to create subdomains: For accessing Nextcloud.
- Mail Server with SMTP Support: Optional for notifications.
Rent a Server
First, we need a server. I recommend renting a VPS from a provider of your choice. I personally use Netcup. They offer a simple and fast way to rent a VPS.
You can also check here for vouchers.
The costs currently start at €3.99 per month, plus an annoying newly introduced setup fee of €5. I find this counterproductive for VPSs, as they should offer a way to start quickly and flexibly. The Root Servers (from €9.81 per month) offer significantly better performance due to the dedicated CPU cores.
In the future, I will probably use Hetzner more often for testing, as they don’t have a setup fee.
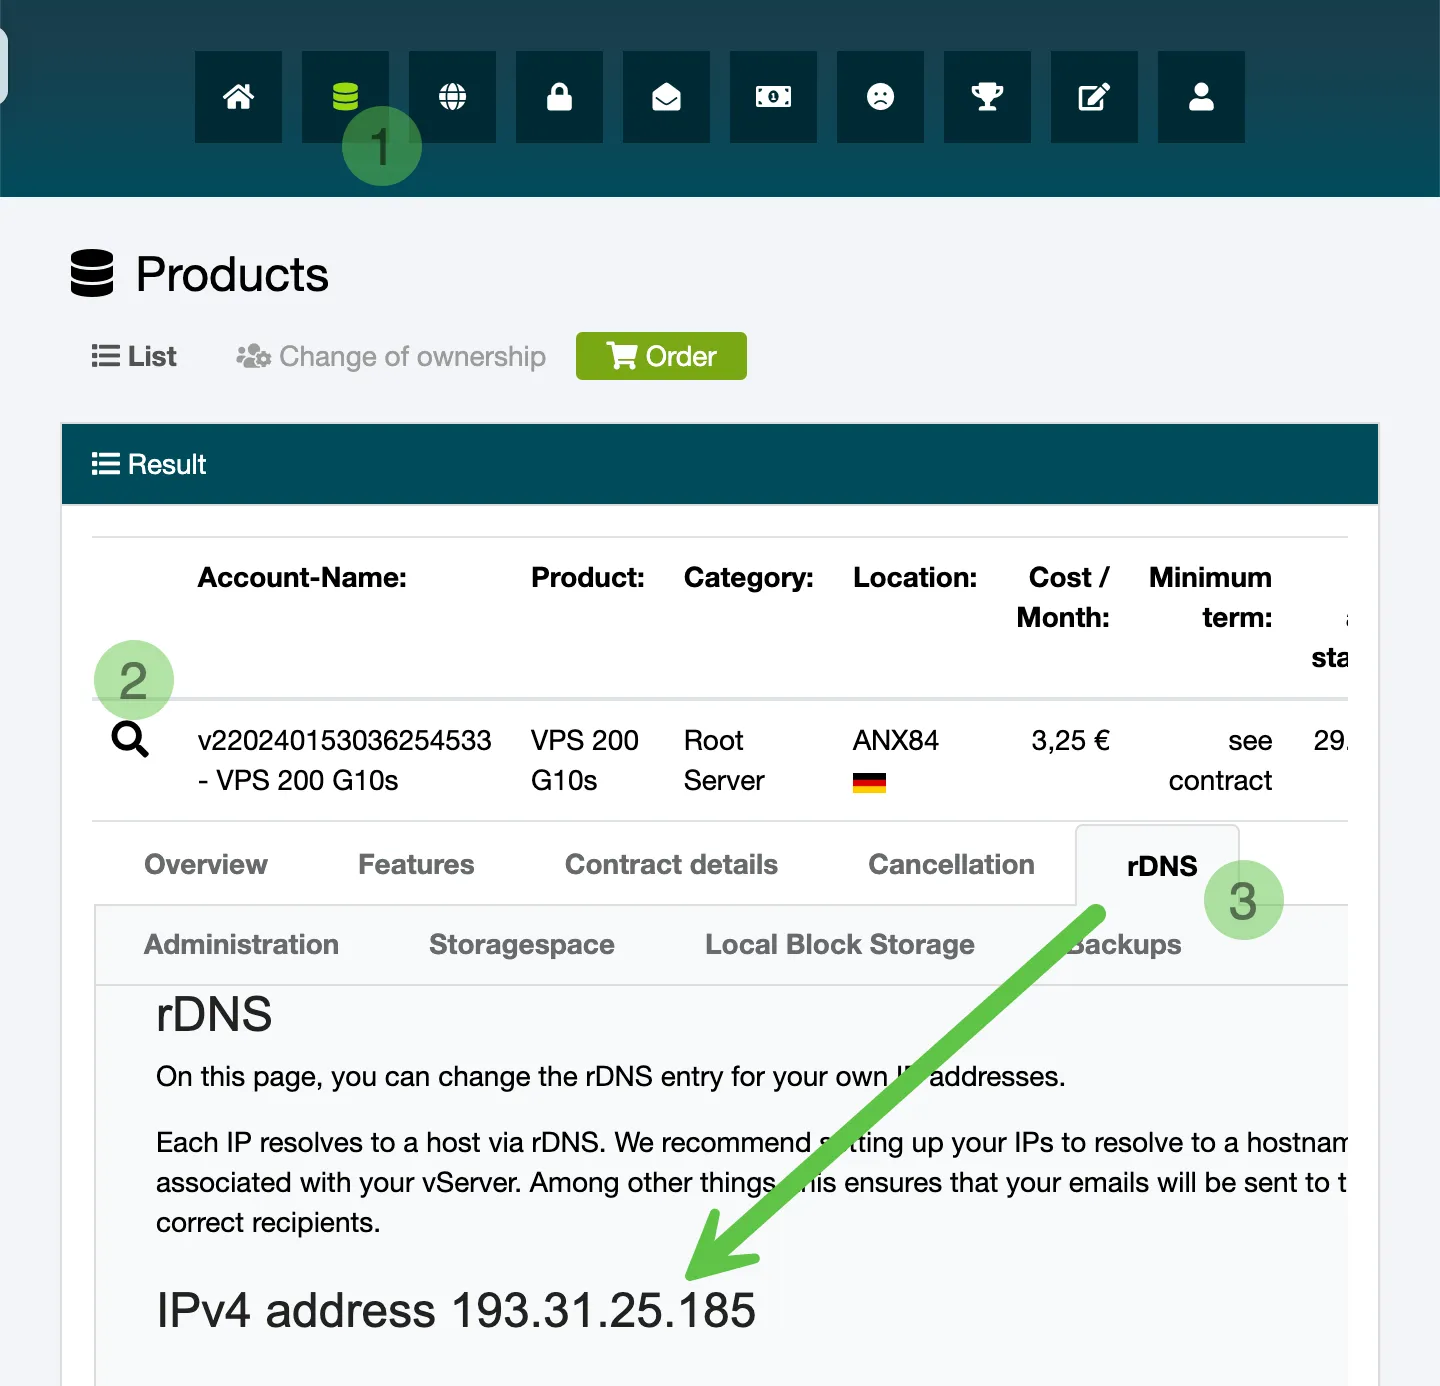
Once you’ve rented a VPS, you’ll find the IP address in the CCP. Otherwise, it should also be in the email.

Rent a Domain
Next, we need a domain. Again, you should use a provider of your choice. The domain and server don’t have to be with the same provider. However, I also use Netcup for this. Here you have two options:
- Rent an additional domain.
- Rent a web hosting package with an included domain.
The additional domain has the advantage of being cheaper (currently €5.04 per year for a .de domain). However, the web hosting packages (from €2.17 per month) offer you additional features such as email mailboxes and webspace.
Configure the Domain
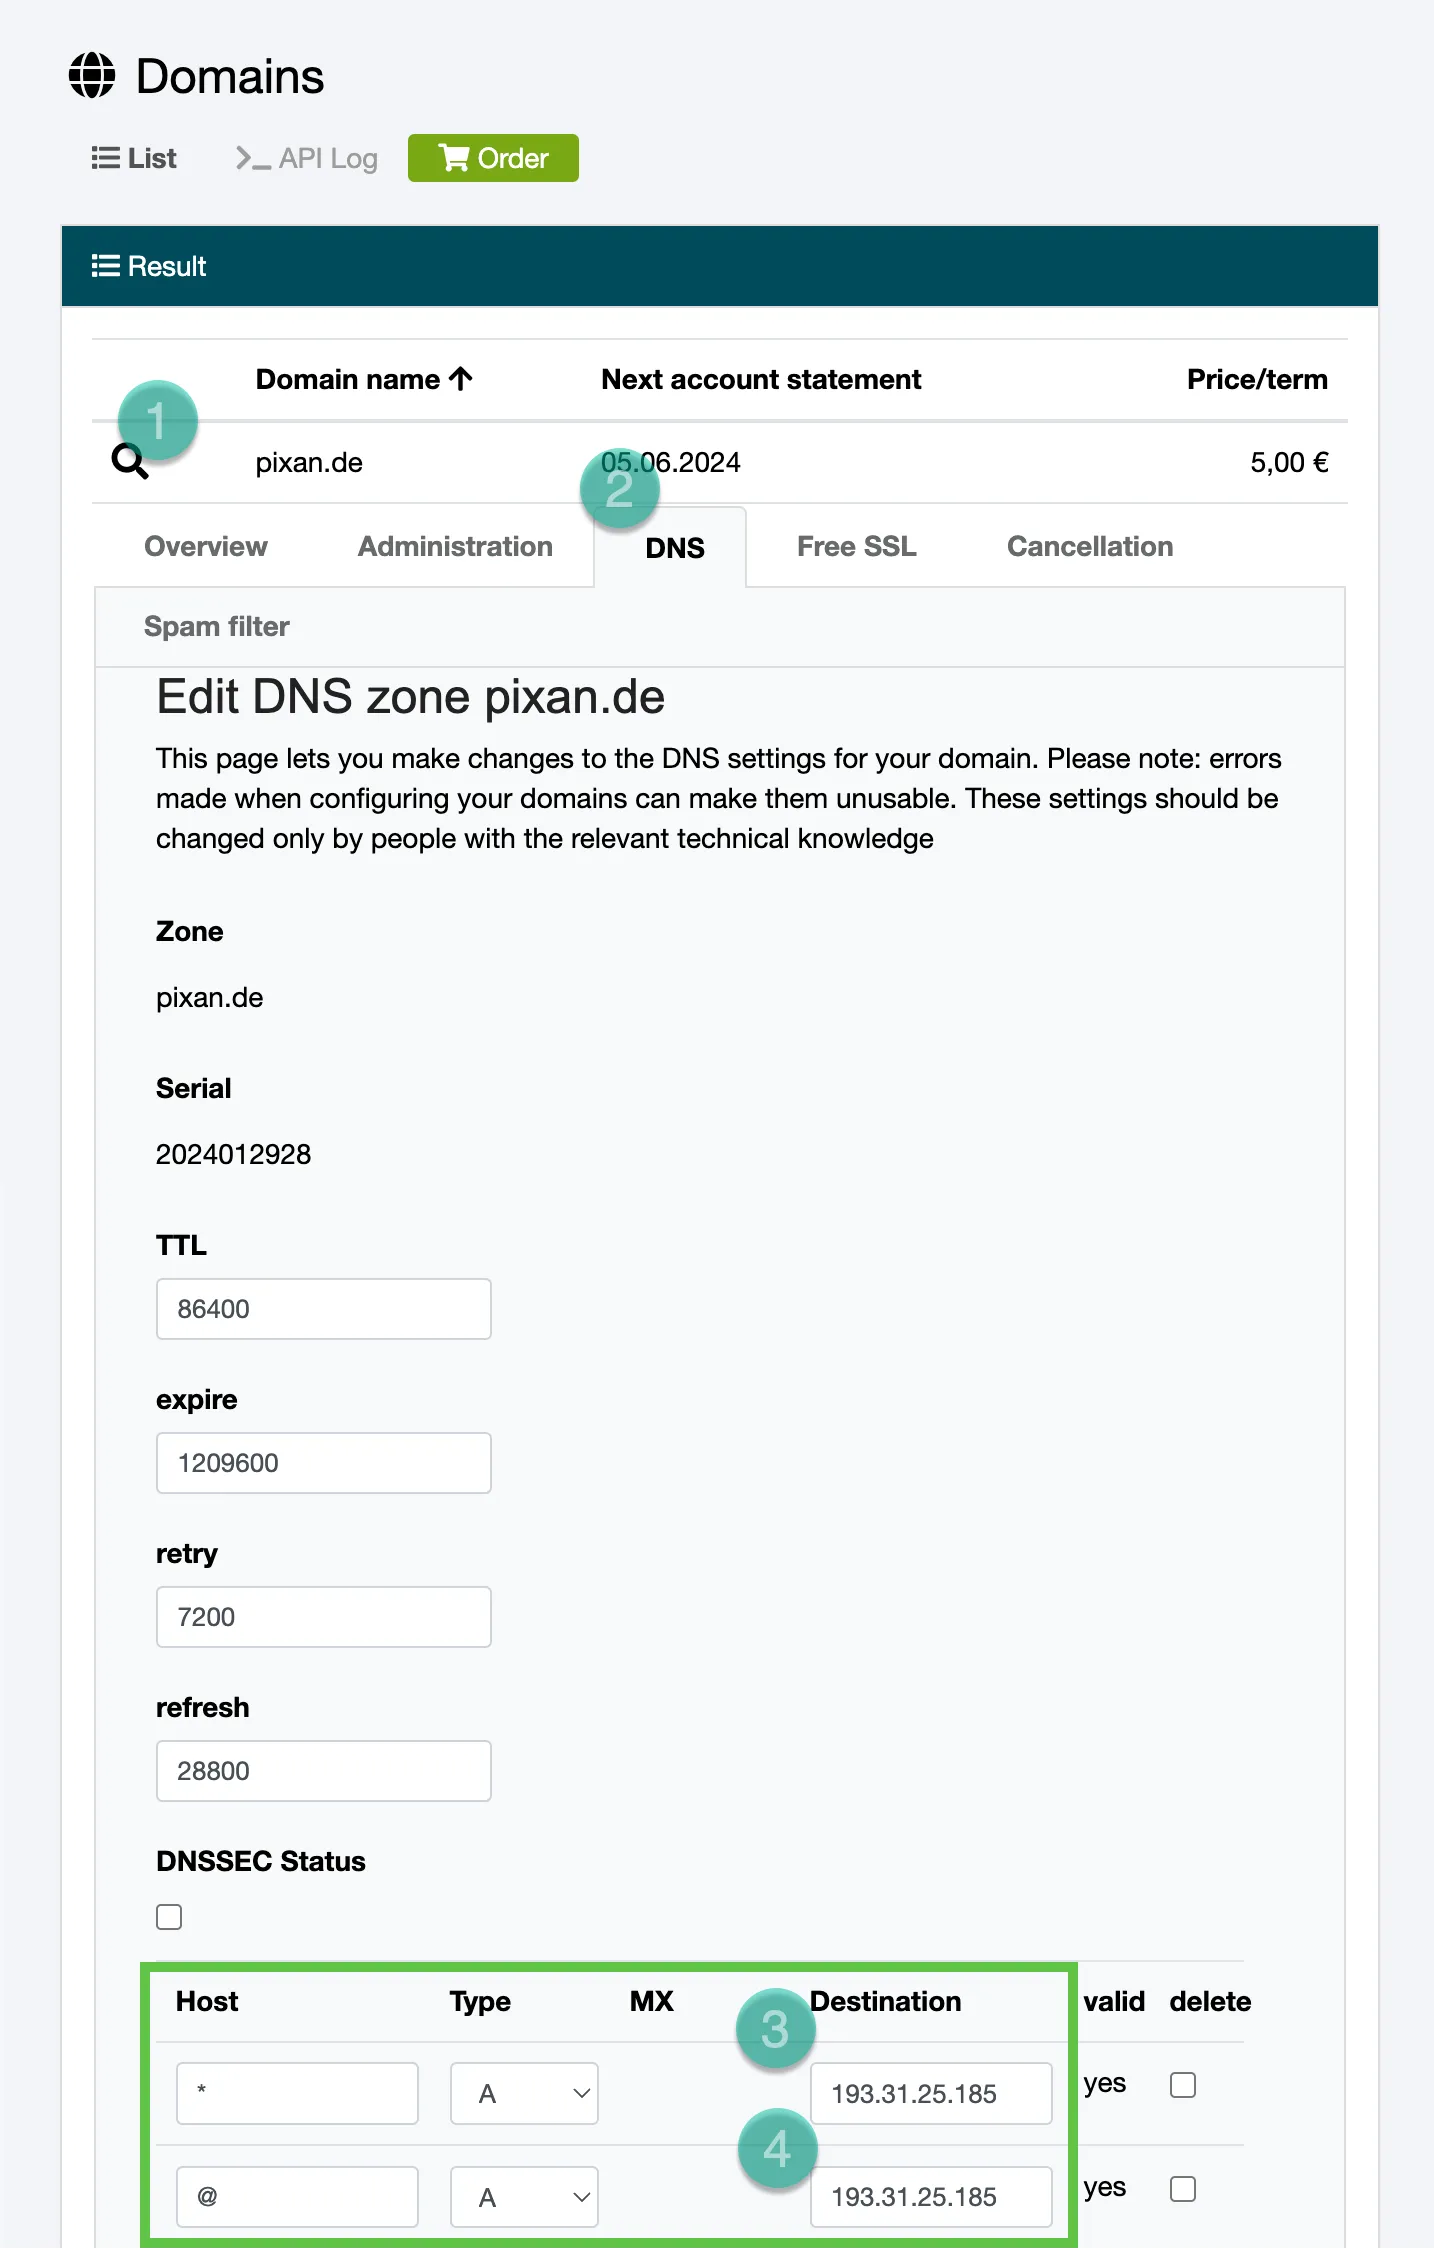
After renting the domain, you need to configure it. Log in to the CCP and click on “Domains.” Select your domain and click on “DNS.”

Add two new A records. The host is ”@” (for the main domain) and ”*” (for all subdomains). Enter your server’s IP address as the target.
If you have the web hosting package, first delete the entries for ”@” and ”*” for both the A records and the AAAA records. The rest must remain as it is for the email mailboxes and webspace to function.
Now you have to wait until the DNS changes have propagated everywhere. This can take up to 24 hours. You can test it in the terminal with ping your-domain.de. If your server’s IP address is returned, the domain is ready.
Reinstall the Server
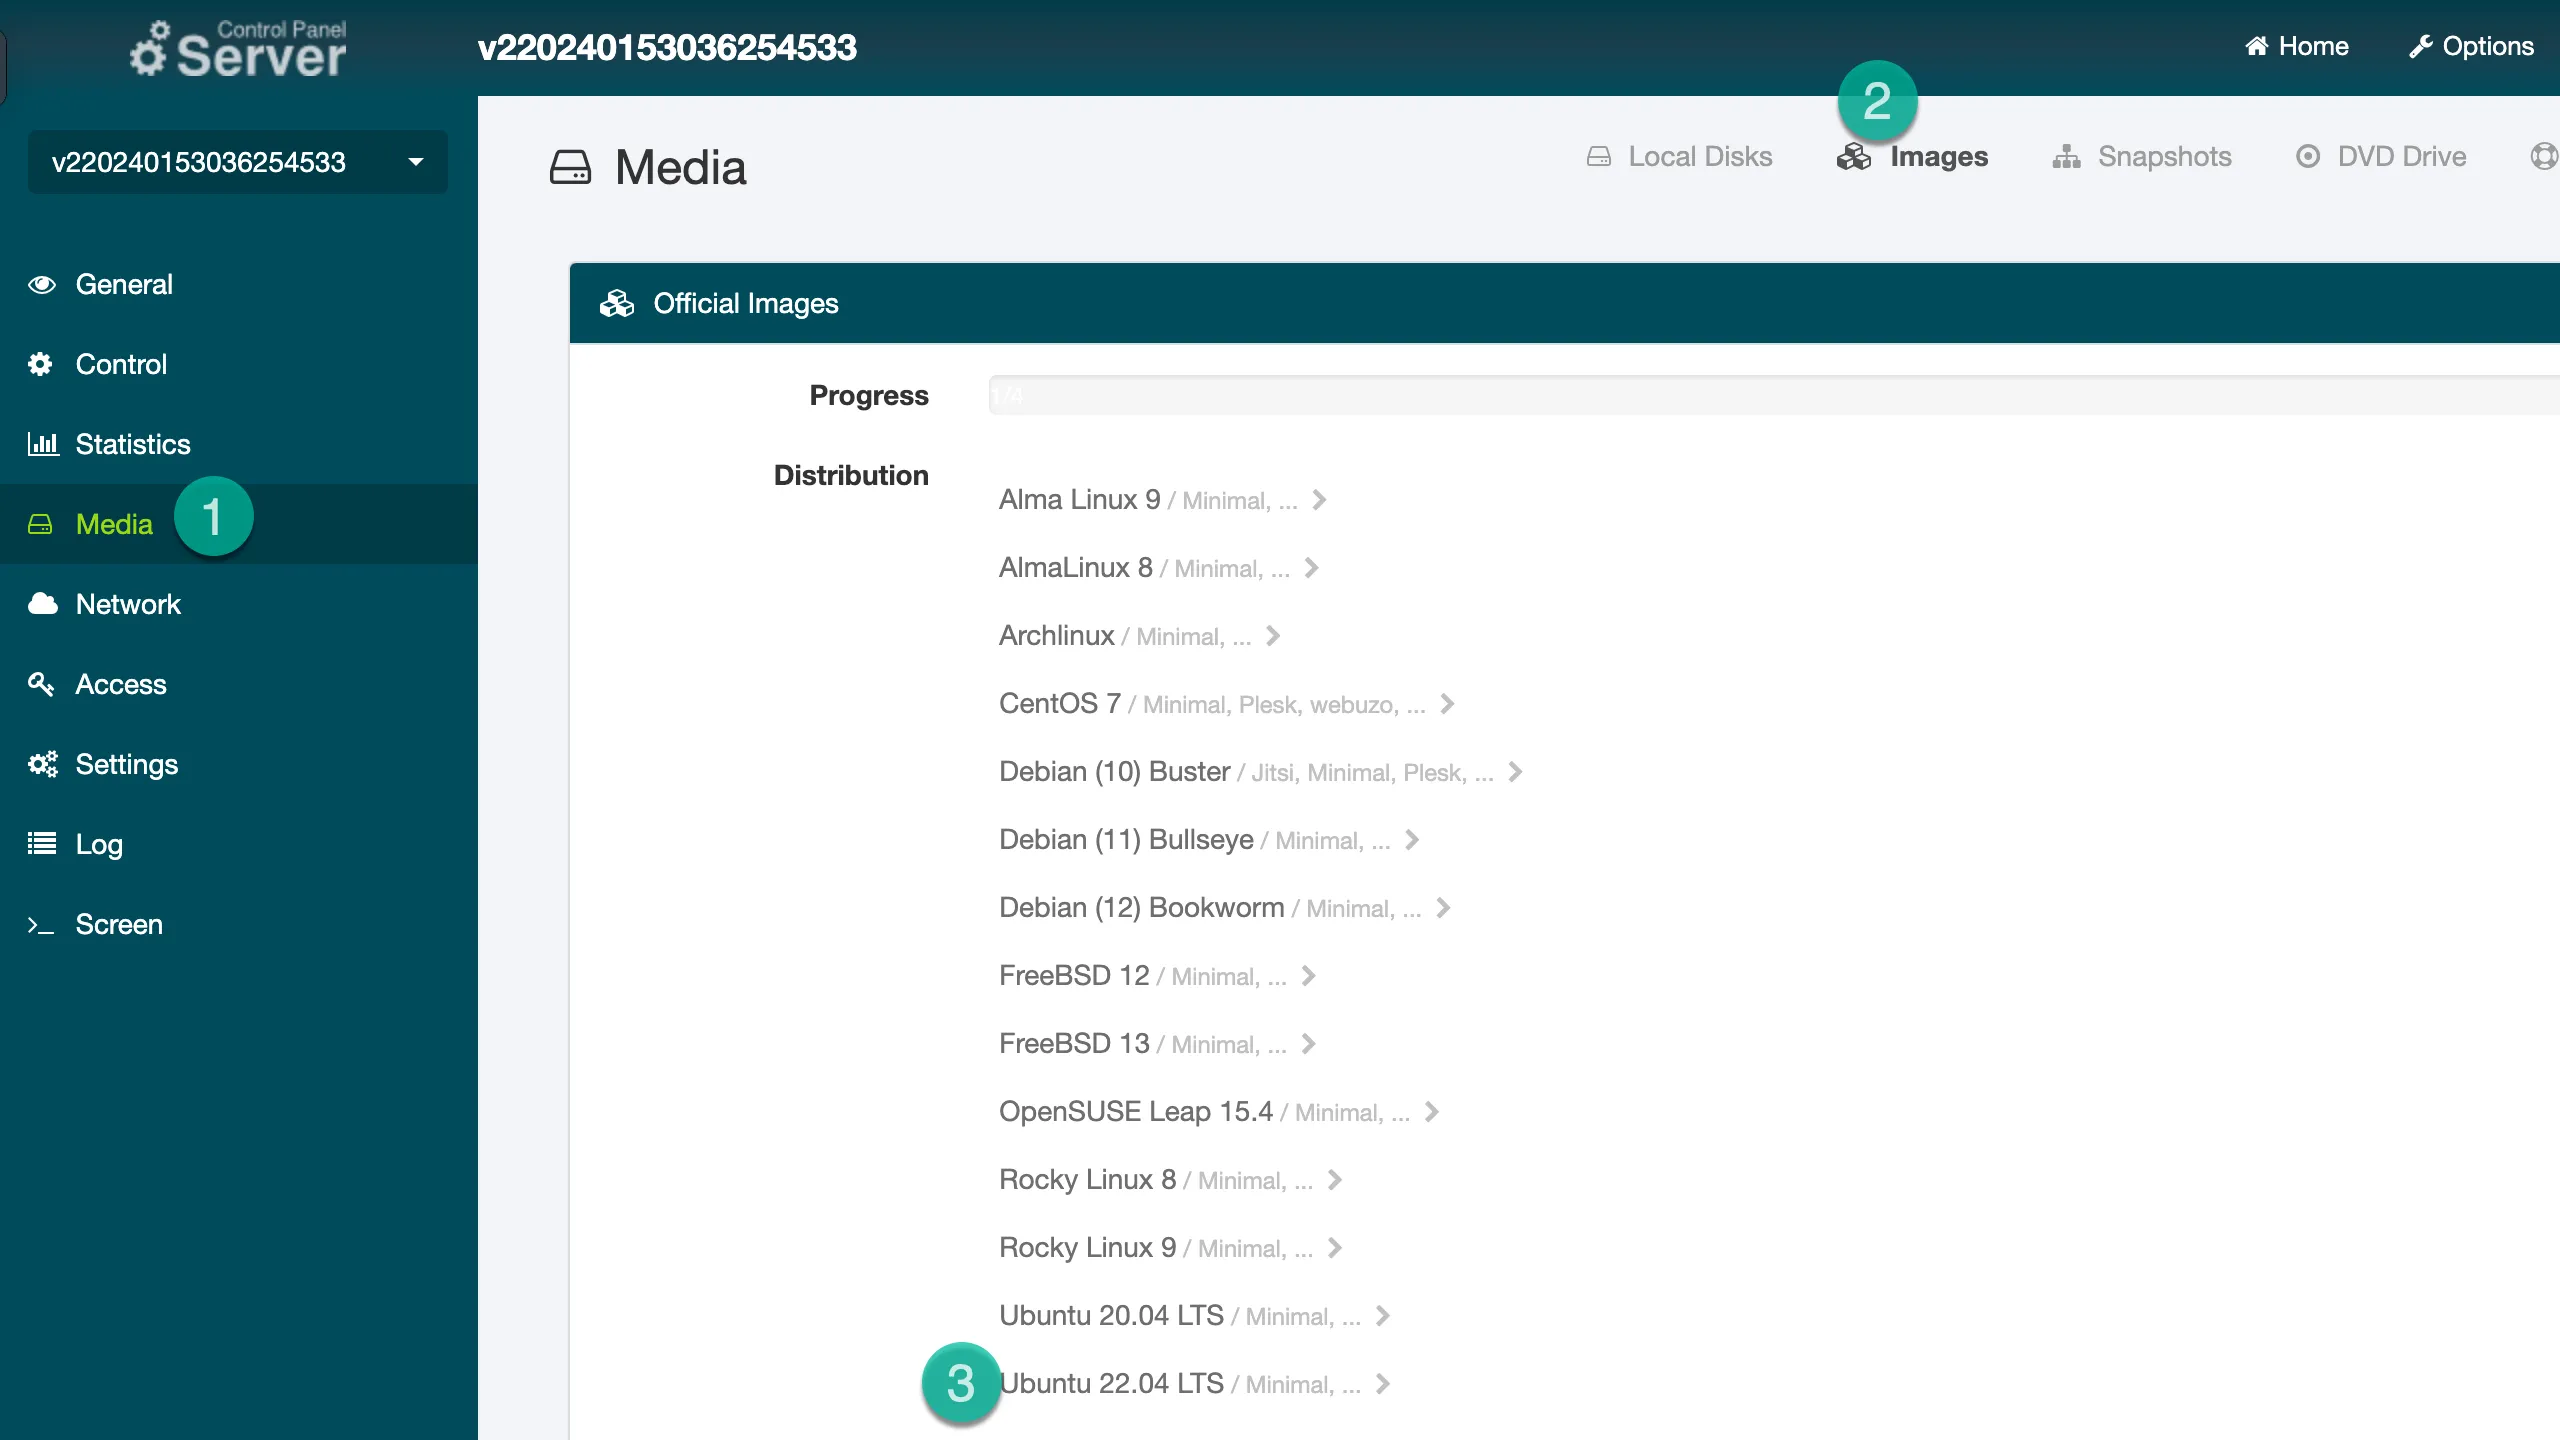
You can now log in to the Server Control Panel and select your server. Under “Media” and then “Images,” you can choose a new operating system. I recommend Ubuntu 24.04 LTS (updates until April 2029).

You should create a user during the installation.
Establish an SSH Connection
After the installation is complete, you can connect to your server via SSH. We’ll use VSCode for this. Install the Remote - SSH plugin and click on the icon in the bottom left corner. There you can select “Remote-SSH: Connect to Host…” and configure your SSH connection. The command ssh user@ip should also connect you.
Once connected, you can open your user’s home directory in the explorer and edit your files there. You can also use the terminal to execute commands:
# Update system packages
sudo apt update     # Update package lists
sudo apt upgrade    # Upgrade installed packages
Install Docker and Docker Compose
Next, we install Docker. Execute the following commands:
# Add Docker's official GPG key:
sudo apt-get update
sudo apt-get install ca-certificates curl
sudo install -m 0755 -d /etc/apt/keyrings
sudo curl -fsSL https://download.docker.com/linux/ubuntu/gpg -o /etc/apt/keyrings/docker.asc
sudo chmod a+r /etc/apt/keyrings/docker.asc

# Add the repository to Apt sources:
echo \
  "deb [arch=$(dpkg --print-architecture) signed-by=/etc/apt/keyrings/docker.asc] https://download.docker.com/linux/ubuntu \
  $(. /etc/os-release && echo "$VERSION_CODENAME") stable" | \
  sudo tee /etc/apt/sources.list.d/docker.list > /dev/null
sudo apt-get update
sudo apt-get install docker-ce docker-ce-cli containerd.io docker-buildx-plugin docker-compose-pluginPrepare Caddy
We’ll use Caddy as a reverse proxy to make Nextcloud accessible via HTTPS.
First, we need a network to connect Caddy to the other containers:
sudo docker network create proxyNow, create a folder for Caddy and the necessary files:
mkdir -p caddy/{data,config}
touch caddy/docker-compose.yml caddy/Caddyfile
Enter the following into the docker-compose.yml file:
networks:
    proxy:
        external: true
        name: proxy

services:
    caddy:
        image: caddy:2
        container_name: caddy
        restart: unless-stopped
        ports:
            - 80:80
            - 443:443
        volumes:
            - ./data:/data
            - ./config:/config
            - ./Caddyfile:/etc/caddy/Caddyfile:ro
        networks:
            - proxy
Install Nextcloud
Perfect! The foundation is laid. Let’s get started with the actual Nextcloud installation. Create a new folder and the necessary files:
mkdir -p nextcloud/data
touch nextcloud/docker-compose.yml
Enter the following into the nextcloud/docker-compose.yml file:
networks:
    proxy:
        external: true
        name: proxy

services:
    nextcloud:
        container_name: nextcloud
        image: nextcloud
        restart: always
        volumes:
            - ./data:/var/www/html/
        networks:
            - proxy
Now, start the container:
sudo docker compose -f nextcloud/docker-compose.yml up -dConfigure the Nextcloud Proxy
Finally, enter the configuration for Nextcloud into the Caddyfile:
{
	acme_ca https://acme-v02.api.letsencrypt.org/directory
	email mail@deployn.de
}

nextcloud.pixan.de {
	reverse_proxy nextcloud:80
}
And start Caddy:
sudo docker compose -f caddy/docker-compose.yml up -dConfigure Nextcloud
Now you can log in under the domain and configure Nextcloud. Create an admin user. At this point, we could add other users and upload files. However, we won’t do that now; instead, we’ll optimize the installation.
💡 Common problems
- If the domain is not reachable: Check DNS entries and propagation.
- If you have connection problems: Check firewall rules.
- If Nextcloud doesn’t start: Check container logs with
docker logs nextcloud.
Create an Alias
We will be deleting and reinstalling Nextcloud a few more times. To avoid typing the same commands repeatedly, let’s create an alias. Open the .bashrc file and add the following at the very bottom:
alias caddy-reload='sudo docker compose -f ~/caddy/docker-compose.yml exec caddy caddy reload --config /etc/caddy/Caddyfile'
alias caddy-down='sudo docker compose -f ~/caddy/docker-compose.yml down'
alias caddy-up='sudo docker compose -f ~/caddy/docker-compose.yml up -d'
alias nc-down='sudo docker compose -f ~/nextcloud/docker-compose.yml down'
alias nc-up='sudo docker compose -f ~/nextcloud/docker-compose.yml up -d'
alias nc-remove='sudo rm -rf ~/nextcloud/data'
alias nc-init='mkdir -p ~/nextcloud/data'
Then run source ~/.bashrc to apply the changes.
nc-down
nc-remove
Nextcloud is deleted again, and we can start over.
Add a Database
We don’t want to use SQLite, so let’s add a database. Update our aliases:
alias caddy-reload='sudo docker compose -f ~/caddy/docker-compose.yml exec caddy caddy reload --config /etc/caddy/Caddyfile'
alias caddy-down='sudo docker compose -f ~/caddy/docker-compose.yml down'
alias caddy-up='sudo docker compose -f ~/caddy/docker-compose.yml up -d'
alias nc-down='sudo docker compose -f ~/nextcloud/docker-compose.yml down'
alias nc-up='sudo docker compose -f ~/nextcloud/docker-compose.yml up -d'
alias nc-remove='sudo rm -rf ~/nextcloud/{data,db}'
alias nc-init='mkdir -p ~/nextcloud/{data,db}'
Apply the changes:
source ~/.bashrc
nc-init
Now, update the docker-compose.yml file in the nextcloud directory:
networks:
    proxy:
        external: true
        name: proxy
    internal:
        external: false

services:
    nextcloud:
        container_name: nextcloud
        image: nextcloud
        restart: always
        volumes:
            - ./data:/var/www/html/
        networks:
            - proxy
            - internal
        environment:
            - MYSQL_HOST=db
            - MYSQL_DATABASE=nextcloud
            - MYSQL_USER=nextcloud
            - MYSQL_PASSWORD=nextcloud_password
        depends_on:
            - db
    db:
        container_name: nextcloud-db
        image: mariadb:11.4
        restart: unless-stopped
        volumes:
            - ./db:/var/lib/mysql
        networks:
            - internal
        environment:
            - MYSQL_ROOT_PASSWORD=root_password
            - MYSQL_DATABASE=nextcloud
            - MYSQL_USER=nextcloud
            - MYSQL_PASSWORD=nextcloud_password
Start the containers:
nc-upAdding Redis
Let’s enhance performance by adding Redis. Delete everything again:
nc-down
nc-remove
Update the aliases:
alias caddy-reload='sudo docker compose -f ~/caddy/docker-compose.yml exec caddy caddy reload --config /etc/caddy/Caddyfile'
alias caddy-down='sudo docker compose -f ~/caddy/docker-compose.yml down'
alias caddy-up='sudo docker compose -f ~/caddy/docker-compose.yml up -d'
alias nc-down='sudo docker compose -f ~/nextcloud/docker-compose.yml down'
alias nc-up='sudo docker compose -f ~/nextcloud/docker-compose.yml up -d'
alias nc-remove='sudo rm -rf ~/nextcloud/{data,db,redis}'
alias nc-init='mkdir -p ~/nextcloud/{data,db,redis}'
Apply the changes:
source ~/.bashrc
nc-init
We need our UserID and GroupID:
idUpdate the docker-compose.yml file:
networks:
    proxy:
        external: true
        name: proxy
    internal:
        external: false

services:
    nextcloud:
        container_name: nextcloud
        image: nextcloud
        restart: always
        volumes:
            - ./data:/var/www/html/
        networks:
            - proxy
            - internal
        environment:
            - MYSQL_HOST=db
            - MYSQL_DATABASE=nextcloud
            - MYSQL_USER=nextcloud
            - MYSQL_PASSWORD=nextcloud_password
            - REDIS_HOST=redis
        depends_on:
            - db
            - redis
    db:
        container_name: nextcloud-db
        image: mariadb:11.4
        restart: unless-stopped
        volumes:
            - ./db:/var/lib/mysql
        networks:
            - internal
        environment:
            - MYSQL_ROOT_PASSWORD=root_password
            - MYSQL_DATABASE=nextcloud
            - MYSQL_USER=nextcloud
            - MYSQL_PASSWORD=nextcloud_password
    redis:
        container_name: nextcloud-redis
        image: redis:7
        restart: unless-stopped
        cap_add:
            - SYS_RESOURCE
        user: "1000:1000"
        volumes:
            - ./redis:/data
        networks:
            - internal
Start the containers:
nc-upFurther Optimizations
Let’s optimize the installation a bit more. Starting fresh:
nc-down
nc-remove
Update the Caddyfile:
{
  # General Options
  log {
    level ERROR
  }

  # TLS Options
  auto_https disable_redirects
  email mail@deployn.de
  acme_ca https://acme-v02.api.letsencrypt.org/directory

  # Server Options
  servers {
    protocols h1 h2 h2c
  }
}

http://nextcloud.pixan.de {
  redir https://{host}{uri} permanent
}

https://nextcloud.pixan.de {

  header {
    Strict-Transport-Security "max-age=15552000; includeSubDomains; preload"
    X-Forwarded-Proto "https"
    X-Forwarded-Host {host}
    X-Forwarded-For {remote}
    X-Real-IP {remote}
  }

  redir /.well-known/carddav /remote.php/dav/ 301
  redir /.well-known/caldav /remote.php/dav/ 301

  # Respond Handlers
  reverse_proxy nextcloud:80
}
Inspect the proxy network:
sudo docker network inspect proxyUpdate the docker-compose.yml file:
networks:
    proxy:
        external: true
        name: proxy
    internal:
        external: false

services:
    nextcloud:
        container_name: nextcloud
        image: nextcloud
        restart: always
        volumes:
            - ./data:/var/www/html/
        networks:
            - proxy
            - internal
        environment:
            - MYSQL_HOST=db
            - MYSQL_DATABASE=nextcloud
            - MYSQL_USER=nextcloud
            - MYSQL_PASSWORD=nextcloud_password
            - REDIS_HOST=redis
            - NEXTCLOUD_TRUSTED_DOMAINS=nextcloud.pixan.de
            - PHP_UPLOAD_LIMIT=10G
            - OVERWRITEPROTOCOL=https
            - OVERWRITEHOST=nextcloud.pixan.de
            - TRUSTED_PROXIES=172.18.0.0/12
            - APACHE_DISABLE_REWRITE_IP=1
        depends_on:
            - db
            - redis
    cron:
        container_name: nextcloud-cron
        image: nextcloud
        restart: unless-stopped
        volumes:
            - ./data:/var/www/html/
        networks:
            - internal
        entrypoint: /cron.sh
        depends_on:
            - db
            - redis
    db:
        container_name: nextcloud-db
        image: mariadb:11.4
        restart: unless-stopped
        command: --transaction-isolation=READ-COMMITTED --log-bin=binlog --binlog-format=ROW
        volumes:
            - ./db:/var/lib/mysql
        networks:
            - internal
        environment:
            - MYSQL_ROOT_PASSWORD=root_password
            - MYSQL_DATABASE=nextcloud
            - MYSQL_USER=nextcloud
            - MYSQL_PASSWORD=nextcloud_password
    redis:
        container_name: nextcloud-redis
        image: redis:7
        restart: unless-stopped
        cap_add:
            - SYS_RESOURCE
        user: "1000:1000"
        volumes:
            - ./redis:/data
        networks:
            - internal
Access the Nextcloud container:
sudo docker compose -f nextcloud/docker-compose.yml exec -u 33 nextcloud bashRun maintenance commands:
php occ db:add-missing-indices
php occ maintenance:repair --include-expensive
php occ config:system:set maintenance_window_start --type=integer --value=1
Nextcloud All in One
Let’s try a different approach by using Nextcloud All-in-One, even without Caddy:
nc-down
nc-remove
caddy-down
Run the following command:
sudo docker run \
--init \
--sig-proxy=false \
--name nextcloud-aio-mastercontainer \
--restart always \
--publish 80:80 \
--publish 8080:8080 \
--publish 8443:8443 \
--volume nextcloud_aio_mastercontainer:/mnt/docker-aio-config \
--volume /var/run/docker.sock:/var/run/docker.sock:ro \
nextcloud/all-in-one:latest
Then, open https://your-vps-ip-address:8080 in your browser and configure Nextcloud.
Conclusion
Installing Nextcloud on a VPS is a great way to set up your own cloud. Using Docker and Caddy makes the installation simple and flexible. I hope this blog post helped you launch your own Nextcloud instance. If you have any questions or suggestions, feel free to leave a comment.