Install Mistborn: Your Own Cloud with VPN & Firewall
Install Mistborn and turn your server into a secure cloud platform with built-in firewall and WireGuard VPN. A complete step-by-step guide – get started now!

Table of Contents
CAUTION
Please note that this blog post was originally written in German and has been translated for your convenience. Although every effort has been made to ensure accuracy, there may be translation errors. I apologize for any discrepancies or misunderstandings that may result from the translation and I am grateful for any corrections in the comments or via mail.
Suppose you want to avoid setting up a VPN with authentication, a firewall or IP filtering yourself. In that case, this can be simplified with Mistborn. Even other services, such as Nextcloud or Bitwarden, can be installed at the touch of a button.
Requirements
Mistborn requires any server, preferably Ubuntu.
A Raspberry Pi can also be used. For this, I recommend Ubuntu 21.04 (instead of Ubuntu 20.04 or Raspberry Pi OS). Otherwise, you will unfortunately run into problems.
It is recommended to have at least 2 GB RAM and 15 GB disk space for the basic installation. A public IP4 address and no DS-Lite connection must be available. Otherwise, Mistborn can also be installed on a VPS.
Setting up Ubuntu
First, we set up the host system after it has been installed.
On the Raspberry Pi, the default login data is {username: ubuntu; password: ubuntu}. This is also one reason why ssh is disabled by default. The username and password are not secure.
Open the terminal again to connect:
ssh ubuntu@192.168.0.47Of course, the data (user name, password and IP address) may differ.
Now, we first update the packages.
sudo apt update
sudo apt upgrade
sudo apt dist-upgrade
Confirm with Y if necessary.
You should update the password if not changed upon initial login.
passwd
ubuntu
newPassword
newPassword
The new password should be more secure. The correct time should be set.
dateIf the correct time is not displayed:
tzselectYou can select your time zone using the numbers.
timedatectl set-timezone 'Europe/Berlin'The htop command shows the system load.
htopIf it is not installed, first install it with sudo apt install htop.
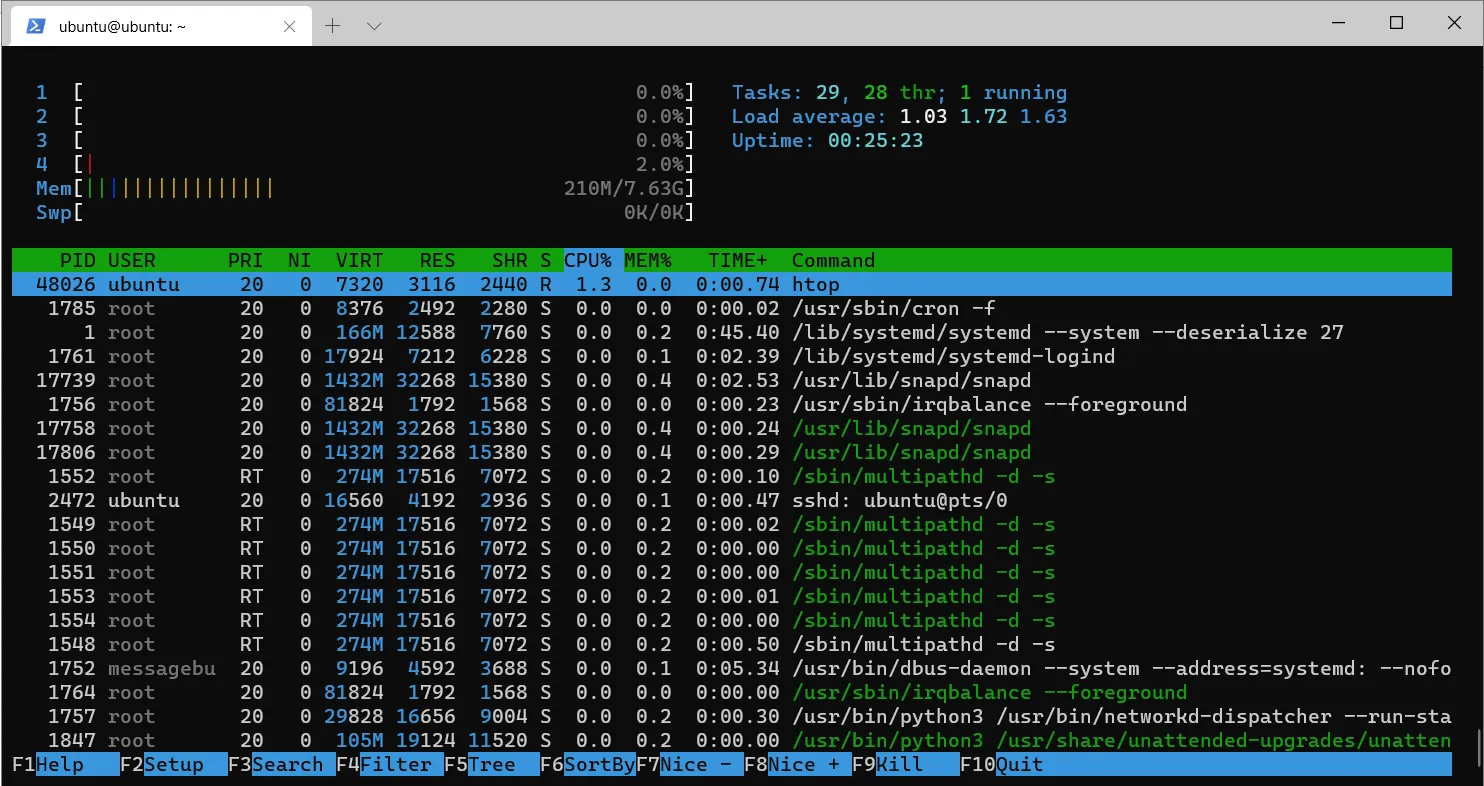
This makes it easy to see how much CPU and RAM are used. Press F10 or CTRL+C to exit the view.
With the Raspberry Pi, you can also display the temperature in °C*100 with cat /sys/class/thermal/thermal_zone0/temp.
We can rename our host.
cd /
sudo nano etc/hostname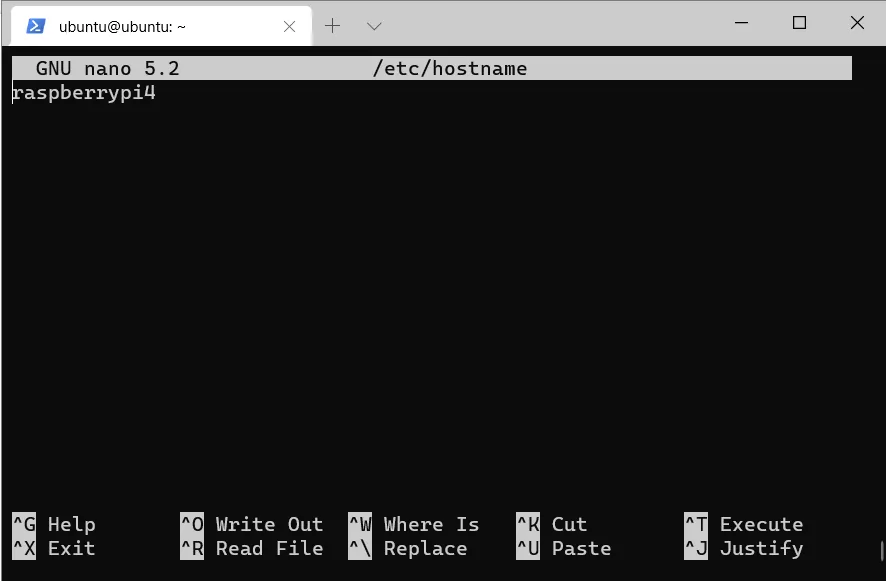
In Nano, exit the file with CTRL+DfIV1urYZXqXKiU4rOSfO0Iu589pEO. Nano will ask you if you want to save the changes (confirm with Y) and what the file should be called. As we want to overwrite it, we do not change the name; we simply confirm with Enter.
Let’s reboot to be safe before we use it to get the latest repository from Mistborn and run the installation script.
sudo reboot
### wait ###
ssh ubuntu@192.168.0.47
install Mistborn
git clone https://gitlab.com/cyber5k/mistborn.git
sudo -E bash ./mistborn/scripts/install.sh
First, you need to set a secure admin password and then choose whether to install Cockpit (this is not such a good idea on a smaller Raspberry Pi). The installation now takes a few minutes.
sudo journalctl -xfu Mistborn-baseWith this command, we read the log of the Mistborn-base. If everything goes normally, the configuration for Wireguard can be read out.
sudo mistborn-cli getconfThis text will then appear.
# "10.15.91.2" - WireGuard Client Profile
[Interface]
Address = 10.15.91.2/32
# The use of DNS below effectively expands to:
# PostUp = echo nameserver 10.15.91.1 | resolvconf -a tun.%i -m 0 -x
# PostDown = resolvconf -d tun.%i
# If the use of resolvconf is not desirable, simply remove the DNS line
# and use a variant of the PostUp/PostDown lines above.
# The IP address of the DNS server that is available via the encrypted
# WireGuard interface is 10.15.91.1.
DNS = 10.15.91.1
PrivateKey = cPPflVGsxVFw2/lMmhiFTXMmH345bGqoqArD/NgjiXU=

[Peer]
PublicKey = DfIV1urYZXqXKiU4rOSfO0Iu589pEO+59dHV5w5N0mU=
PresharedKey = Z1SO5NuAnZ7JhzVCuUnYOQLWOQYmMoqG0pG1SNXUlh0=
AllowedIPs = 0.0.0.0/0,::/0
Endpoint = <Mistborn public IP address>:55080
Wireguard must now be installed on the client.
An empty tunnel can be added to the program. The text from the config goes in there.
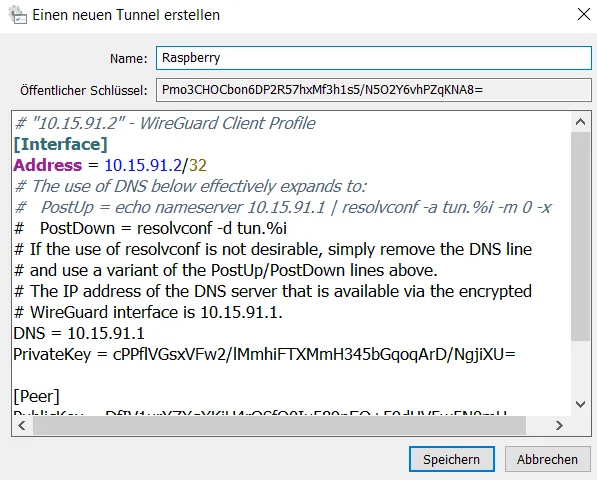
If a domain has already been set up or you have decided on a DynDNS, you should change the IP address in the last line.
![]()
Otherwise, you have to set up a domain.
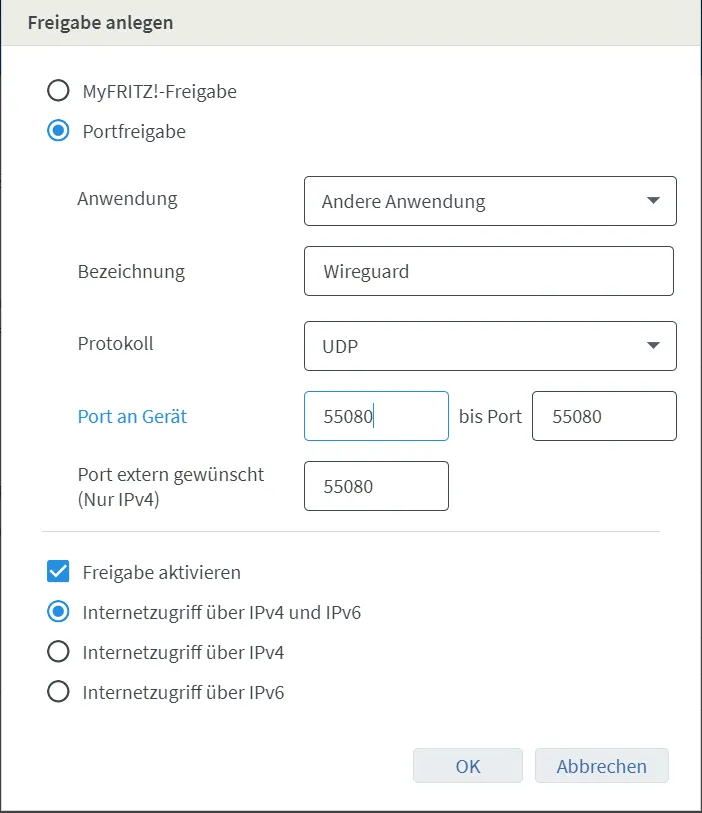
The next step is port sharing. The last number in the configuration file (in this case, 55080) must be released. With a Fritz!Box this is possible under Shares and then Port Sharing.
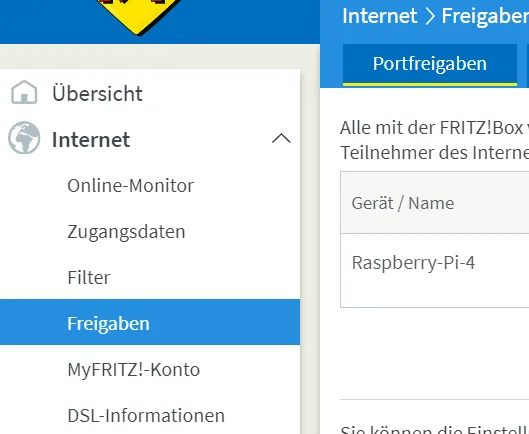
A “New share” can be created here. The device must be selected there with Mistborn and then the share is created in the UDP protocol.
Once everything has been confirmed, you can connect to the profile in WireGuard and, in the best case, you will see that a two-way transfer is taking place.

The website http://home.mistborn/wireguard/ can now be called up. If the dashboard opens, the installation is complete :)
Related Articles
Asustor NAS Homeserver Setup with Docker: VPN, Gitea & Calibre
Set up your Asustor NAS as a homeserver step by step: VPN, firewall, reverse proxy, Gitea and Calibre with Docker. The complete NAS homeserver guide.
Synology NAS Setup: Your First Homeserver Step-by-Step
Set up your Synology DiskStation from scratch: VPN, DDNS, Firewall, Docker, and Nginx Proxy Manager. The complete NAS homeserver setup guide for beginners.
Setting up Ubuntu Homeserver with Docker (Intel-Nuc)
Set up your Ubuntu homeserver step-by-step: from base configuration to your first Docker containers. The complete guide for beginners. Start building today.
Install Karakeep: Self-Hosted Bookmark Manager with Docker
Install Karakeep as your self-hosted bookmark manager with Docker. Includes Caddy reverse proxy and optional AI integration – full control over your bookmarks!