Build a Blog with Gatsby.js and Ghost CMS on Your VPS
Step-by-step guide: Build a blog with Gatsby.js and Ghost as a headless CMS. Set up everything on your VPS, configure Docker, and publish your website.

Table of Contents
CAUTION
Please note that this blog post was originally written in German and has been translated for your convenience. Although every effort has been made to ensure accuracy, there may be translation errors. I apologize for any discrepancies or misunderstandings that may result from the translation and I am grateful for any corrections in the comments or via mail.
On this page, I summarize the content of my videos about Gatsby and Ghost. I think there are not enough instructions in German, so I have created one. And now translate it into English. It’s about making your first Gatsby.js site from scratch, installing Ghost on a VPS, using it as a headless CMS, and publishing the site online in the Gatsby cloud. I show all the steps required to do this. I won’t go into every little detail but rather try to give an overview.
Videos
I have created a playlist on YouTube. So far, the first part and the second part are online (links to YouTube). The third part is missing.
Installation of the Gatsby page
Installation of the Gatsby CLI
A few programs must be pre-installed before the local Gatsby page can be created. We need Node.js, Git and VSCode (or another text editor).
We install the Gatsby CLI in the terminal (run as administrator).
npm install -g gatsby-cli
The Gatsby CLI is now installed.
Create a Gatsby page
First, git/bash must be opened (either standalone or in VSCode)

The command gatsby new creates a new Gatsby page.
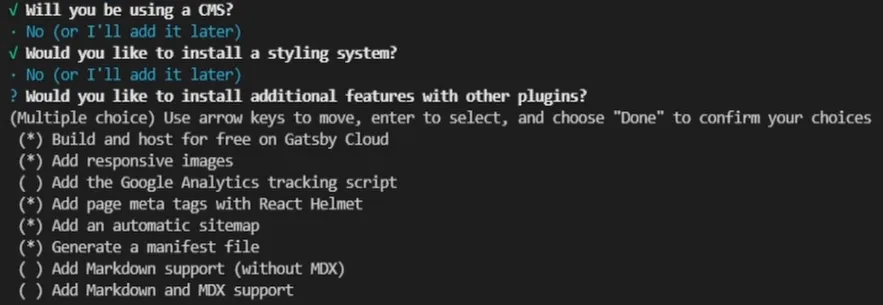
The Gatsby page is now created.
Starting the live server
To start the live server, follow the instructions displayed.
cd namedesneuenverzeichnisses
# or cd full path of the directory where the new page was created
npm run develop
The live server is started. It is terminated again with Ctrl + C.
Edit local Gatsby project
After the project is opened, the individual elements can now be edited.
Customize Index.js
The content of index.js in the /src/pages directory can be deleted, we want to add our own instead.
/src/pages/index.js:
import * as React from "react";

const IndexPage = () => {
	return (
		<div>
			<h1> Hello world </h1>
			<p> Your advertisement could be placed here 😃 </p>
		</div>
	);
};

export default IndexPage;
HTML-in-JS code can then be used within the return function. The changes can be seen if the development server is started again (either gatsby develop or npm run develop).
Integrate CSS globally
CSS can be used for styling. To do this, create a CSS file and edit it.
mkdir src/styles
touch src/styles/global.css
I create a global.css in a styles folder
I then put ordinary CSS code in this folder.
/src/styles/global.css:
body {
	margin: 0 auto;
	max-width: 50em;
}

h1 {
	color: slateblue;
}
The CSS code can be imported into the respective Gatsby page or use the gatsby-browser. To do this, create gatsby-browser.js in the root directory.
touch gatsby-browser.jsInsert the following code into the file:
import "./src/styles/global.css";The changes will be visible through the CSS file when the server is restarted.
Link multiple subpages with Gatsby link
We create a new subpage in the Pages directory.
touch src/pages/about.jsAnd insert the code we need there again.
import * as React from "react";

const About = () => {
	return (
		<div>
			<h1> About </h1>
			<p> This is the about page 😃 </p>
			<p> Unfortunately, there is no link to the main page yet </p>
		</div>
	);
};

export default About;
This page can be seen after saving under localhost:8000/about if the Gatsby server is still running.
With Gatsby-Link you can insert internal links. We just have to import it. To do this, we change the about page again.
import * as React from 'react'
import { Link } from 'gatsby'

const About = () => {
  return (
    <div>
      <h1> About </h1>
      <p> This is the about page 😃 </p>
      <p>
        <Link to='/'> Home </link> is now linked.
      </p>
    </div>
  )
}

export default About
Structure with components
I can empty the Gatsby-Browser.js file again; we don’t need it now. It is recommended to use reusable components. To do this, we create a new folder.
mkdir src/components
touch src/components/layout.js
I add the following code to Layout.js:
import * as React from "react";
import { Link } from "gatsby";

const Layout = ({ pageTitle, children }) => {
  return (
    <main>
      <title>{pageTitle}</title>
      <nav>
        <ul>
          <li>
            <link to="/">Home</link>
          </li>
          <li>
            <Link to="/about">About</Link>
          </li>
          <li>
            <a href="https://deployn.de" target="_blank">Deployn</href>
          </li>
        </ul>
      </nav>
      <h1>{pageTitle}</h1>
      {children}
    </main>
  );
};

export default Layout;
The link in the <a> tag is significantly slower (and this is not only due to the speed of my site).
Now, the pages have to be adapted.
import * as React from 'react'
import Layout from '../components/layout'

const About = () => {
  return (
    <Layout pageTitle='About'>
      <p> This is the about page 😃 </p>
    </layout>
  )
}

export default About
import * as React from 'react'
import Layout from '../components/layout'
const IndexPage = () => {
return (
<Layout pageTitle='Home'>
<p> This is not the about page 😃 </p>
</layout>
)
}
export default IndexPageThis gives me a layout component that I use again.
Styling with components
I create a module.css.
touch src/components/layout.module.cssCSS code goes in there.
.container {
	margin: 0 auto;
	max-width: 50em;
}

.heading {
	color: slateblue;
}
We import this CSS into the component.
import * as React from "react";
import { link } from "gatsby";
import { container, heading } from "./layout.module.css";

const Layout = ({ pageTitle, children }) => {
  return (
    <main className={container}>
      <title>{pageTitle}</title>
      <nav>
        <ul>
          <li>
            <link to="/">Home</link>
          </li>
          <li>
            <Link to="/about">About</Link>
          </li>
          <li>
            <a href="https://deployn.de" target="_blank">Deployn</href>
          </li>
        </ul>
      </nav>
      <h1 className={heading}>{pageTitle}</h1>
      {children}
    </main>
  );
};

export default Layout;
Insert images with Gatsby plugin image
With Gatsby-Plugin-Image you can insert and optimize images. The plugin must be installed for this.
npm install gatsby-plugin-imageIt must also be listed as a plugin in the Gatsby-Config.
We want to insert a static image, first we insert any image into the project.
mkdir src/images
# now insert an image here
This image should be loaded on the About page. To do this, import and use StaticImage.
import * as React from 'react'
import { StaticImage } from 'gatsby-plugin-image'
import Layout from '../components/layout'

const About = () => {
  return (
    <Layout pageTitle='About'>
      <p> This is the about page 😃 </p>
      <StaticImage src='../images/image.jpg' />
    </layout>
  )
}

export default About
A few more options can be used.
import * as React from "react";
import { StaticImage } from "gatsby-plugin-image";
import Layout from "../components/layout";

const About = () => {
	return (
		<Layout pageTitle="About">
			<p> This is the about page 😃 </p>
			<StaticImage src="../images/image.jpg" alt="An image description" width="200" placeholder="tracedSVG" />
		</Layout>
	);
};

export default About;
The Documentation explains the plugin in more detail.
Provide Gatsby page
The site URL may have to be entered in the Gatsby-config for the build.
module.exports = {
siteMetadata: {
title: "Deployn",
siteUrl: "https://deployn.de",
},
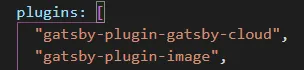
plugins: [
"gatsby-plugin-gatsby-cloud",
"gatsby-plugin-image",
"gatsby-plugin-react-helmet",
"gatsby-plugin-sitemap",
{
resolve: "gatsby-plugin-manifest",
options: {
icon: "src/images/icon.png",
},
},
"gatsby-plugin-sharp",
"gatsby-transformer-sharp",
{
resolve: "gatsby-source-filesystem",
options: {
name: "images",
path: "./src/images/",
},
__key: "images",
},
},
],
};The build process can now be started.
npm run buildA page is now created in the public folder. The page can be published by packing the content on a web server.
Set up server
Next, a CMS is required. I would like to use Ghost.js headless for this. Suppose you have already set up a server with Traefik as a proxy manager. You can use these instructions in that case. Otherwise, I will summarize the steps again here.
If you want to avoid installing Ghost locally (difficult if it should always be online and there are several authors) or use Ghost Pro for financial reasons, the only option is hosting on a server.
Rent a VPS
I use a server from Netcup (affiliate link). For new customers, I have vouchers for the servers here. If you only use the server for Ghost, the smallest one is sufficient but has little storage space.
Installing Ubuntu 20.04
I install Ubuntu 20.04 on the server.
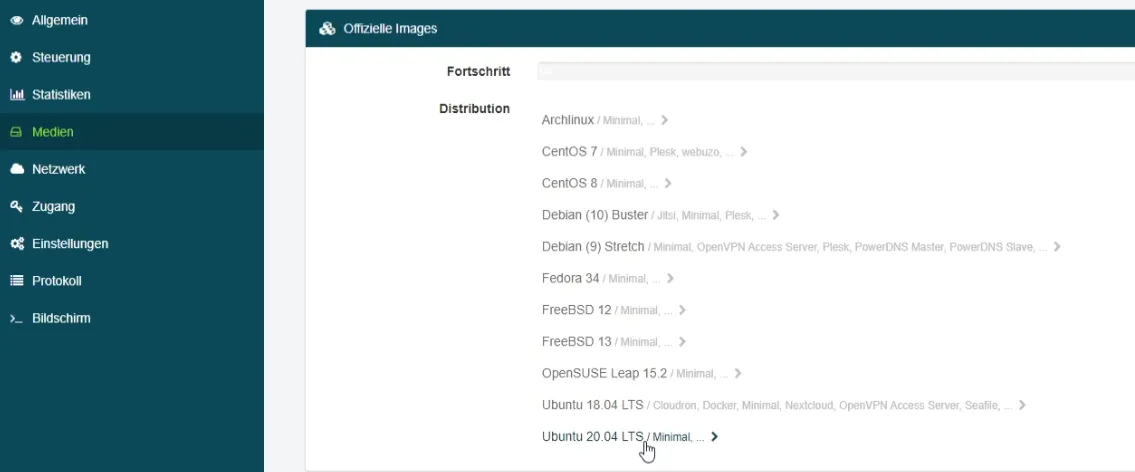
Does it also work with the other images? Yes, even almost identical, because I use Docker.
Establish SSH connection
I establish an SSH connection to the server. For Windows, I first have to activate the OpenSSH client. Click “Optional features” under “Apps and features” to do this.
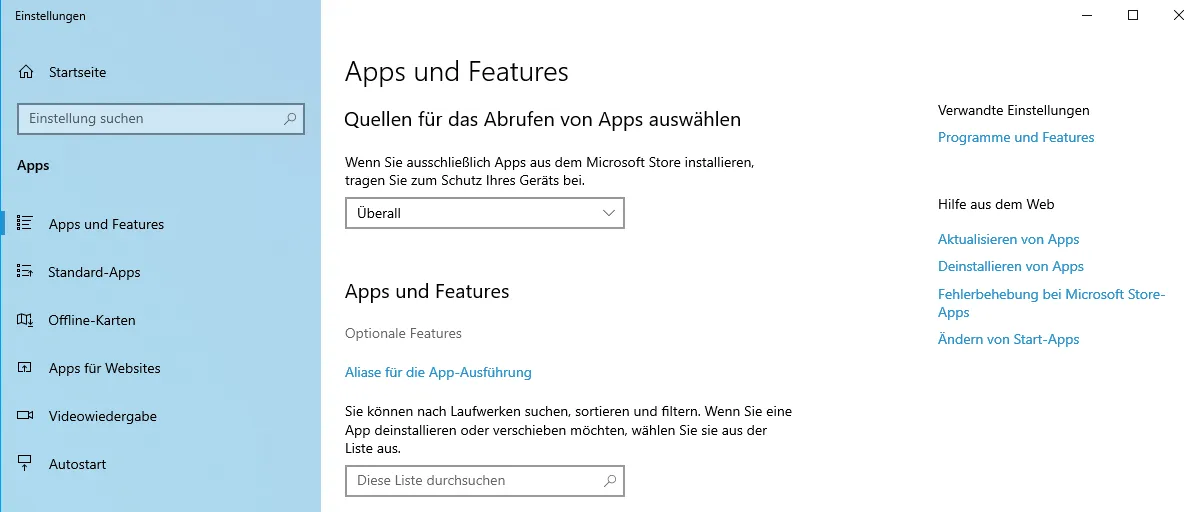
The OpenSSH client can be installed there (not to be confused with the OpenSSH server).

Now call up a terminal.
ssh root@185.183.158.137
The IP address must be that of your own server.
Set up user
apt update apt upgrade
This updates the server from the Ubuntu data packages
useradd -m -G sudo jewgeni passwd jewgeni
With this, we create a new user, add him to the sudo group and give him a password.
reboot
This restarts the server
ssh jewgeni@185.183.158.137
This time we connect to the newly created user.
Install Docker
Option 1 is to simply install Docker from the standard Ubuntu packages.
sudo apt install docker docker-compose
Disadvantage: It is not the latest version.
Option 2 is to follow the official instructions.
sudo apt-get remove docker docker-engine docker.io containerd runc
sudo apt-get update
sudo apt-get install apt-transport-https ca-certificates curl gnupg lsb-release
curl -fsSL https://download.docker.com/linux/ubuntu/gpg | sudo gpg --dearmor -o /usr/share/keyrings/docker-archive-keyring.gpg
echo \
  "deb [arch=amd64 signed-by=/usr/share/keyrings/docker-archive-keyring.gpg] https://download.docker.com/linux/ubuntu \
  $(lsb_release -cs) stable" | sudo tee /etc/apt/sources.list.d/docker.list > /dev/null
  sudo apt-get update
  sudo apt-get install docker-ce docker-ce-cli containerd.io
Docker is now installed
sudo gpasswd -a jewgeni docker
This adds the user to the Docker group I also install Lazydocker.
curl https://raw.githubusercontent.com/jesseduffield/lazydocker/master/scripts/install_update_linux.sh | bashI create a Docker folder and give the Docker group all rights.
mkdir docker
sudo apt install acl
sudo setfacl -Rdm g:docker:rwx docker
sudo setfacl -Rm g:docker:rwx docker
sudo chmod -R 775 docker
sudo chown -R jewgeni:docker docker
Set up domain
Next, I need a domain for the server. Again, I use Netcup (affiliate link). A domain with “.de” as TLD costs 5 € per year (also in the following years).
In the domain’s DNS settings, I set an entry for root (@), as well as one with a wildcard (*), after I have deleted the default values.

It may take up to 48 hours for the changes to take effect after saving.
Nginx Proxy Manager
Install
To simplify the management of an Nginx reverse proxy and Let’s Encrypt certificates, I would like to install the Nginx Proxy Manager on the server.
ssh jewgeni@185.183.158.137
Reconnect to the server
cd ~/docker
sudo docker network create npm_net
mkdir nginx-proxy-manager
cd nginx-proxy-manager
mkdir data/mysql -p
mkdir letsencrypt
touch .env
echo "DB_PWD=$(openssl rand -hex 16)" >> .env
echo "DB_ROOT_PWD=$(openssl rand -hex 16)" >> .env
touch docker-compose.yml
We have thus created a new Docker network with additional directories and two files in the new nginx-proxy-manager folder. The Docker-Compose file must be filled. You can also use VSCode.
nano docker-compose.ymlversion: "3.7"
networks:
npm_net:
external:
name: npm_net
internal:
external: false
default:
driver: bridge
services:
nginx-proxy-manager:
container_name: nginx-proxy-manager
image: jc21/nginx-proxy-manager:2.9.3
restart: unless-stopped
networks:
- npm_net
- internal
ports:
- "80:80"
- "443:443"
- "81:81"
environment:
DB_MYSQL_HOST: npm_db
DB_MYSQL_PORT: 3306
DB_MYSQL_USER: npm
DB_MYSQL_PASSWORD: $DB_PWD
DB_MYSQL_NAME: npm
DISABLE_IPV6: true
volumes:
- ./data:/data
- ./letsencrypt:/etc/letsencrypt
depends_on:
- npm_db
npm_db:
container_name: npm_db
image: mariadb:10.6.1
restart: unless-stopped
networks:
- internal
environment:
MYSQL_ROOT_PASSWORD: $DB_ROOT_PWD
MYSQL_DATABASE: npm
MYSQL_PASSWORD: $DB_PWD
MYSQL_USER: npm
volumes:
- ./data/mysql:/var/lib/mysqldocker-compose up -dThe logs can be viewed in Lazydocker.
lazydocker
# or sudo lazydocker
Configure
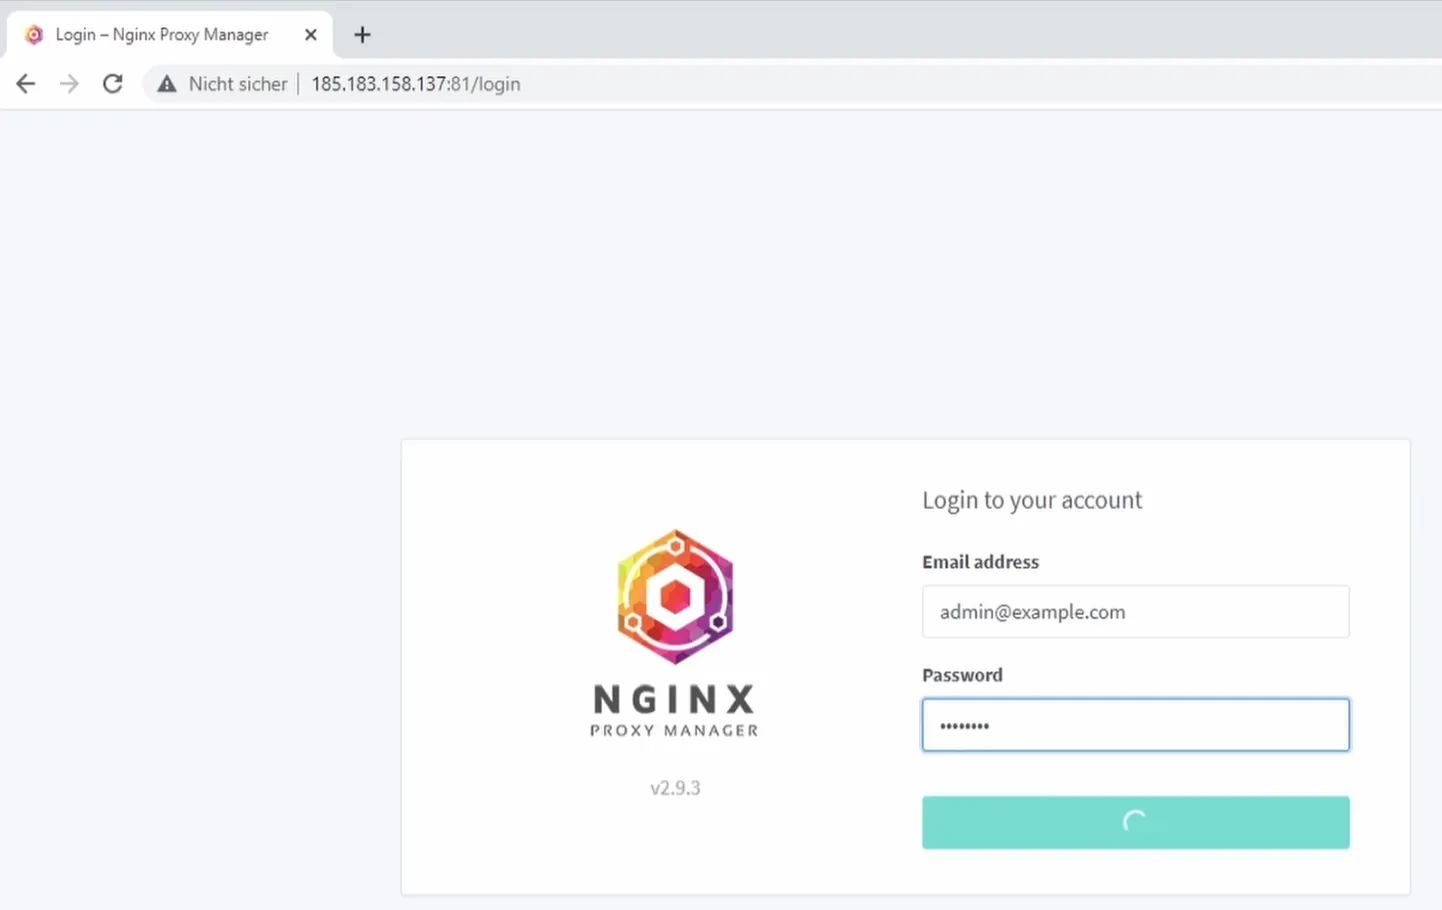
The login under the IP address and port 81 is done with admin@example.com and the password “changeme”.
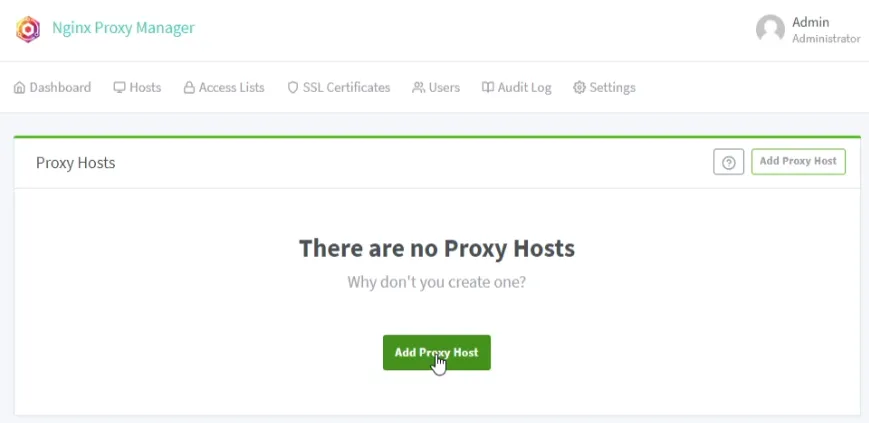
We need a new proxy host.
The subdomain under which you want to access this GUI of the nginx-proxy-manager must now be entered as the domain. The hostname is localhost. Port is 81 unless this setting has been changed in the docker-compose file.
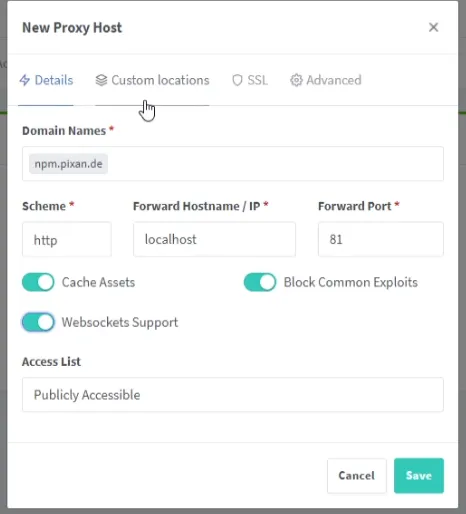
A new certificate must be requested under the SSL settings.
The nginx-proxy-manager can be called up via the subdomain as soon as it is saved.
Firewall
We install a firewall on the server (optional).
ssh jewgeni@185.183.158.137
Reconnect to the server
sudo ufw allow 80/tcp
sudo ufw allow 443/tcp
sudo ufw allow 22/tcp
sudo ufw default deny incoming
sudo ufw enable
sudo reboot
A different port must be selected if SSH is not used via port 22, otherwise you will lock yourself out Docker ensures that the firewall does not block properly. At Github there is a solution:
sudo nano /etc/ufw/after.rules
The following code is added to the bottom of this file.
# BEGIN UFW AND DOCKER
*filter
:ufw-user-forward - [0:0]
:ufw-docker-logging-deny - [0:0]
:DOCKER-USER - [0:0]
-A DOCKER-USER -j ufw-user-forward

-A DOCKER-USER -j RETURN -s 10.0.0.0/8
-A DOCKER-USER -j RETURN -s 172.16.0.0/12
-A DOCKER-USER -j RETURN -s 192.168.0.0/16

-A DOCKER-USER -p udp -m udp --sport 53 --dport 1024:65535 -j RETURN

-A DOCKER-USER -j ufw-docker-logging-deny -p tcp -m tcp --tcp-flags FIN,SYN,RST,ACK SYN -d 192.168.0.0/16
-A DOCKER-USER -j ufw-docker-logging-deny -p tcp -m tcp --tcp-flags FIN,SYN,RST,ACK SYN -d 10.0.0.0/8
-A DOCKER-USER -j ufw-docker-logging-deny -p tcp -m tcp --tcp-flags FIN,SYN,RST,ACK SYN -d 172.16.0.0/12
-A DOCKER-USER -j ufw-docker-logging-deny -p udp -m udp --dport 0:32767 -d 192.168.0.0/16
-A DOCKER-USER -j ufw-docker-logging-deny -p udp -m udp --dport 0:32767 -d 10.0.0.0/8
-A DOCKER-USER -j ufw-docker-logging-deny -p udp -m udp --dport 0:32767 -d 172.16.0.0/12

-A DOCKER-USER -j RETURN

-A ufw-docker-logging-deny -m limit --limit 3/min --limit-burst 10 -j LOG --log-prefix "[UFW DOCKER BLOCK] "
-A ufw-docker-logging-deny -j DROP

COMMIT
# END UFW AND DOCKER
Now I have to allow the routes.
sudo ufw route allow 80/tcp sudo ufw route allow 443/tcp sudo reboot
Ghost CMS
Installation
The installation of Ghost is straightforward using Docker. To do this, I reconnect to the server.
ssh jewgeni@185.183.158.137
Reconnect to the server
cd ~/docker
mkdir ghost
cd ghost
mkdir content
mkdir db
touch .env
touch docker-compose.yml
echo "DB_PWD=$(openssl rand -hex 20)" >> .env
nano docker-compose.ymlversion: "3.7"
networks:
npm_net:
external:
name: npm_net
internal:
external: false
default:
driver: bridge
services:
ghost:
container_name: ghost
image: ghost:4.6.4
restart: unless-stopped
networks:
- npm_net
- internal
security_opt:
- no-new-privileges:true
environment:
- database_client=mysql
- database_connection_host=ghost-db
- database_connection_user=root
- database_connection_password=$DB_PWD
- database_connection_database=ghost
- url=https://ghost.pixan.de
volumes:
- ./content:/var/lib/ghost/content
depends_on:
- ghost-db
ghost-db:
container_name: ghost-db
image: mariadb:10.6.1
restart: unless-stopped
networks:
- internal
security_opt:
- no-new-privileges:true
environment:
MYSQL_ROOT_PASSWORD: $DB_PWD
volumes:
- ./db:/var/lib/mysqldocker-compose up -dGhost reverse proxy
The next step is to set up a new proxy host for Ghost in the Nginx proxy manager. The hostname corresponds to the name of the service (in my case ghost). The port of Ghost is 2368.
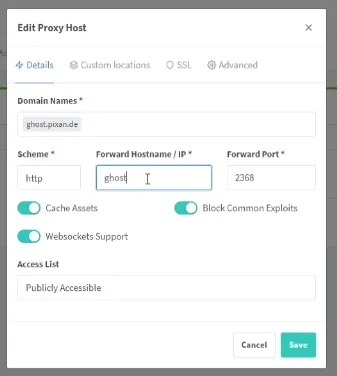
Request a new certificate again under the SSL settings (or switch to DNS challenge).
After saving, the Ghost CMS should be accessible via the URL. The administration is located under domain.de/ghost. Here, you have to create an account.
Headless
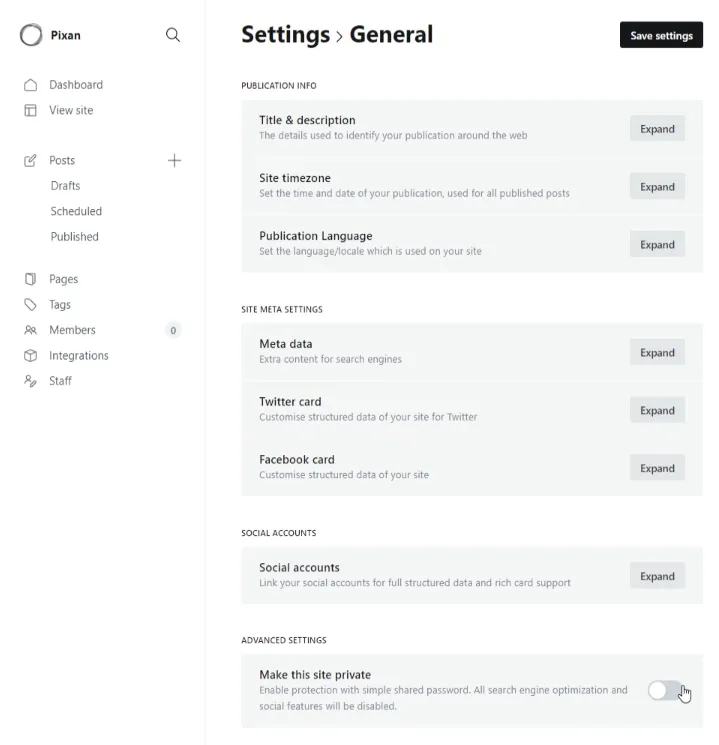
Ghost automatically creates a frontend (like WordPress, for example). You can also run a blog directly if you don’t use Gatsby. However, we do not need a frontend that is to be visited by strangers. We can, therefore, set the page to private in the settings.
Posts
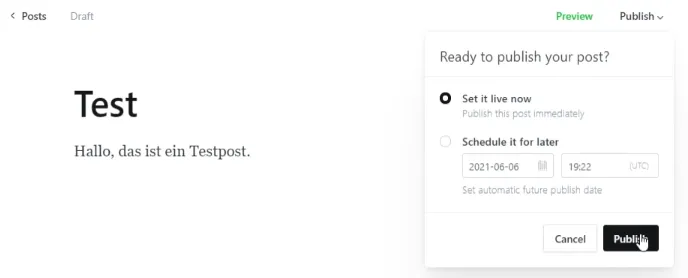
If you delete the Ghost user, at least two test posts should be created and published as a test. Otherwise, we have nothing to run the query on later.
Ghost as source
Install plugin
The Gatsby Source Ghost plugin must be installed in the Gastby page to use Ghost as a source.
npm install gatsby-source-ghost
Content-API-Key
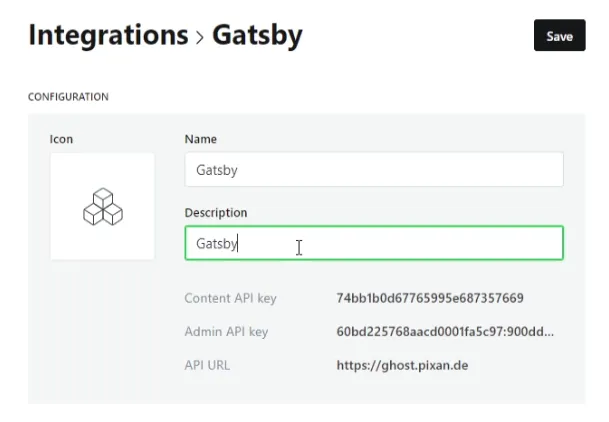
The plugin requires the content api key to be able to verify itself. This can be created in the Ghost instance under the menu item “Integrations”.
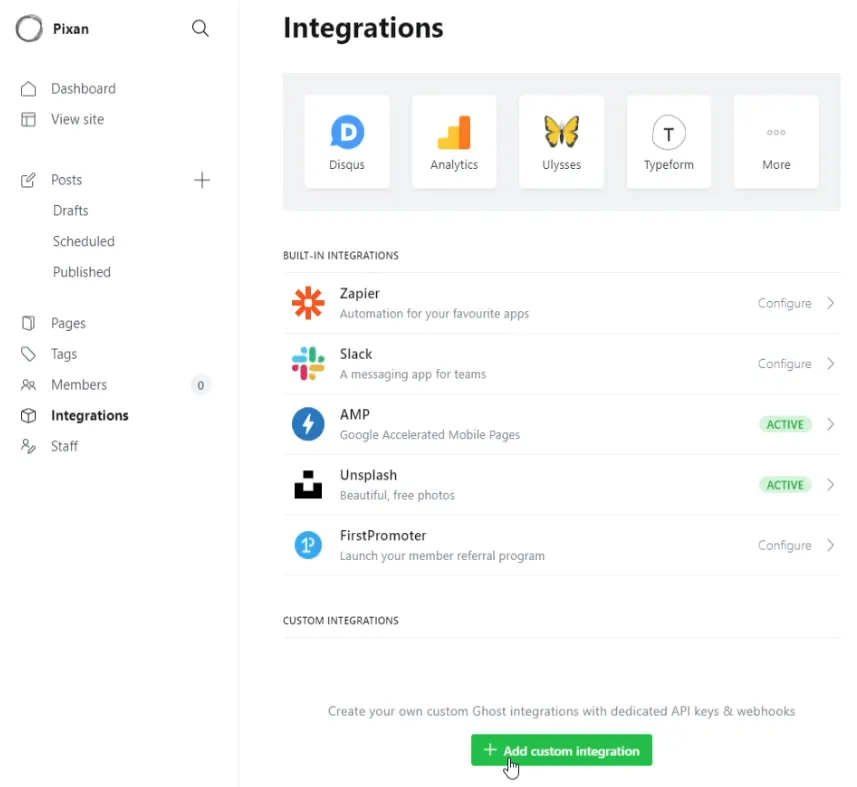
After a name has been assigned, the API key can be seen.
Integration in Gatsby
The plugin must then be added to the Gatsby config file, including its own data.
module.exports = {
	siteMetadata: {
		title: "Pixan",
		siteUrl: "https://pixan.de",
	},
	plugins: [
		"gatsby-plugin-gatsby-cloud",
		"gatsby-plugin-image",
		"gatsby-plugin-react-helmet",
		"gatsby-plugin-sitemap",
		{
			resolve: "gatsby-plugin-manifest",
			options: {
				icon: "src/images/icon.png",
			},
		},
		"gatsby-plugin-sharp",
		"gatsby-transformer-sharp",
		{
			resolve: "gatsby-source-filesystem",
			options: {
				name: "images",
				path: "./src/images/",
			},
			__key: "images",
		},
		{
			resolve: `gatsby-source-ghost`,
			options: {
				apiUrl: `https://ghost.pixan.de`,
				contentApiKey: `74bb1b0d67765995e687357669`,
			},
		},
	],
};
A gatsby-node.js must now be created in the root directory.
const path = require(`path`);

exports.createPages = async ({ graphql, actions, reporter }) => {
	const postTemplate = path.resolve(`./src/templates/post.js`);

	// Query ghost data
	const result = await graphql(`
		{
			allGhostPost(sort: { order: ASC, fields: published_at }) {
				edges {
					node {
						slug
					}
				}
			}
		}
	`);

	// Handle errors
	if (result.errors) {
		reporter.panicOnBuild(`Error while running GraphQL query.`);
		return;
	}

	if (!result.data.allGhostPost) {
		return;
	}

	// Create pages for each Ghost post
	const items = result.data.allGhostPost.edges;
	items.forEach(({ node }) => {
		node.url = `/${node.slug}/`;

		actions.createPage({
			path: node.url,
			component: postTemplate,
			context: {
				slug: node.slug,
			},
		});
	});
};
We need the template file for the posts to be created dynamically from the GhostPosts. We save them in the src/templates folder.
cd src
mkdir templates
cd templates
touch post.js
import React from "react";
import { graphql } from "gatsby";
const Post = ({ data }) => {
const post = data.ghostPost;
return (
<>
<article className="post">
{post.feature_image ? <img src={post.feature_image} alt={post.title} /> : null}
<h1>{post.title}</h1>
<section dangerouslySetInnerHTML={{ __html: post.html }} />
</article>
</>
);
};
export default Post;
export const postQuery = graphql`
query ($slug: String!) {
ghostPost(slug: { eq: $slug }) {
title
slug
feature_image
html
}
}
`;This creates the posts dynamically.
Dynamic list
For example, I would like all posts to be shown as a link on the blog page. To do this, we change the blog.js file.
import * as React from 'react'
import { graphql, Link } from 'gatsby'
import Layout from '../components/layout'

const Blog = ({ data }) => {
  return (
    <Layout pageTitle='Blog'>
      <p>Here could be a blog.</p>
      <ul>
        {data.allGhostPost.edges.map(({ node }) => (
          <li>
            <link to={`/${node.slug}`}>{node.title}</link>
          </li>
        ))}
      </ul>
    </layout>
  )
}

export default Blog

export const postSlug = graphql`
  query MyQuery {
    allGhostPost {
      edges {
        node {
          slug
          title
        }
      }
    }
  }
`
All slugs are searched for the corresponding title using the map function. The title is displayed and the link naturally leads to the slug.
Publish in the Gatsby Cloud
Create a repository
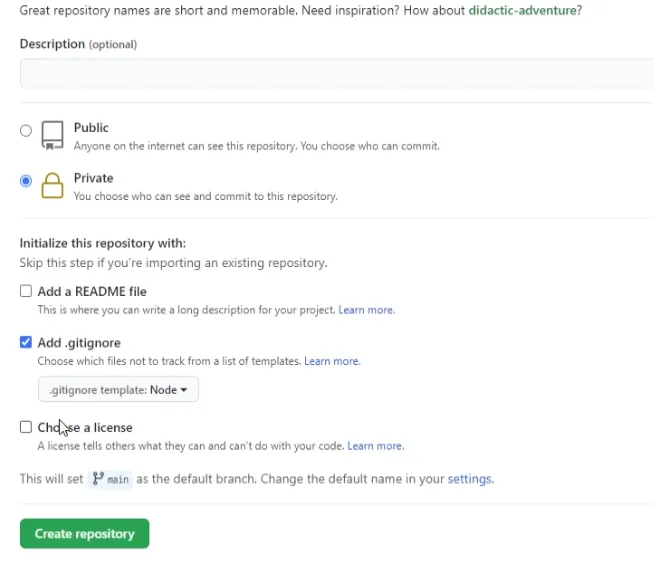
First I need a repository. I use GitHub for this. After logging in, a new (private) repository can be created.
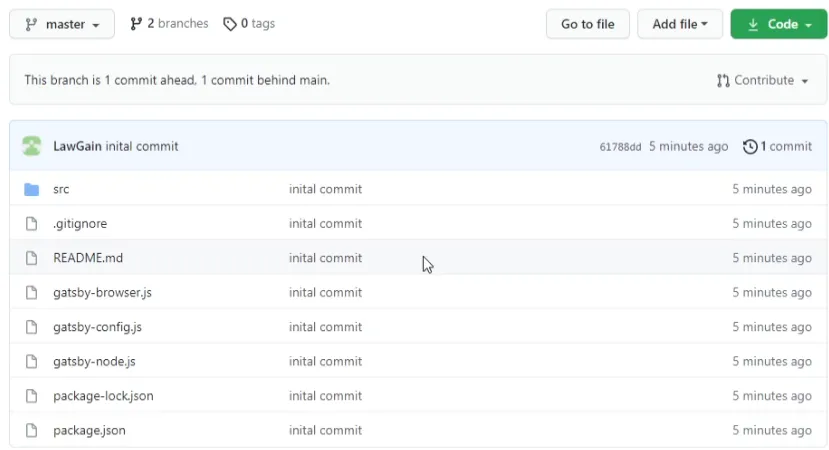
Copy local project to Github
I initiate Git in my Gatsby project. For the pull, I need the URL of the repository.
git init
git pull https://github.com/Benutzername/Name.git
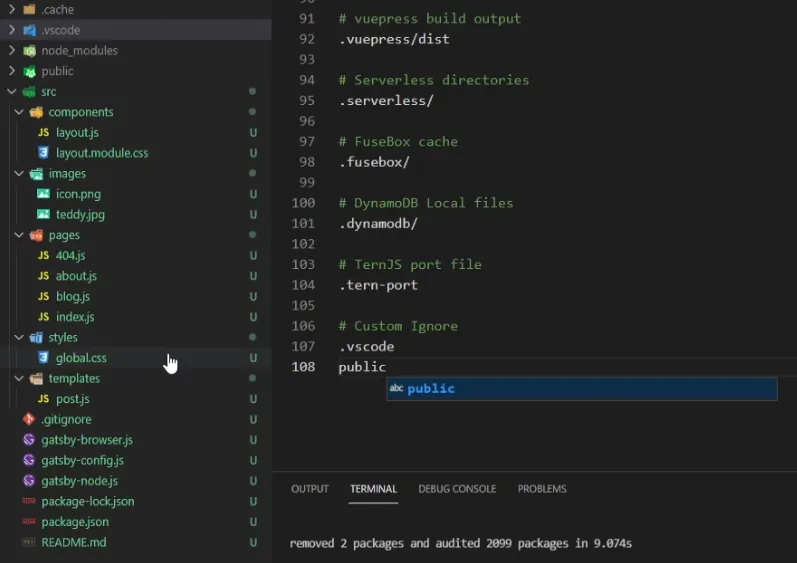
git remote add origin https://github.com/Benutzername/Name.gitI add at least .cache, .vscode, node-modules and public to the git ignore file so that these files or directories are not uploaded.
Git must be configured before uploading.
git config --global user.name "Github Name"
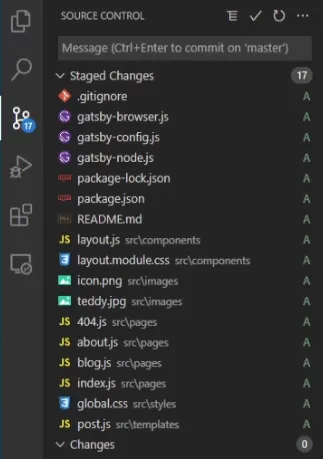
git config --global user.email eigenemail@gmail.comNow select all files so that they appear in the staged changes. Confirm with the checkmark and write a comment.
The changes can be synchronized via the symbol below.
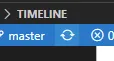
You should then be able to see the code in master-branch in Github.
Gatsby Cloud
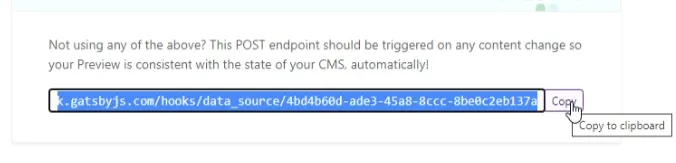
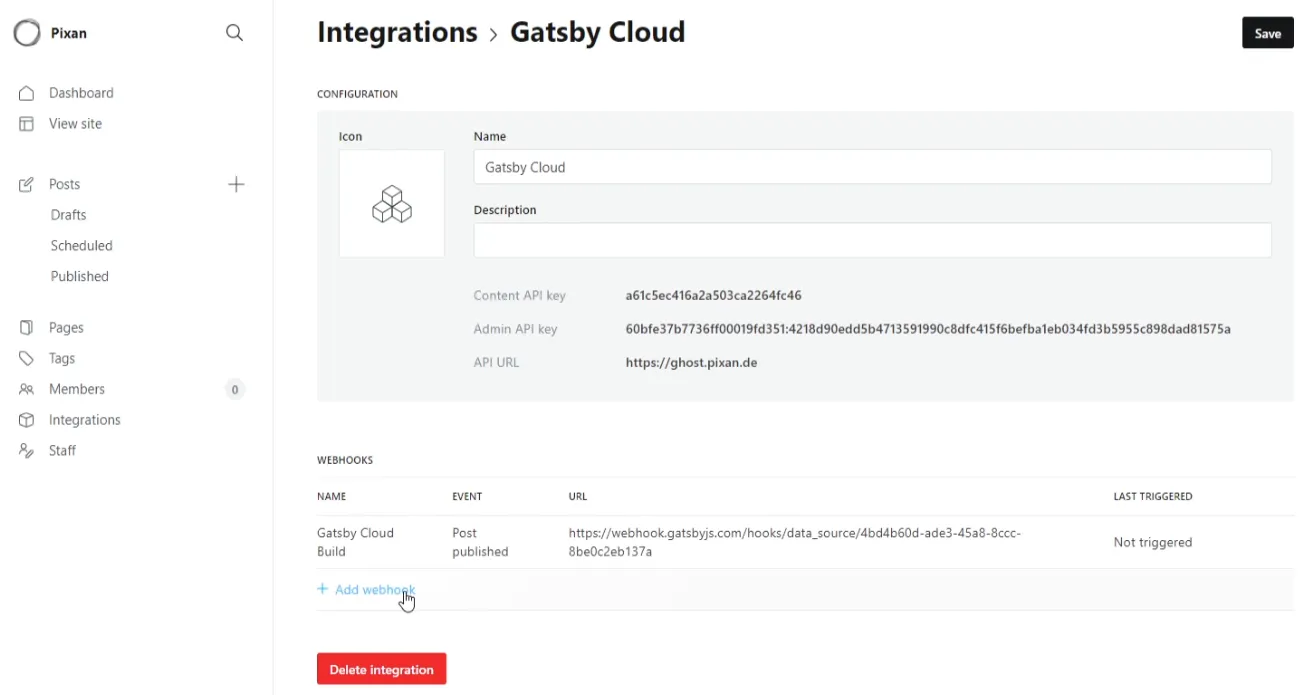
Now, create a free account in the Gatsby Cloud. A webhook is displayed when adding a new page from a GitHub repository. Let’s copy it.
This can, in turn, be added to the integrations as a custom integration in Ghost.
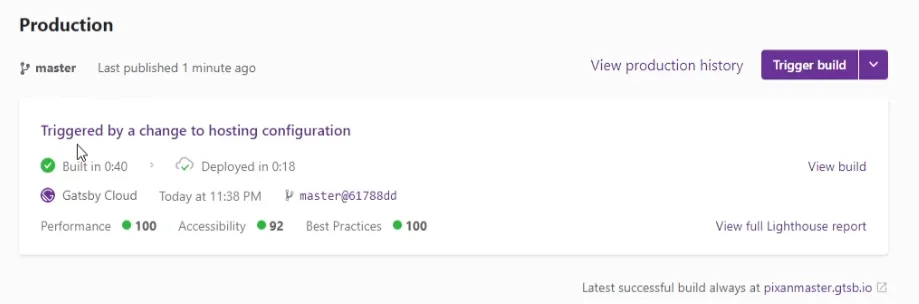
Finally, the page should be created.
You can add your own domain under the settings.

The displayed DNS settings must be set.

The setup is complete, and the site can be accessed (possibly only after a few hours) under your domain.
Related Articles
Set Up Ghost CMS with Docker & Traefik: Full Guide
Run Ghost CMS with Docker behind a Traefik reverse proxy. A step-by-step guide for building your own blog system with SSL and a custom domain – get started now!
Astro.js & Docker: Deploy Your Site on a VPS (Static & Dynamic)
Astro.js with Docker on your VPS: static (Nginx) or dynamic (Node.js). Full tutorial with current Dockerfiles, Docker Compose, and deployment workflow.
Guide for mail server Mailcow behind Traefik with Docker
Set up your own mail server with Mailcow and Docker. Run it behind Traefik as a reverse proxy with SSL, spam filtering, and webmail – complete step-by-step guide!
How to Install Plausible Analytics with Docker & Traefik
Install the privacy-friendly Google Analytics alternative Plausible with Docker and Traefik. Set up self-hosted web analytics on your own server step by step.