5 Ways to Rename Multiple Files at Once on Windows 11/10
Rename multiple files at once on Windows 11 and 10. Five easy methods: File Explorer, CMD, PowerShell, Excel, and PowerRename – with step-by-step examples!

Table of Contents
Why Rename Multiple Files on Windows?
There are many situations where you may need to rename multiple files in a folder on Windows 11 or Windows 10:
- Organizing photos from your camera
- Versioning documents for better organization
- Changing the file name structure for consistency
- Correcting typos or replacing terms across many filenames
While you can rename files individually, this gets tedious if you have dozens or hundreds to modify. Luckily, Windows provides ways to bulk rename files so you can rename files in batches.
How to use Built-in Windows Techniques for Batch Renaming (No Extra Tools Needed)
Using File Explorer to Bulk Rename Files
The simplest way to rename multiple files on Windows is using File Explorer’s built-in bulk rename feature:
- Open File Explorer Win + E.
- Navigate to the folder with the files you want to rename.
- Select the files to be renamed. To select all files, use Ctrl + A. For multiple selections, hold Ctrl and click on the desired files.
- Press F2 or right-click on a selected file and choose “Rename” from the context menu.
- Type in the new name for the group of files.
- Press Enter to apply the name change.

This method works great when you want to assign the same base name to a group of files. An added benefit is the ability to undo changes with Ctrl + Z. Many articles I found only mention this procedure. However, this is a basic method and may not suffice for more complex batch renaming needs.
Renaming Files using the Command Prompt (CMD)
For more control, turn to the Command Prompt (CMD):
- Open the command prompt via the Start menu or with Win + R, then type
cmd. - Navigate to your folder using
cd. You can change the directory withcdfollowed by the directory name. Usecd ..to move up a level. If you are in your personal user folder, you can change to the desktop directory withcd Desktop. Folders with spaces need to be enclosed in quotes. Verify your files are present withdir. - Utilize
rento rename files.
For instance:
ren old-file.txt new-file.txtTo rename multiple files, chain commands together:
ren old-file.txt new-file.txt & ren old-file2.txt new-file2.txtPlaceholders like * for any string and ? for a single character can help with broader changes:
ren *.txt *.md
However, this method has limitations when renaming multiple files with different names.
It is possible to save ren commands in a batch file and execute them.
For example, I create a text file named rename.txt and insert the following content.
@echo off
setlocal enabledelayedexpansion

for %%F in (*.txt) do (
  set "filename=%%~nF"
  ren "%%F" "new_!filename!.txt"
)

endlocal
After the file and its contents have been saved, I change the file extension from .txt to .bat. Now I can execute the file, and all files with the extension .txt are renamed new_*.txt.
Renaming Files in PowerShell
PowerShell, a powerful scripting language within Windows, elevates file renaming capabilities, offering enhanced flexibility and control. Here’s how to leverage it:
-
Open the desired folder in File Explorer.
-
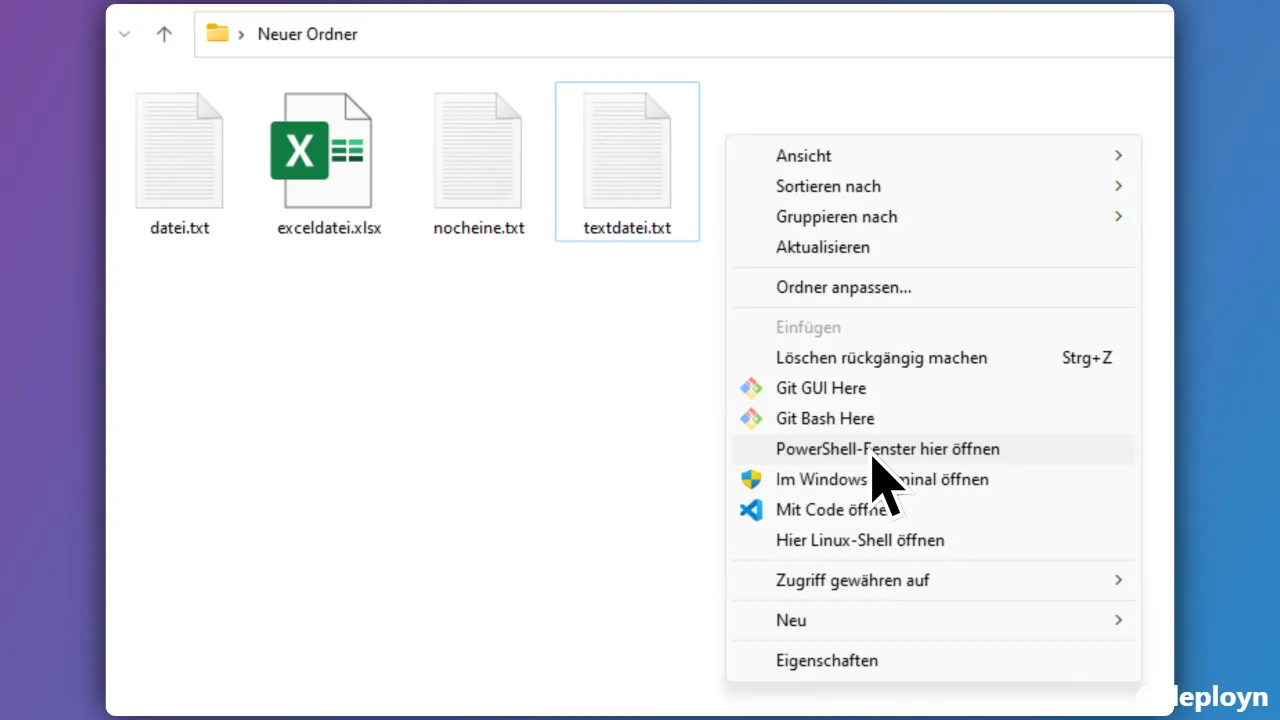
Open PowerShell in your target folder by holding Shift and right-clicking, then choosing “Open PowerShell window here.” You can also navigate using
cd.
-
Use the command
Get-ChildItemto list all files in the current directory. WithGet-ChildItem *.txtall files with the extension.txtare listed.Get-ChildItem -Filelists all files. -
Rename using
Rename-Item.
PowerShell can accomplish a variety of tasks:
Add Prefixes
Get-ChildItem -File | Rename-Item -NewName { "hallo_" + $_.Name }This adds the prefix “hallo_” to all files.
Add Suffixes
Get-ChildItem *.txt | Rename-Item -NewName { $_.Name + "_hallo" }This adds the suffix “_hallo” to all files with the extension .txt. This means the file file.txt is renamed file.txt_hallo. However, this is probably not the desired result. The file name must be broken down into components to achieve this.
Get-ChildItem *.txt | Rename-Item -NewName { $_.BaseName + "_hallo" + $_.Extension }Delete characters
Get-ChildItem -File | Rename-Item -NewName { $_.Name.Remove(0, 5) }This removes the first 5 characters from all files (regardless of the extension).
Add characters
Get-ChildItem -File | Rename-Item -NewName { $_.Name.Insert(2, "test_") }This inserts the string “test_” after the second position in the name of all files.
Replacing part of the name
Get-ChildItem *.txt | Rename-Item -NewName { $_.Name -replace 'file', 'new-file' }This command renames all files with the extension .txt by replacing the string “file” with “new-file”. This means that the file file.txt is renamed to new-file.txt and the file textfile.txt is renamed to textnew-file.txt. The files nocheine.txt and exceldatei.xlsx remain unchanged.
Add random characters
Get-ChildItem -File | Rename-Item -NewName { $_.Name.Insert(0, [System.IO.Path]::GetRandomFileName()) }This inserts a random string as a prefix for all files.
Random Naming
Get-ChildItem -File | Rename-Item -NewName { $_.Name -replace $_.BaseName, [System.IO.Path]::GetRandomFileName() }This randomly renames all files. The file extension is retained.
File names in capital letters
Get-ChildItem -File | Rename-Item -NewName { $_.BaseName.ToUpper() + $_.Extension }This renames all files to upper case.
File names in lowercase letters
Get-ChildItem -File | Rename-Item -NewName { $_.BaseName.ToLower() + $_.Extension }This renames all files to lowercase.
Remove spaces
Get-ChildItem -File | Rename-Item -NewName { $_.Name -replace ' ', '' }This removes all spaces from the file names.
Last modified date as a prefix
Get-ChildItem -File | Rename-Item -NewName { $_.LastWriteTime.ToString("yyyyMMdd") + "_" + $_.Name }This adds the last write access date as a prefix to all files.
File size as prefix
Get-ChildItem -File | Rename-Item -NewName { "Size_" + $_.Length + "_" + $_.Name }This adds the file size in bytes as a prefix to all files.
Folder name as prefix
Get-ChildItem -File | Rename-Item -NewName { $_.Directory.Name + "_" + $\_.Name }This adds the parent folder’s name as a prefix to all files.
Use Regular Expressions for Renaming
Regular expressions (regex) are powerful tools for pattern matching and manipulation. Here are a few examples for using regex in PowerShell:
-
. (dot): Matches any single character except newline. Example:
file.matches “file1”, “fileA”, etc. -
* (asterisk): Matches zero or more of the preceding character. Example:
file.*matches “file”, “file.txt”, “file.docx”, etc. -
+ (plus): Matches one or more of the preceding character. Example:
file.+matches “file1”, “file.txt”, but not “file”. -
? (question mark): Matches zero or one of the preceding character. Example:
files?matches “file” and “files”. -
^ (caret): Matches the start of a string. Example:
^2024matches filenames starting with “2024”. -
$ (dollar): Matches the end of a string. Example:
.txt$matches filenames ending with “.txt”. -
[] (square brackets): Matches any single character in the brackets. Example:
file[123]matches “file1”, “file2”, “file3”. -
[^] (caret in square brackets): Matches any single character not in the brackets. Example:
file[^123]matches “fileA” but not “file1”. -
(): Groups patterns together. Example:
(file|doc)matches “file” or “doc”. -
\d: Matches any digit (0-9). Example:
\d{3}matches exactly three digits. -
\w: Matches any word character (a-z, A-Z, 0-9, and _). Example:
\w+matches one or more word characters. -
\s: Matches any whitespace character (space, tab, newline). Example:
\s+matches one or more whitespace characters. -
{n}: Matches exactly n occurrences of the preceding character or group. Example:
\d{4}matches exactly four digits. -
{n,m}: Matches between n and m occurrences of the preceding character or group. Example:
\d{2,4}matches between two and four digits.
Example:
Get-ChildItem | Where-Object { $_.Name -match '^IMG_\d{4}\.jpg$' } |
ForEach-Object { Rename-Item $_ -NewName ('Photo_' + $_.Name) }
This renames all files matching the pattern “IMG*####.jpg” to “Photo_IMG*####.jpg”.
For a deep dive into Rename-Item, check out the Microsoft documentation.
Additional Tools and Techniques
In addition to the integrated methods, other software can be used to rename multiple files in Windows.
Excel for Batch Renaming
For extensive lists of file names, Excel can work in tandem with PowerShell to handle complex renaming:
- Export file names to CSV using PowerShell:
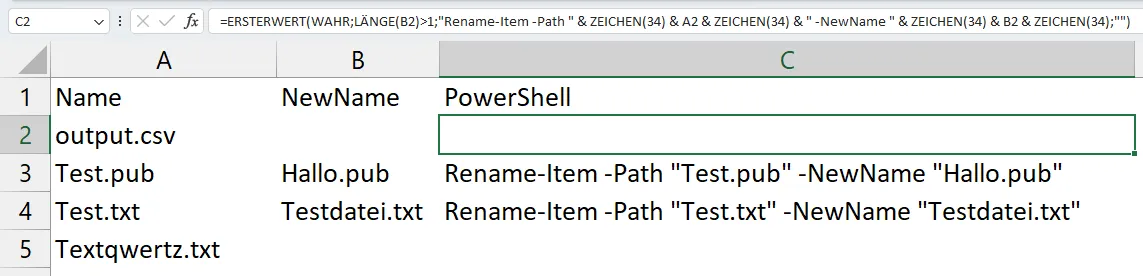
Get-ChildItem -File | Select-Object Name | Export-Csv -Path .output.csv -NoTypeInformation- Open the CSV in Excel.
A table can now be created from which the file names can be changed. Formulas can also be used to change the file names.
In my case, I have the exported file names in column A (Name) and the new file names in column B (NewName). Column B can also remain empty if the file names are not to be changed. The file extension must be retained.
- Create a third column with a formula that renames the files. To do this, use the function
CHAR(34)to insert quotation marks into the formula. The formula in cellC2then looks like this:
=SWITCH(TRUE, LEN(B2)>1, "Rename-Item -Path " & CHAR(34) & A2 & CHAR(34) & " -NewName " & CHAR(34) & B2 & CHAR(34),"")The formula can then be copied down.
-
Copy the generated PowerShell command (without the heading) and execute them to rename files.
-
The files are renamed.
Third-party Software Solutions
For those seeking a more user-friendly interface or advanced features, consider third-party tools, such as (in alphabetical order):
A standout is Microsoft’s own PowerToys, which includes the “PowerRename” utility.
Bulk Renaming Files with PowerToys PowerRename
PowerToys offers a suite of utilities for Windows 10 and 11. You can download the latest version here.
Use the “PowerRename” feature directly from the context menu. The tool offers a very user-friendly interface and many useful functions.
In the PowerRename window, configure your bulk rename settings:
- Search for: Text to find and replace in the filenames
- Replace with: Replacement text for the search term
- Use regular expressions: Allows using regex for complex renaming
- Enumerate items: Sequentially numbers the renamed files
- Item name format: Customize the format
- Exclude files: Skip renaming certain files

The free tool displays the new name on the right. Click “Rename to rename all the selected files at once.
For a comprehensive guide on installing and optimizing Windows 11 check this out.
Renaming Safeguards
When renaming files in bulk, take these precautions:
- Back up data to prevent loss.
- Test renaming methods on a small group first.
- Be cautious with wildcards or regex to avoid unintended changes.
Best Practices for File Naming Conventions
- Use consistent naming conventions across projects or folders.
- Avoid special characters (\ / : * ? “ < > |) which can cause issues in some systems.
- Use underscores (_) or hyphens (-) instead of spaces for better compatibility.
- Include dates in YYYYMMDD format for easy chronological sorting.
- Use descriptive names that indicate the content of the file.
- Keep filenames relatively short while still being descriptive.
- Use leading zeros (001, 002, etc.) to ensure proper sorting.
- Consider including project or client names in filenames for easy identification.
Final Thoughts
Renaming files in bulk doesn’t have to be a tedious task. With these strategies, you can quickly alter file names across Windows systems. Share other tips, questions, or suggestions in the comments!
Related Articles
How to Install and Optimize Windows 11 (2024 Guide)
Debloat your system using Sophia Script, and install essential programs quickly with WingetUI. Get started for a smooth and optimized Windows 11 setup.
Build a Blog with Gatsby.js and Ghost CMS on Your VPS
Step-by-step guide: Build a blog with Gatsby.js and Ghost as a headless CMS. Set up everything on your VPS, configure Docker, and publish your website.
Install Nextcloud on a VPS with Docker: Complete Guide
Set up your own private cloud with Nextcloud on a VPS using Docker and Caddy as a reverse proxy. Beginner-friendly step-by-step guide – start your cloud today!
Install Paperless-ngx on Your VPS with Docker & Caddy
Install Paperless-ngx with Docker on your VPS and securely access your documents from anywhere. Complete guide with Caddy reverse proxy and WireGuard VPN.